Tutu Super Smart Tagger User Guide
This is the full public user guide for Tutu Super Smart Tagger. It is organized by workflow so that new users can follow the quick start first, while experienced users can jump directly to the feature area they need.
The guide covers account setup, credits, project management, image prompt reverse captioning, video reverse prompt workflows, batch processing, model configuration, system settings, and troubleshooting.
Recommended Reading Order
- Quick Start
- Account, Credits, and Authorization
- Project Management
- Image Prompt Reverse Captioning
- Video Prompt Reverse Captioning
- Video Detail Page
- Batch Processing
- Creative Workshop
- AI Lab
- Model Settings
- Other Settings
- Top Bar, Status Bar, and Account Entry
- Troubleshooting
How This Guide Is Structured
Each chapter focuses on one area of the app:
- What the page or feature is used for.
- Where to find it in the interface.
- The normal operating steps.
- What each major button or status means.
- How generated data is saved or exported.
- Common mistakes and recovery paths.
The screenshots are migrated from the original Chinese public guide. They are kept here so that users can understand the layout and operation flow. When English-interface screenshots are available, they can replace the existing images without changing the document structure.
Current User-Friendly Path
New users should normally start with the default AI workflow:
- Install and open the app.
- Log in or register a Tutu account.
- Buy a small credit package for testing.
- Create a project.
- Import images or videos.
- Generate captions or descriptions.
- Review the results.
- Export the dataset.
Advanced model configuration is only needed when you want to use your own API key, a custom model provider, a local model, or GPU-based local processing.
Quick Start
Welcome to Tutu Super Smart Tagger. This quick start walks through the core workflow from installation to the first image and video captioning runs. If this is your first time using the app, read the sections in order. If you already know the basics, jump directly to the workflow you need.
Official download site: https://zhaotutu.xyz
Optional Auxiliary Model Download
The package llama-joycaption-beta-one is an optional captioning model. Some users have unstable connections to the original hosting site, so mirror links are provided for convenience. Downloading this model is optional and does not affect the default cloud AI workflow.
MEGA:
llama-joycaption-beta-one.rar
https://mega.nz/file/sdoThDyZ#H9RpbTNKHbkqydRcQLpkSjclrF87rnRHHVR3DXue_Bw
Baidu Netdisk:
llama-joycaption-beta-one.rar
https://pan.baidu.com/s/1A3UGD-o4_L4NEmoaWv_mJg?pwd=qvkn
Extraction code: qvkn
Quark:
llama-joycaption-beta-one.rar
https://pan.quark.cn/s/a19f8a5e63d2
Prepare the Runtime Environment
The installer package includes the main application and vc_redist.x64.exe. Install vc_redist.x64.exe first, then install Tutu Super Smart Tagger. If this runtime is already installed on your computer, you can skip it.
Ollama download site: https://www.ollama.com
Ollama is only required when you use local-model captioning. If you use the default AI workflow, you do not need to install or configure Ollama. When local mode is enabled, Ollama must stay running in the background, otherwise local captioning cannot work. The Ollama installer is simple: keep the default options and continue through the setup wizard. After installation, you can close the popup dialog as long as the Ollama tray icon remains visible in the lower-right system tray.
Installation Notes
Install according to the prompts, but keep the installation path in English letters only. Do not use Chinese characters, special symbols, or unusual punctuation in the installation path. Otherwise, translation-related functions may not work correctly.
Do not close the installer without reason, and do not repeatedly switch backward and forward during installation. Before installing, it is recommended to close antivirus tools that may interfere with installation. Avoid installing the app into restricted system directories such as C:\Program Files (x86).
It is recommended to install and open the app as administrator. The software contains many features, so the first launch may take a long time. Wait patiently until the interface finishes loading.
The original Chinese video guide is available here:
https://www.bilibili.com/video/BV1XjEez5EAN/?spm_id_from=333.1387.homepage.video_card.click
Each version update may add many new features. The full Chinese video collection contains more than ten videos. This English guide covers the same core usage path in text form, but watching the videos can still help if you are comfortable with Chinese-language tutorials.
For support, contact:
- QQ:
331506796 - WeChat:
tujiang0411
You can also apply to join one of the QQ groups for update support and community help:
- Tutu Pink Room:
628266084 - Tutu Black Room:
950351015 - Tutu Green Room:
903753035
Choose any group you like. They provide the same kind of support.
0.1 First Use
Step 1: Open the App After Installation
- After installation, find the Tutu Super Smart Tagger shortcut on the desktop or in the Start menu. The default shortcut name may be
tutu-super-smart-marker.
- Double-click the shortcut to launch the app.
- After the app opens, it enters the login page.
The login page is the unified account login page used by Tutu products.

Step 2: Log In or Register a Tutu Account
- If you already have an account, enter your account information and log in directly.
- Tutu products share the same account system. For example, if you registered an account in Tutu Video Publisher, you can use the same account to log in to Tutu Super Smart Tagger.
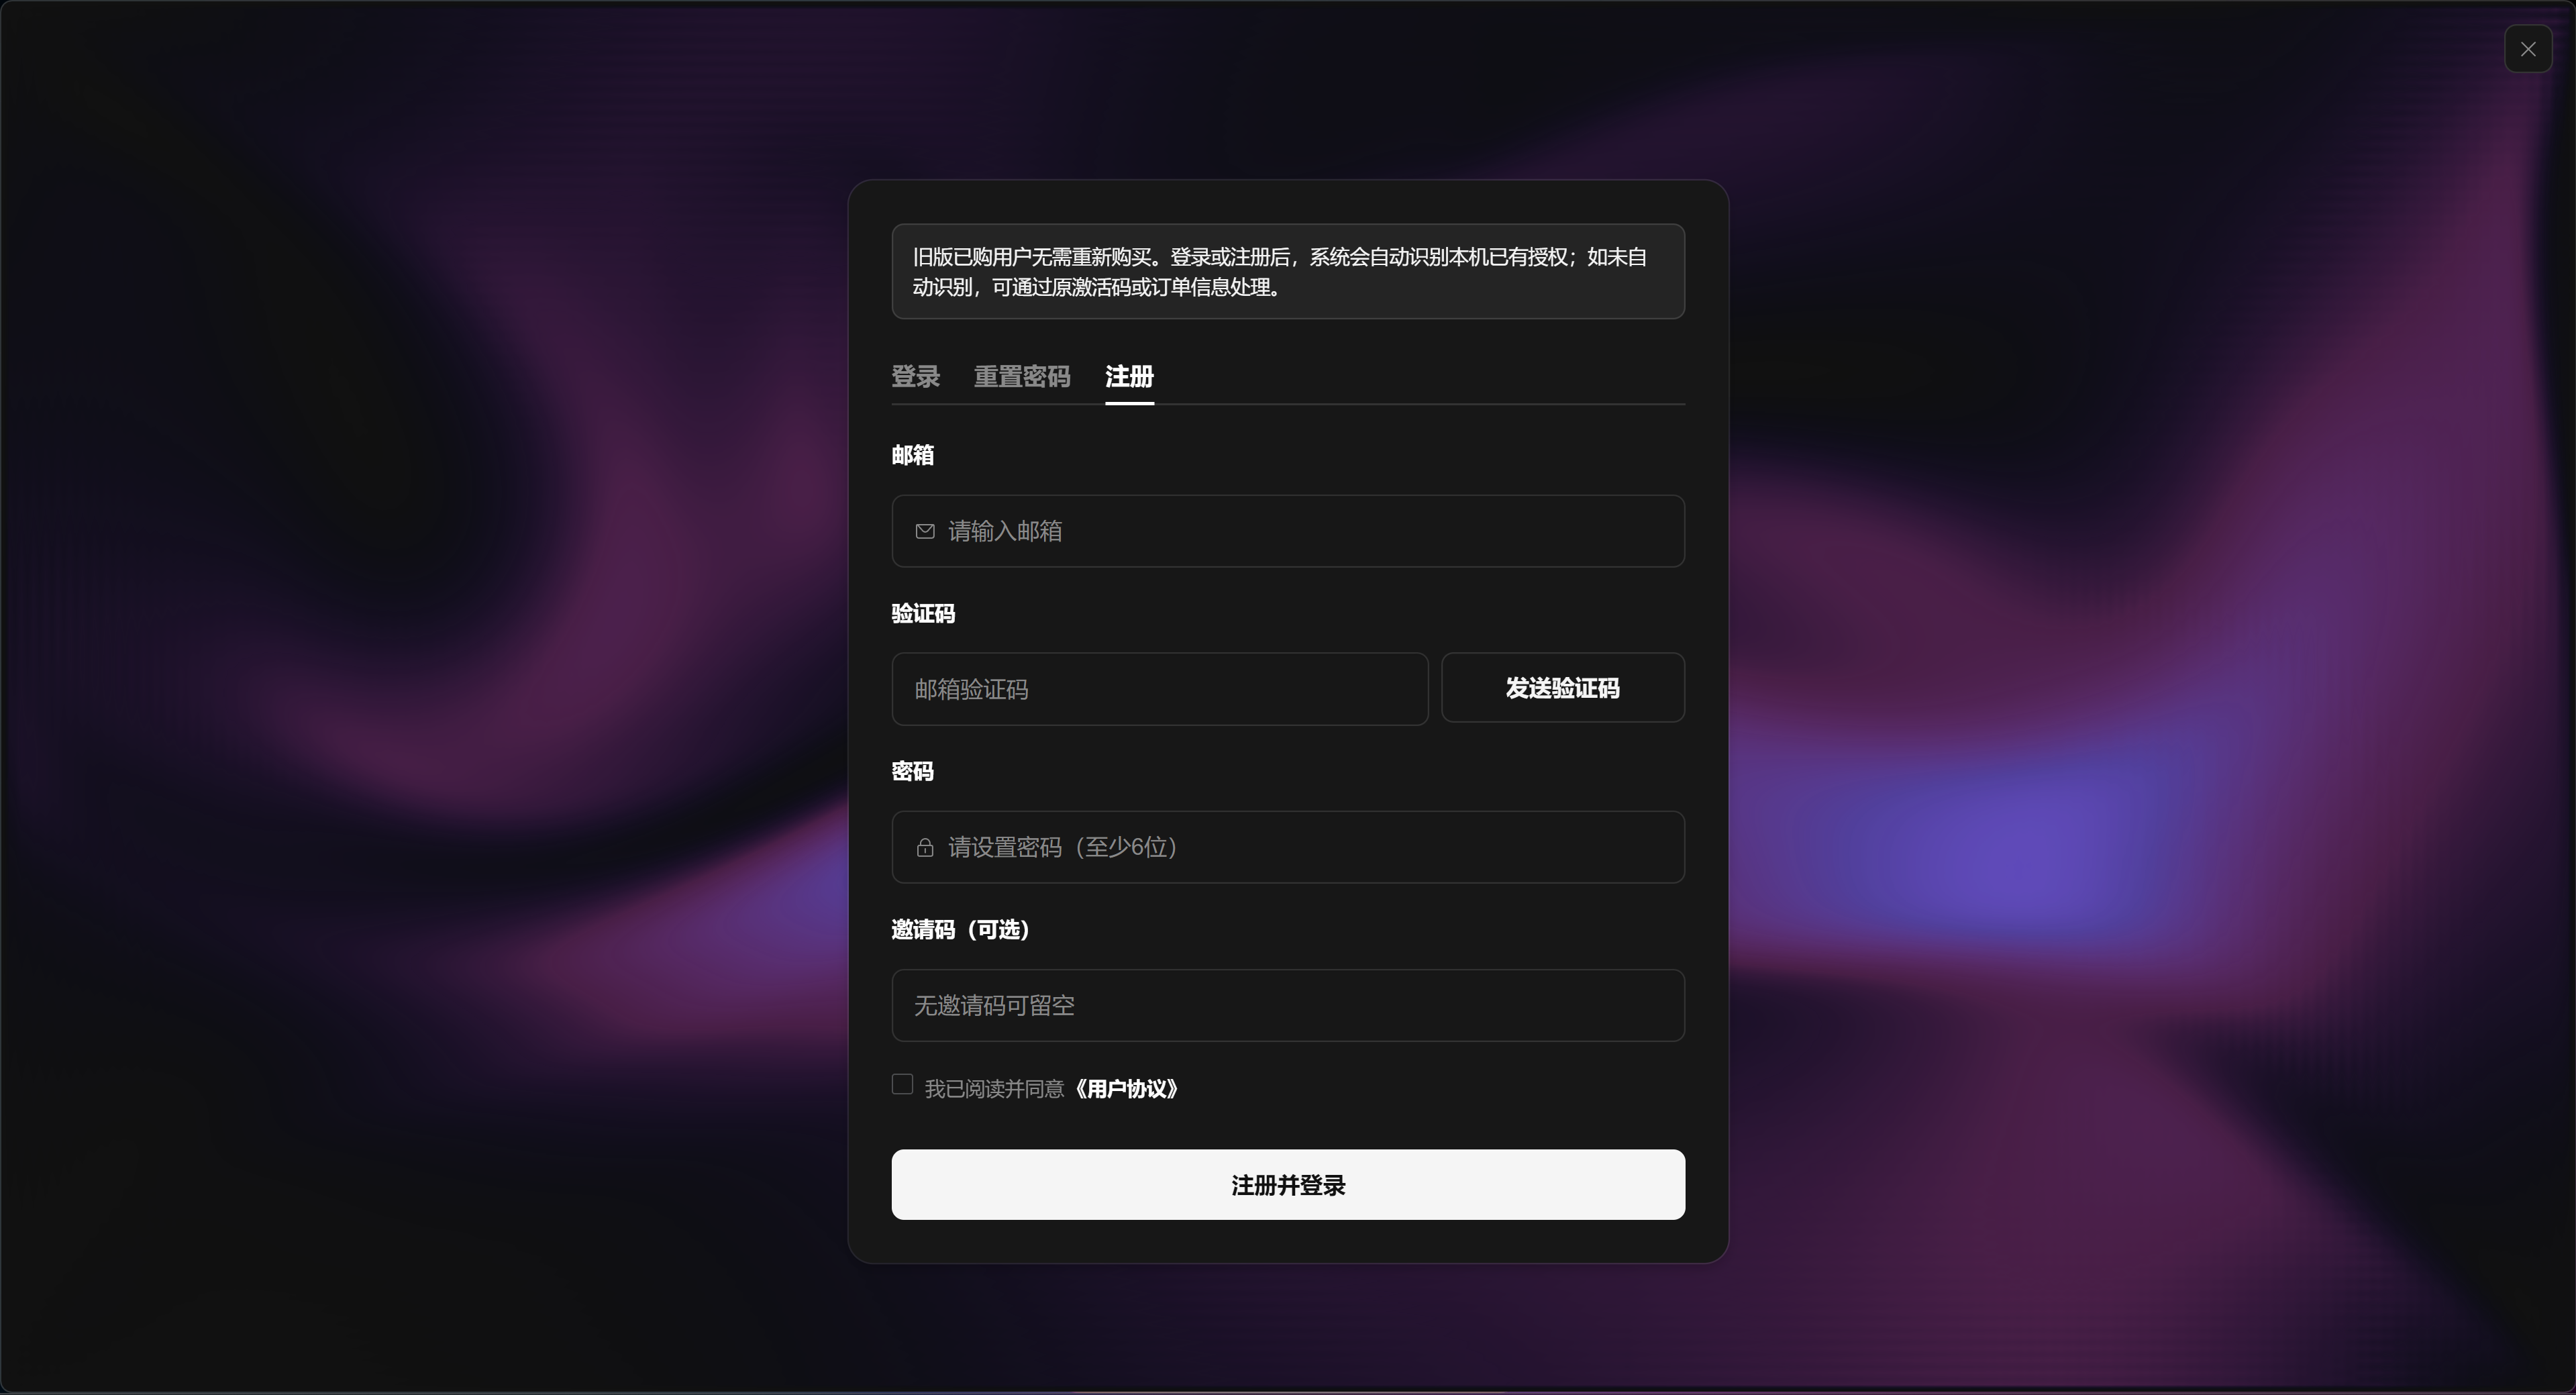
- If you do not have an account, switch to the registration page from the login page. Follow the prompts to enter your email verification code and required information, then return to the login page.
The registration page is where you enter your email verification code, password, and invitation code.
- After login succeeds, the app synchronizes your account, credits, subscription status, and device authorization status.
Step 3: Start with the Lowest-Priced Credit Package
- After login, open the account or credits page and choose the credit purchase entry.
- For a first test, buy the lowest-priced credit package available in your region. In the original Chinese flow, this is the 12 RMB package. This lets you confirm that the default AI workflow works correctly before you spend more.
- After payment, return to the app. Refresh or re-enter the account page and confirm that the credits have arrived.
- Credits are used by default AI features such as image prompt reverse captioning, natural-language descriptions, paired descriptions, and video understanding.
Step 4: Go to Captioning and Start Directly
- Return to the main interface. Open Project Management and create or select a project.
- Open the Image Prompt Reverse Captioning page from the top navigation. Choose Prompt Phrase Mode, Natural Language Description, or Reference Reverse Captioning based on your task.
- After importing images, you can generate captions for one image or run batch generation. The default AI uses your credits to complete the processing.
- After reviewing the generated results, use the page controls to save, export, or perform batch operations.
Step 5: When You Need Model Configuration
- Regular new users do not need to configure a model and do not need to prepare an API key.
- If you want to use your own API key, a custom provider, a local model, or local GPU processing, open System Configuration and complete the advanced setup there.
0.2 Image Captioning Quick Start
Image captioning is the core feature of the app. It adds tags or descriptions to images and helps you build training datasets. This section walks through one complete captioning run.
Prompt Phrase Mode can be completed in four steps.
Step 1: Create and Select a Project
Open Project Management, click the New Project button, fill in the required information, and create the project.
After the project is created, select it.
Step 2: Import and Select Images
- Click Image Prompt Reverse Captioning in the navigation bar, then choose Prompt Phrase Mode.
- Click the Import Images button in the toolbar.
- Choose one or more images. Multi-select is supported. You can also use batch selection. If no image is selected, the captioning function processes all images on the current page by default.
Step 3: Generate Reverse Prompts
- Click the Smart Generate button in the toolbar. It is the round button with the magic-wand icon.
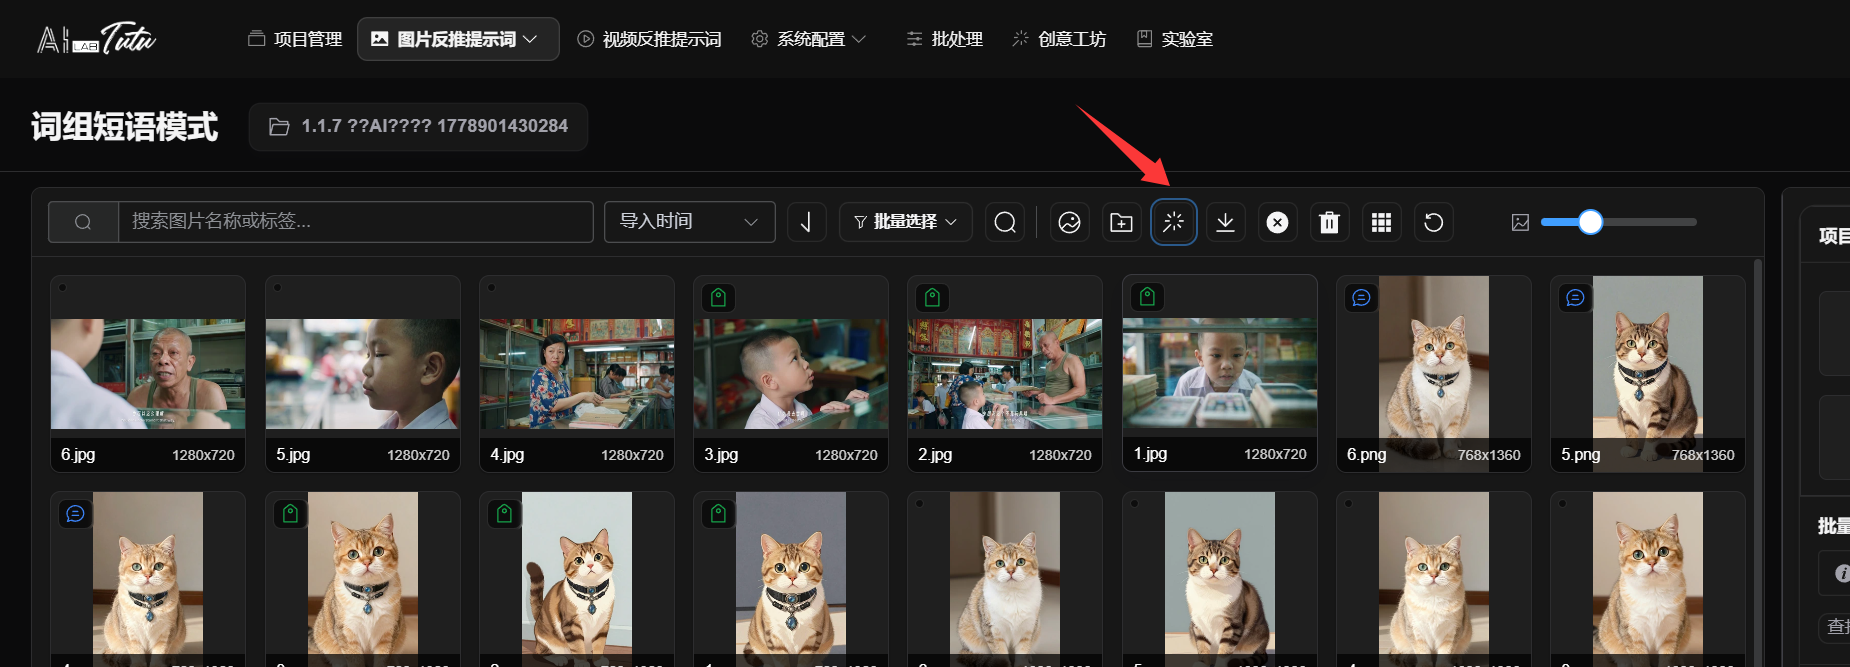
- Choose a generation mode based on your task. If the result is for art-creation reference, choose a general description. If the result is for LoRA model training or similar training tasks, choose a more precise mode.
- Click Start Execution.
- Wait for generation to finish. Tags are added to the images automatically.

Step 4: Export the Dataset
- Click the Export Dataset button in the toolbar. It is the round button with the download icon.
- Choose the output directory.
- Click Start Export.
- After export completes, the dataset files are saved in the selected folder.
You have now completed your first image captioning workflow.
Advanced tips:
- You can manually add, edit, and delete tags.
- Batch operations let you process many images at once.
- Element filtering and other advanced processing tools are available for more complex workflows.
- For the full Prompt Phrase Mode behavior, read the detailed Image Prompt Reverse Captioning chapter.
Natural Language Mode follows a similar workflow and is used to generate more detailed natural-language descriptions.
Reference Reverse Captioning is used to build image-relationship datasets. Read the Reference Reverse Captioning section for the full workflow.
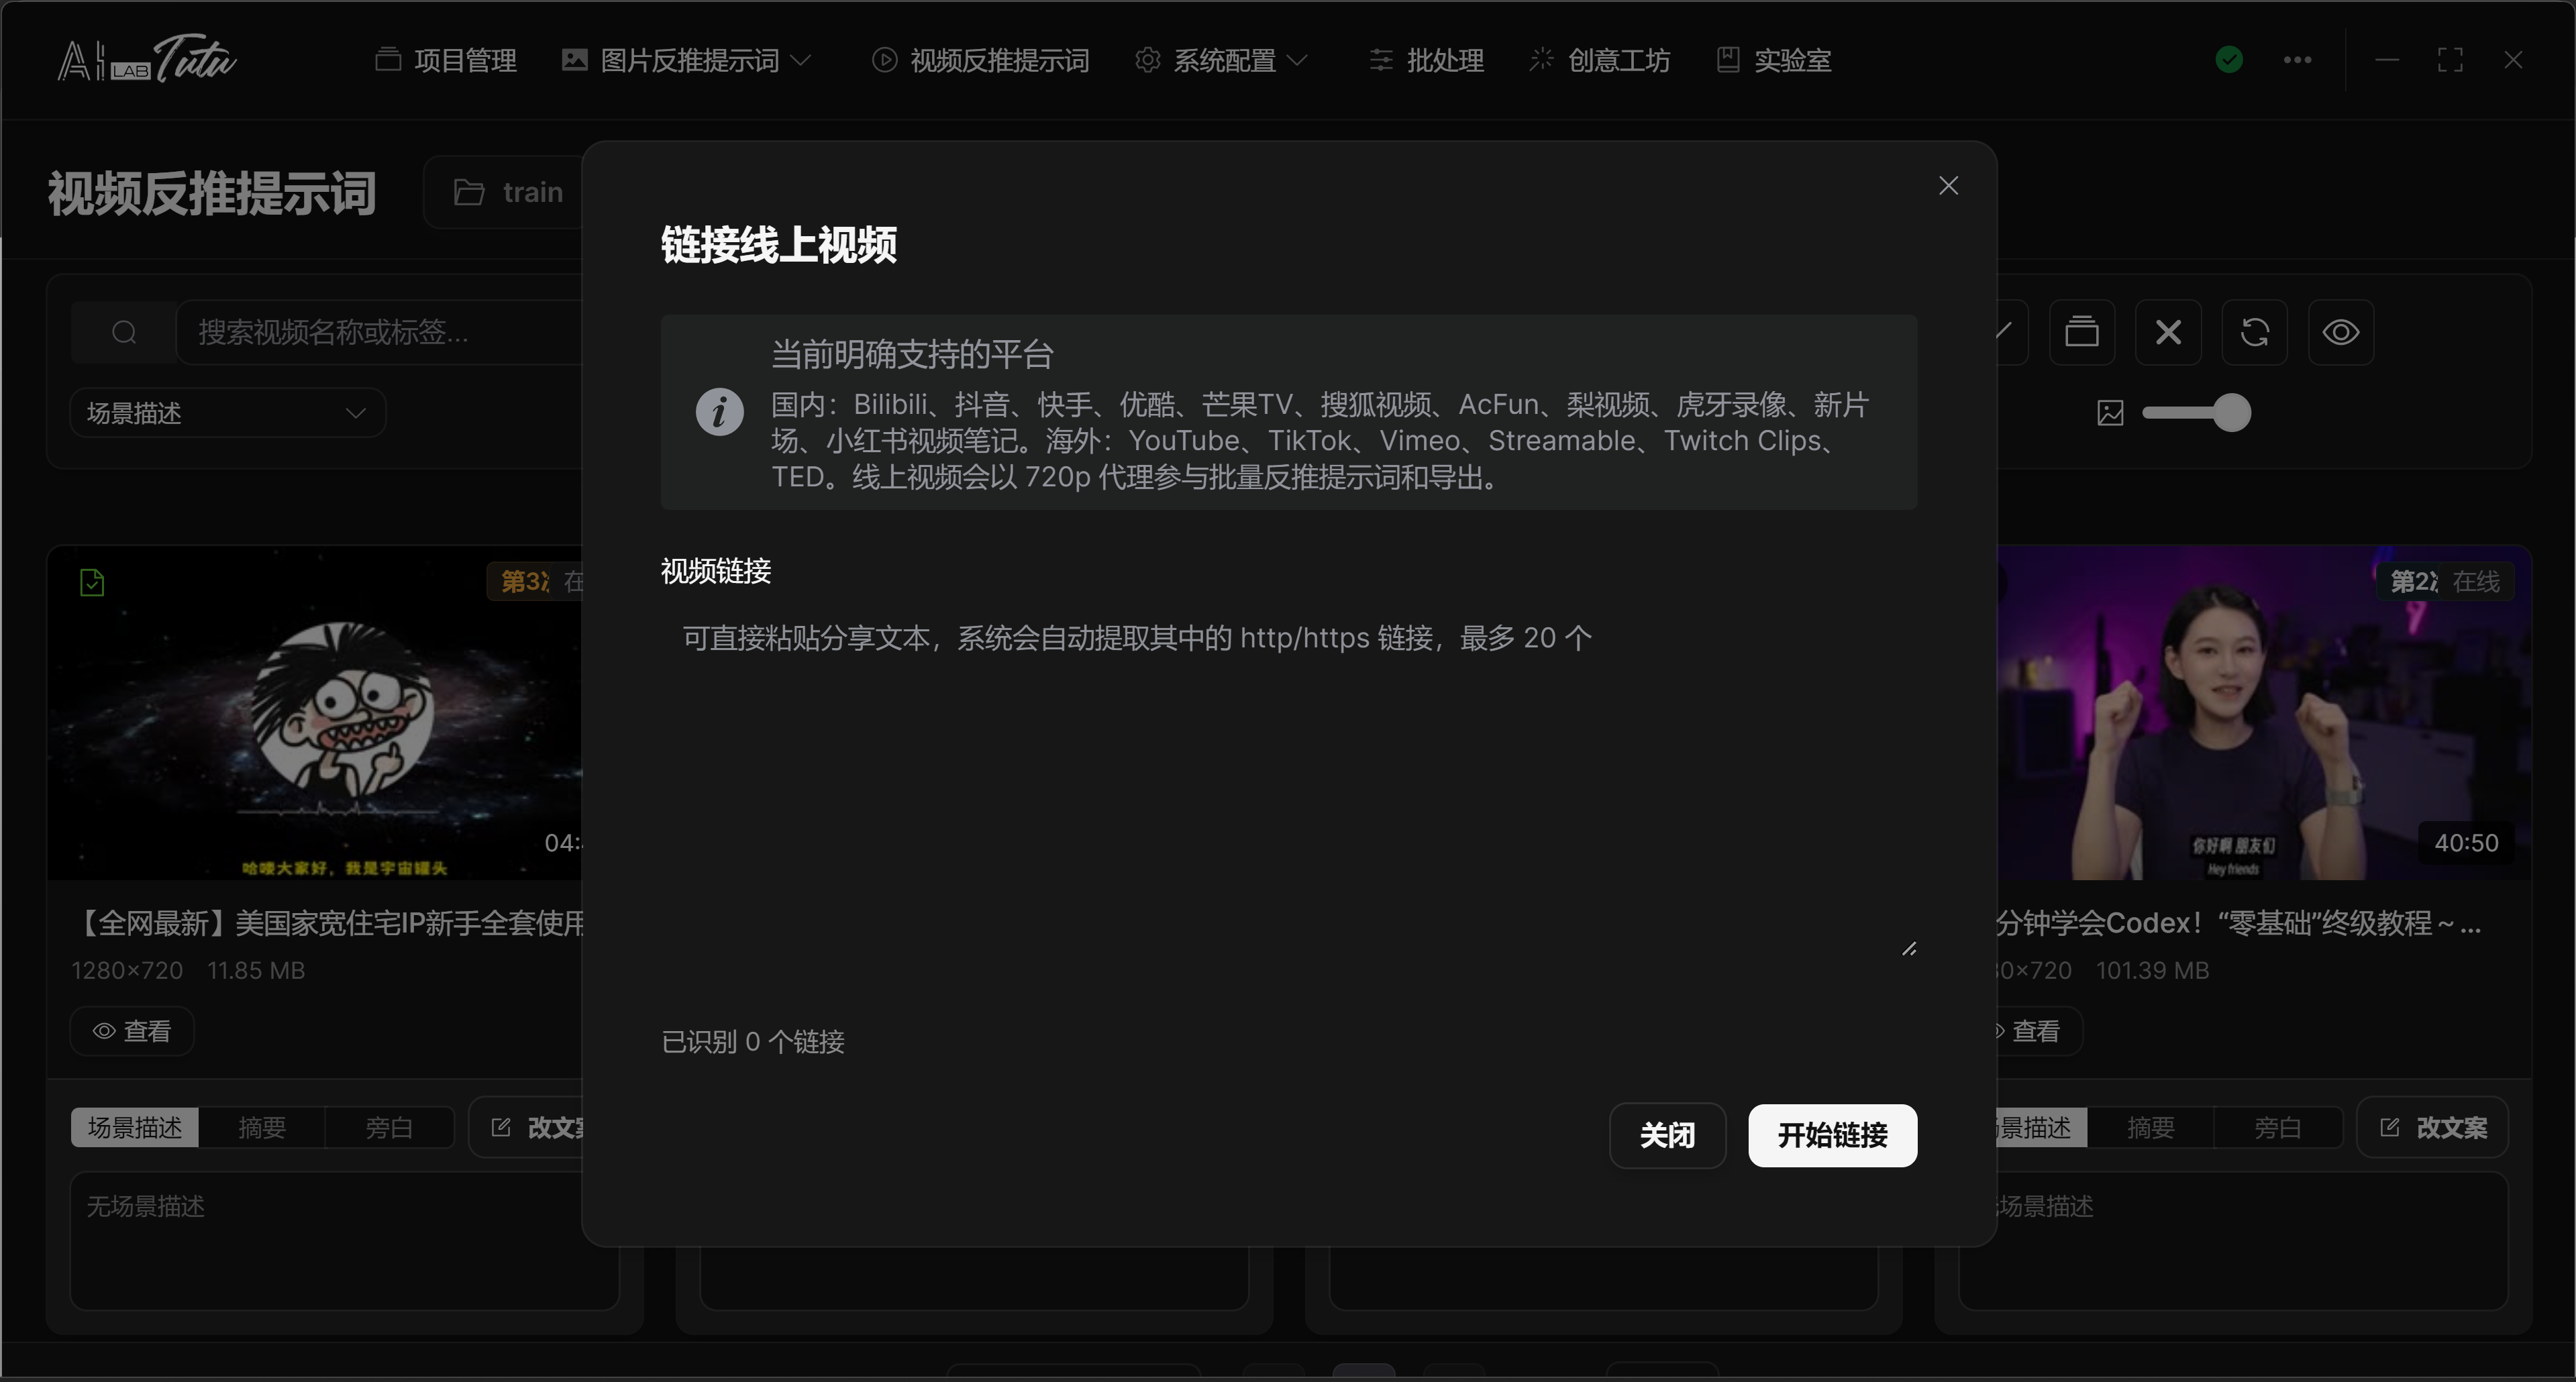
0.3 Video Reverse Prompt Quick Start
Video captioning provides AI-assisted video processing, including scene detection, content analysis, and clipping-related workflows.
Step 1: Import a Video
- Click Video Prompt Reverse Captioning in the navigation bar.
- Click Import Local Video or Link Online Video in the toolbar, then add the video.
- Wait for processing to finish. A progress dialog is displayed during processing.
Step 2: Generate AI Content
- Select one or more video files.
- Click Batch Reverse Prompts.
- Choose the processing type you need, then start batch prompt reverse captioning.
Step 3: Export
- Click Batch Export.
- Choose a suitable location.
- Click Start Batch Export.
Next Steps
After finishing the quick start, continue with the following:
- Learn the detailed chapters. Watch the video collection and read the full guide to understand every feature: https://space.bilibili.com/431046154/lists/6441798?type=season
- Practice with your own data. Try each function with real image and video material.
- If you run into problems, read the troubleshooting chapter.
This quick start only covers the most basic operating path. It helps you become familiar with the main functions, but the app contains many more features. Read the detailed chapters according to your actual workflow.
Account, Credits, and Authorization
Feature Overview
The current core entry point has changed from the old activation-code popup to a unified account, credits, and device-authorization flow. New users log in or register an account first, buy credits, and then use the default AI directly from the captioning pages.
This system handles three things:
- Account: used for login, credit synchronization, transaction history, and shared access across supported Tutu products.
- Credits: used for cloud generation, understanding, and reverse-prompt tasks through the default AI.
- Device authorization: used to recognize users who purchased older versions, historical activation benefits, and the current device state. Device authorization is bound to the current machine.
Login and Registration
- Open the app and enter the login page.
- If you already have an account, log in directly. If you registered an account in Tutu Video Publisher, you can use the same account here.
- If you do not have an account, complete registration from the login page, then return to log in.
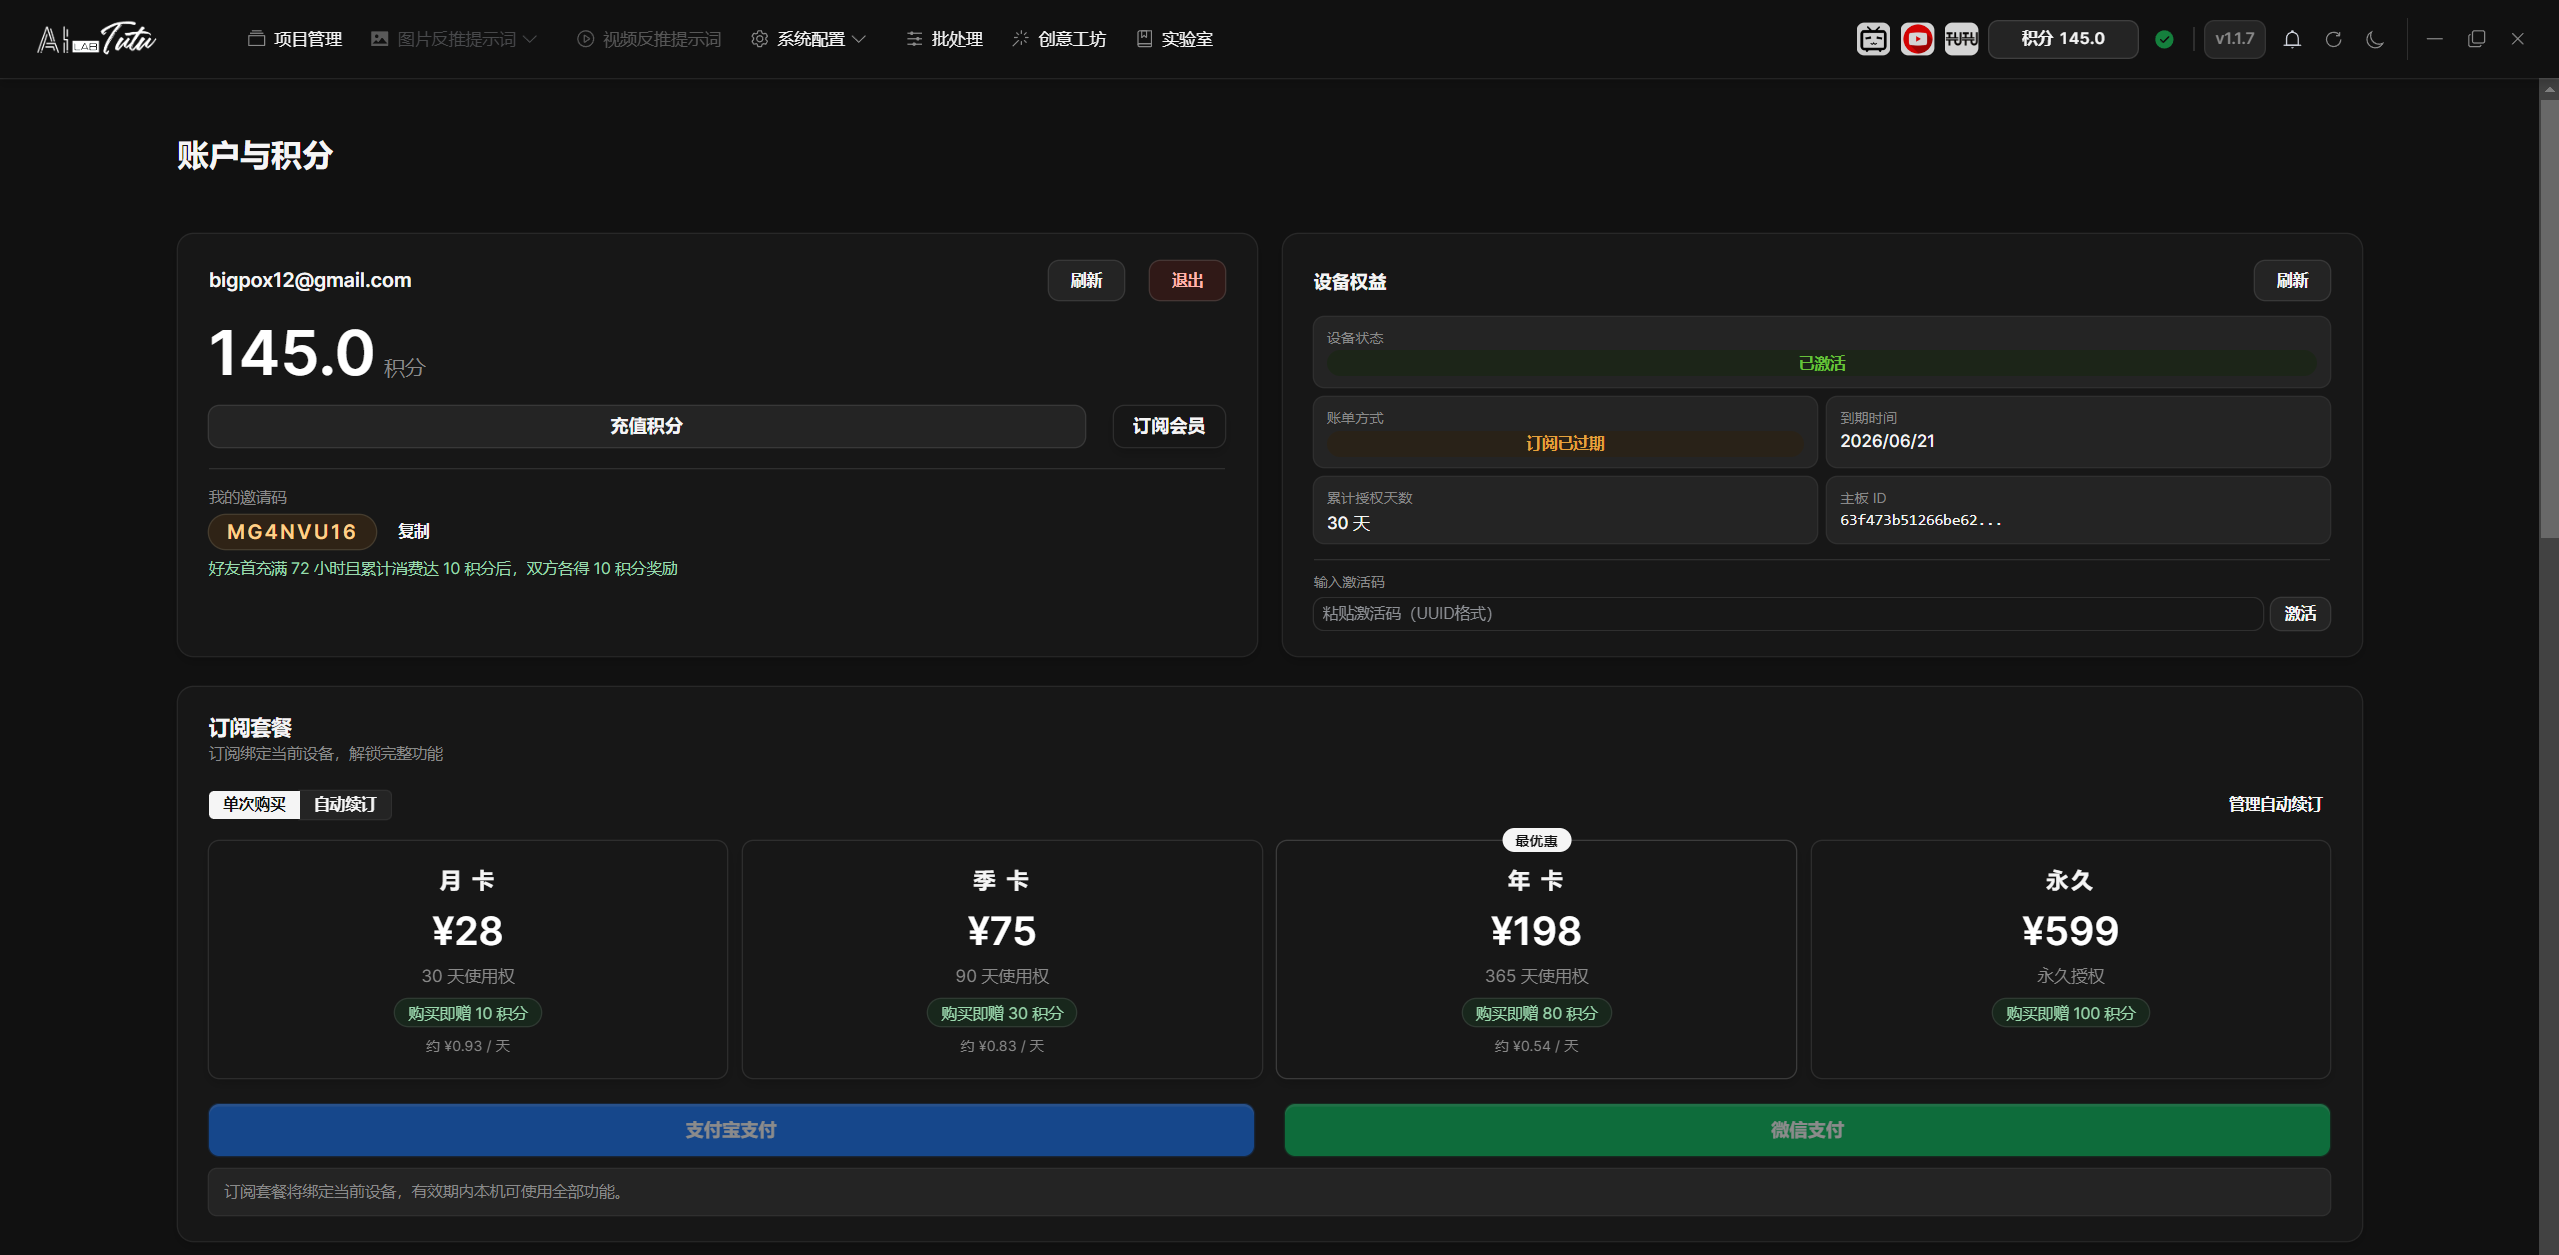
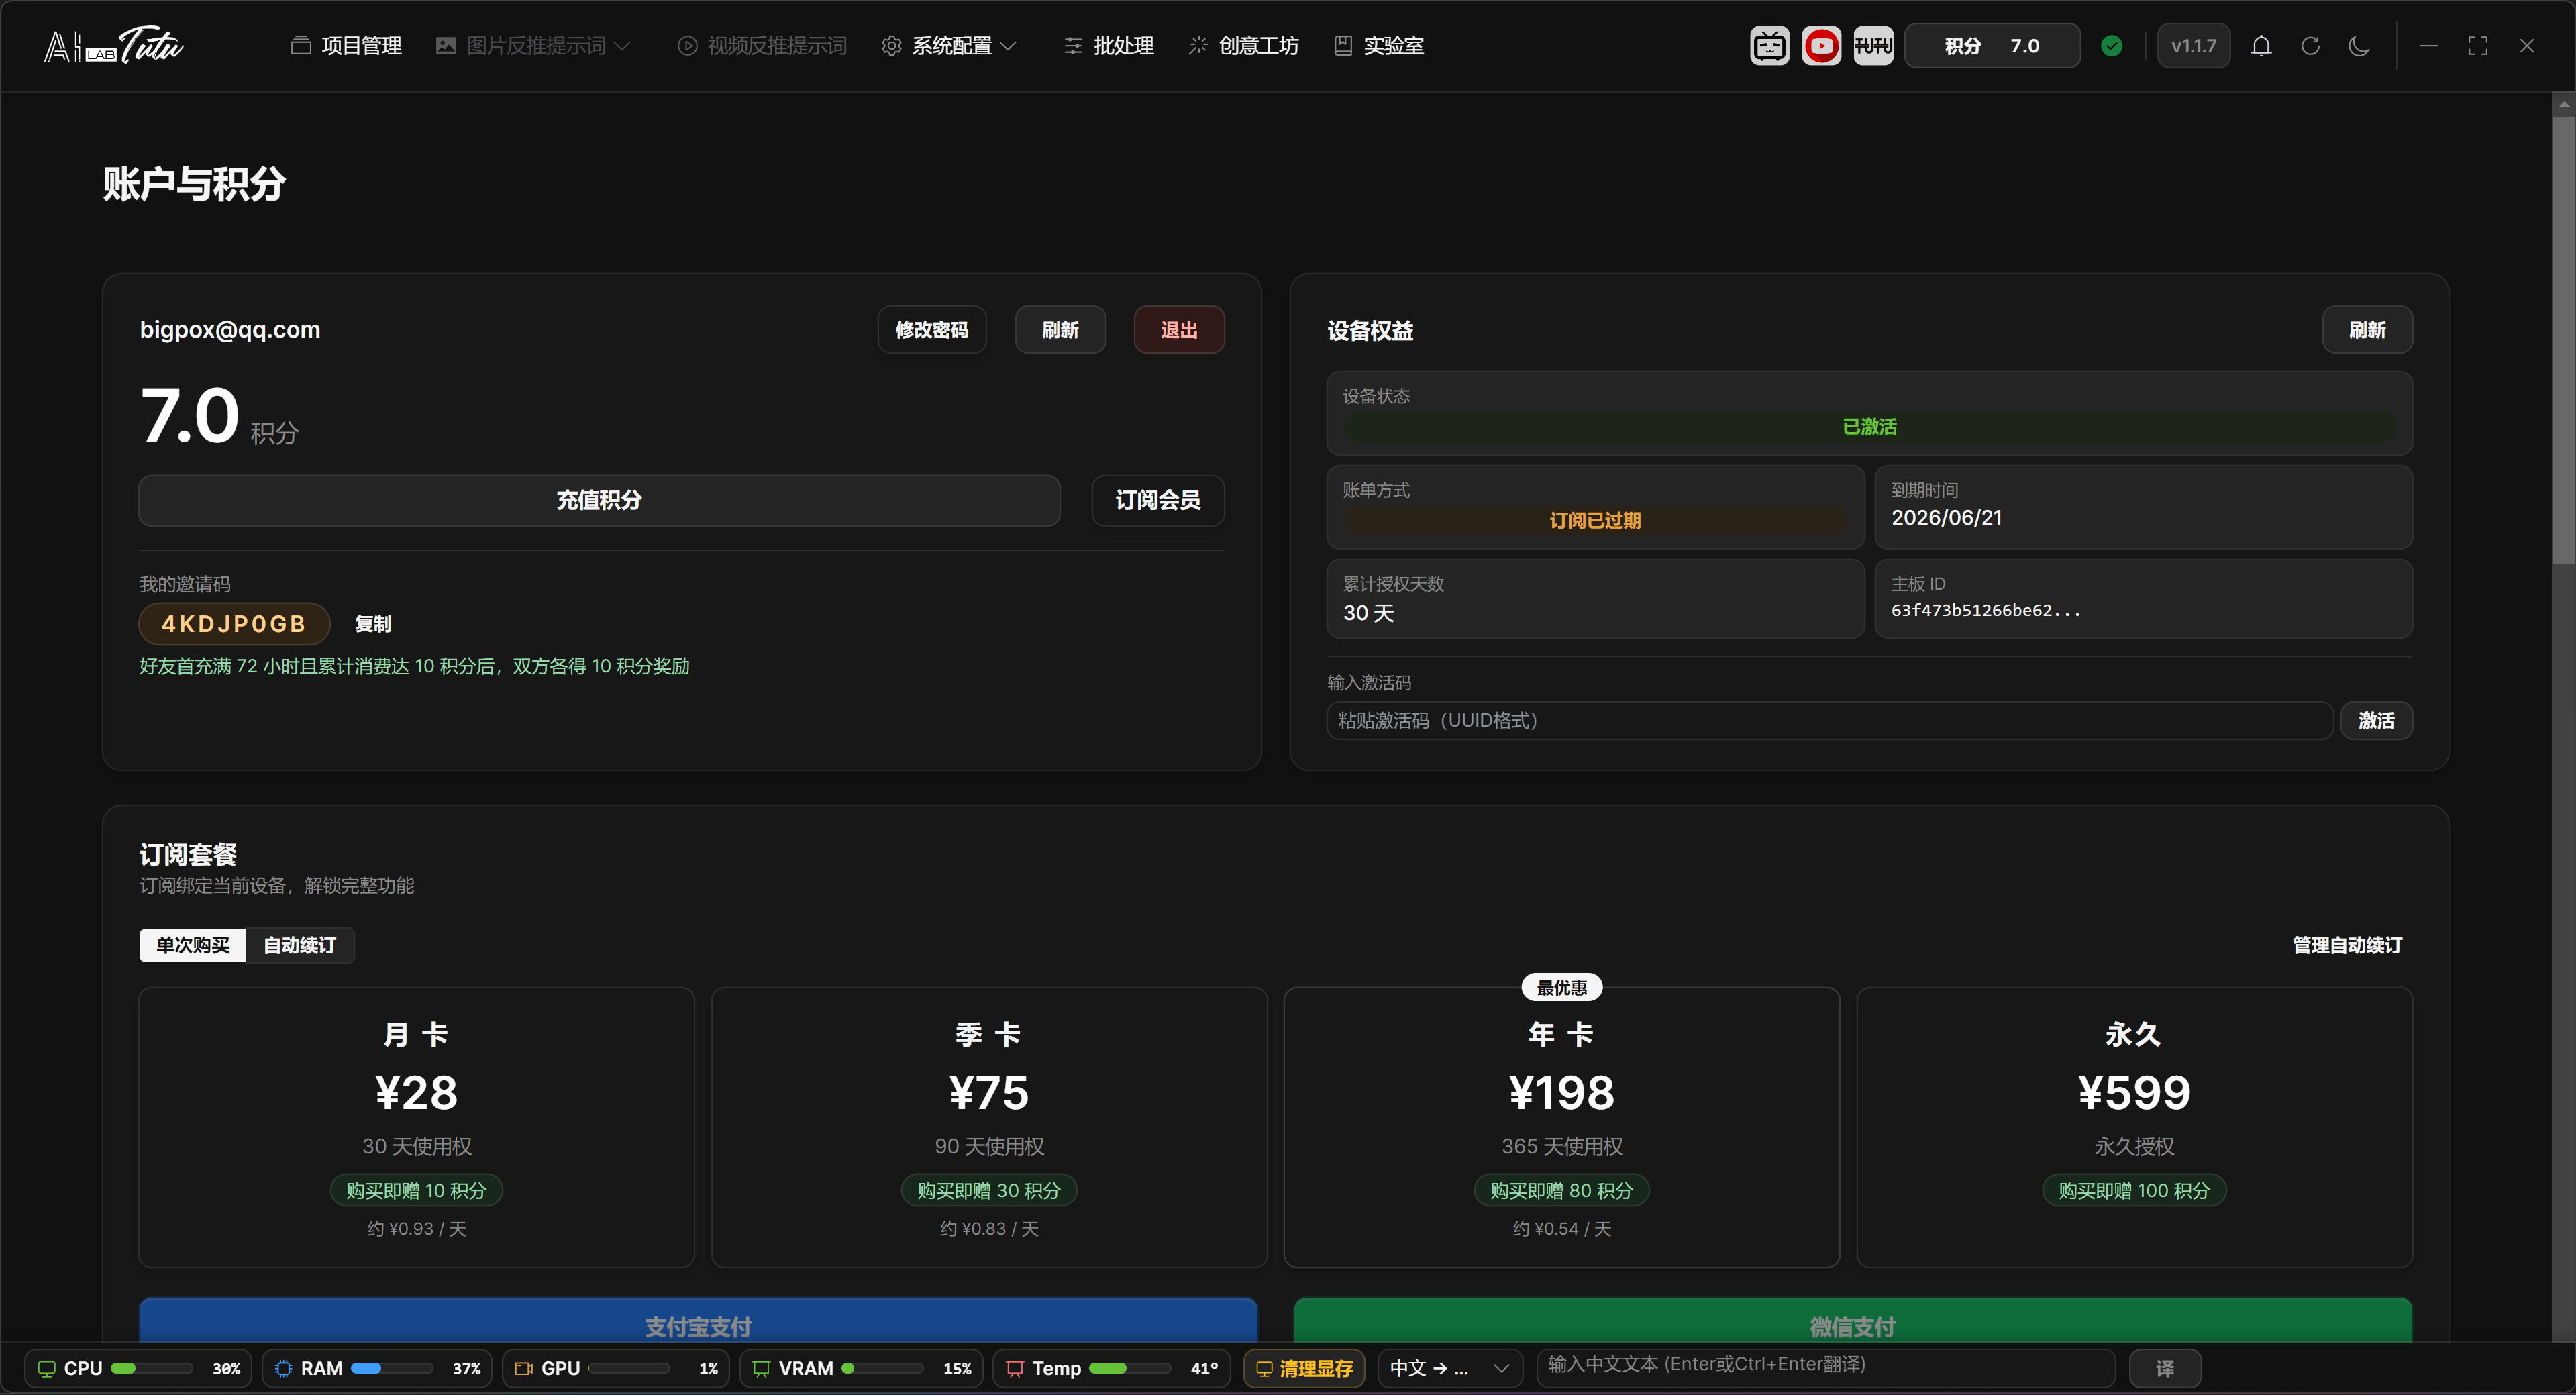
- After login, the account page shows credits, subscription status, device authorization, activation status, invitation code, and transaction history.
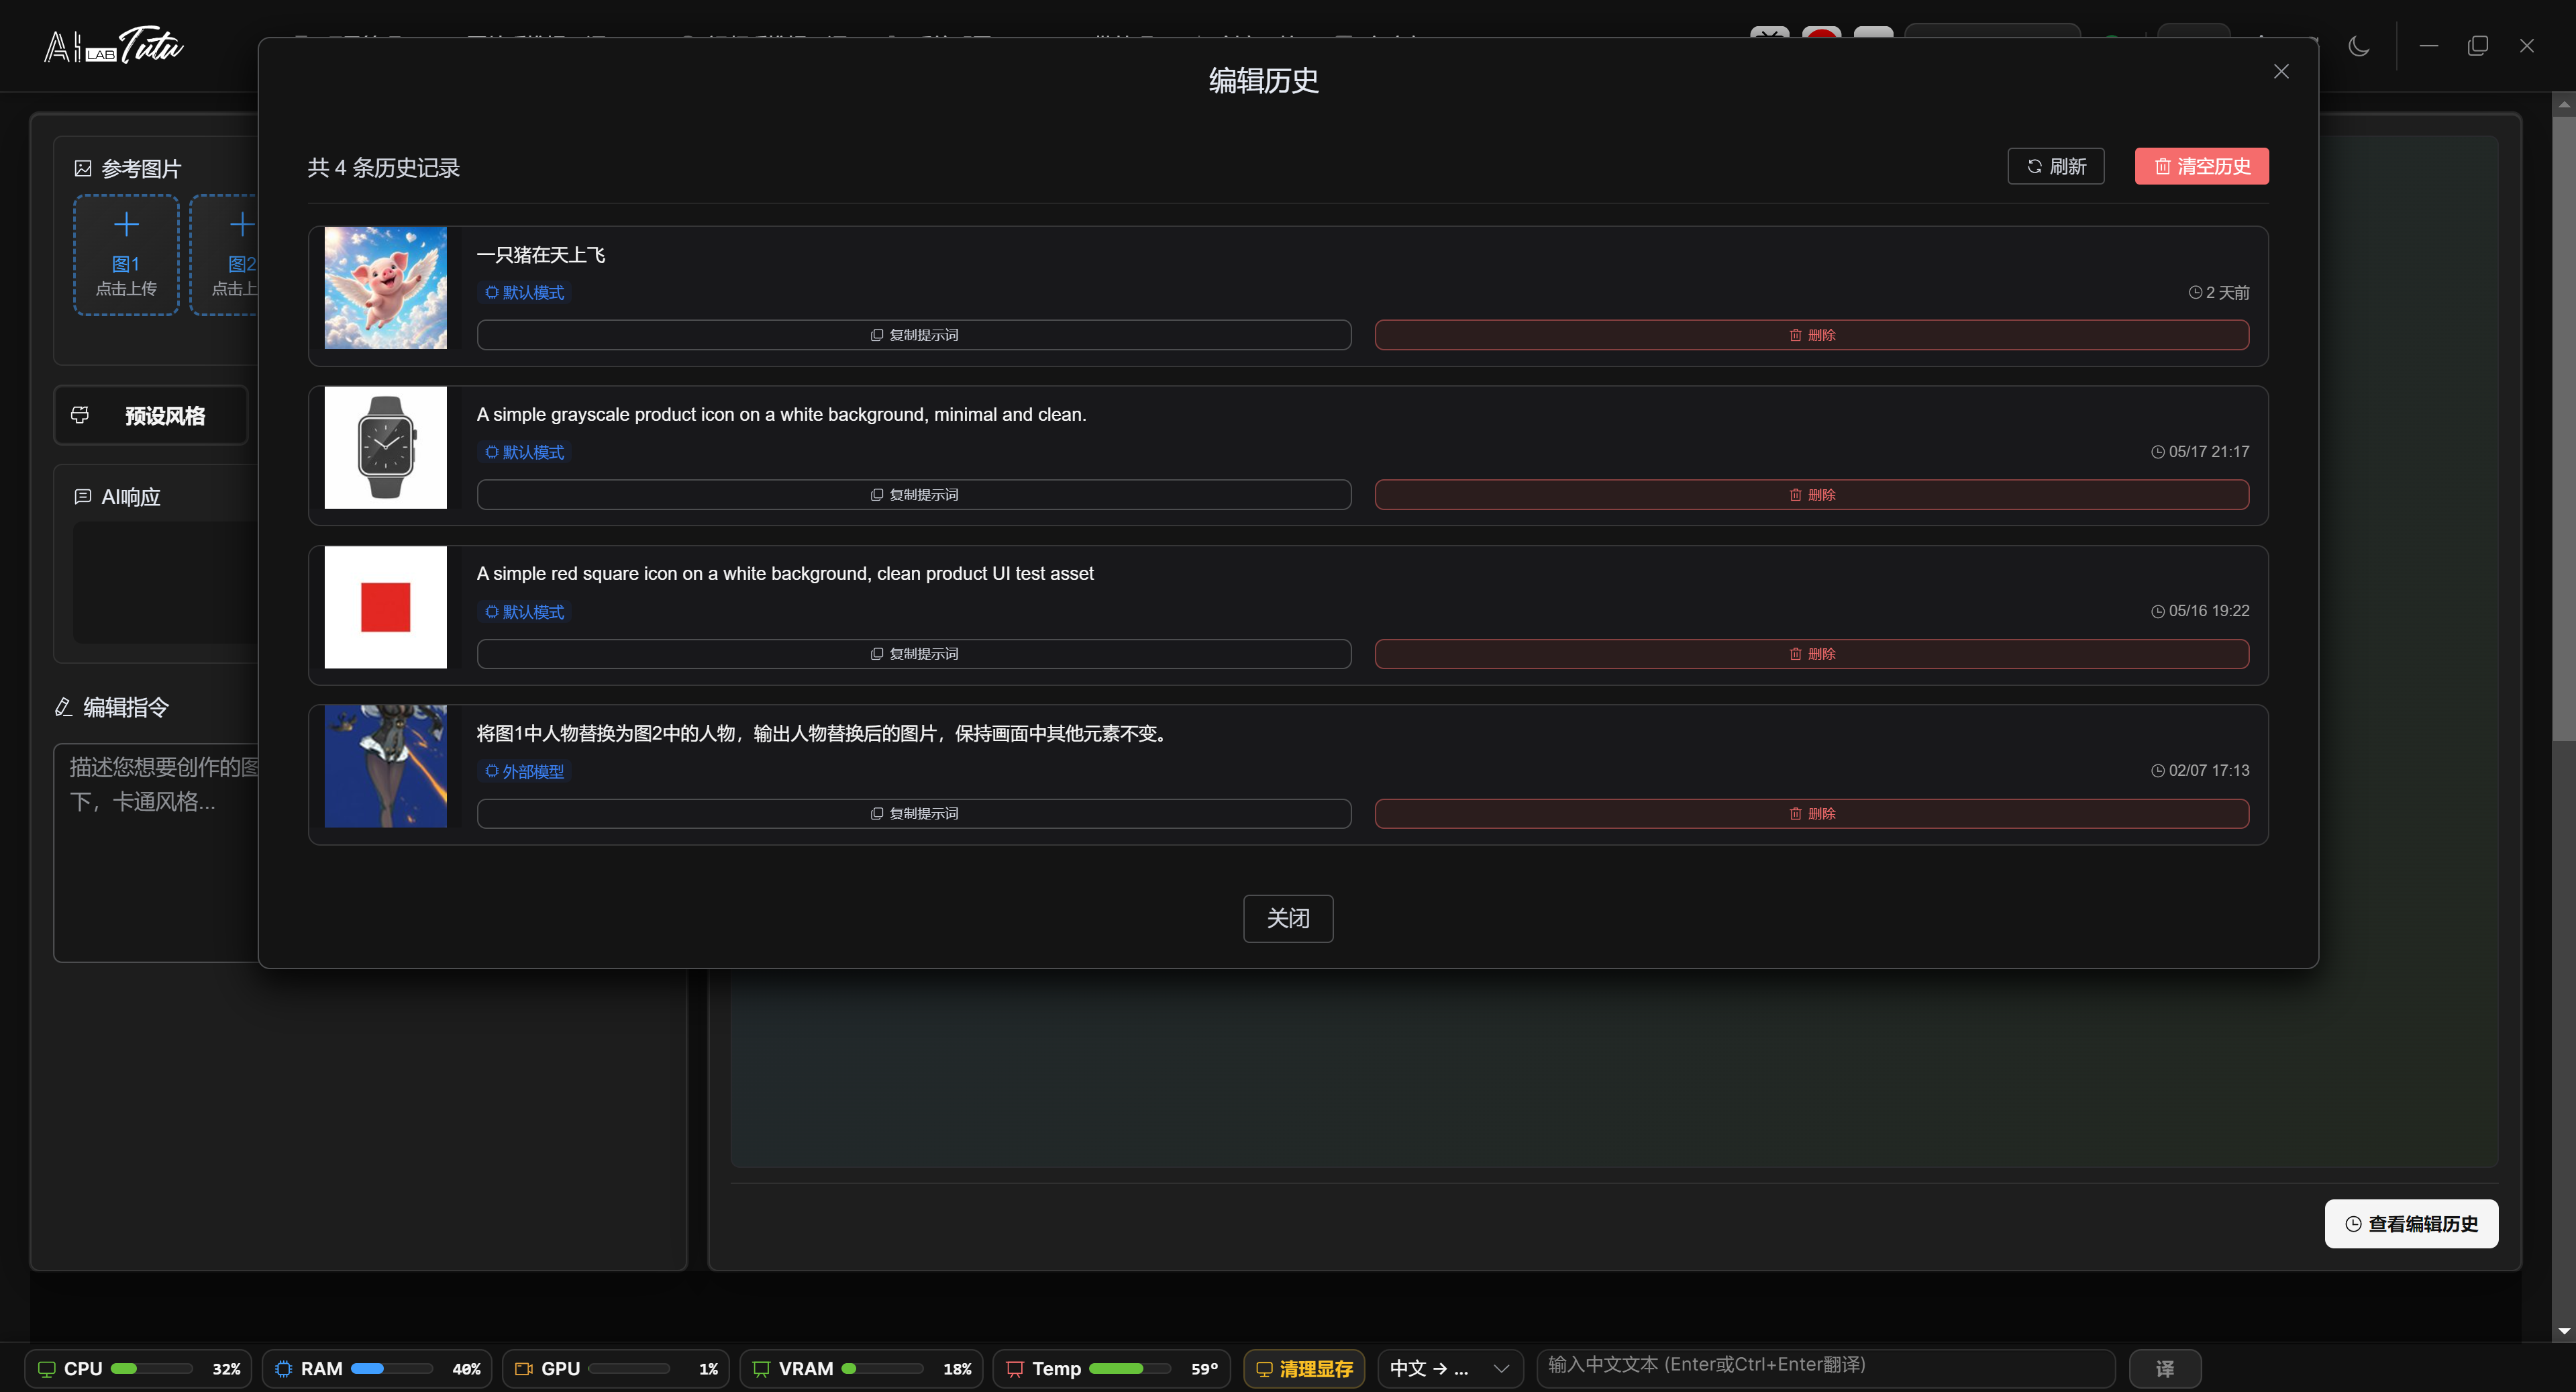
Account page overview. After login, you can view your email, credits, device benefits, subscription, and transaction records.
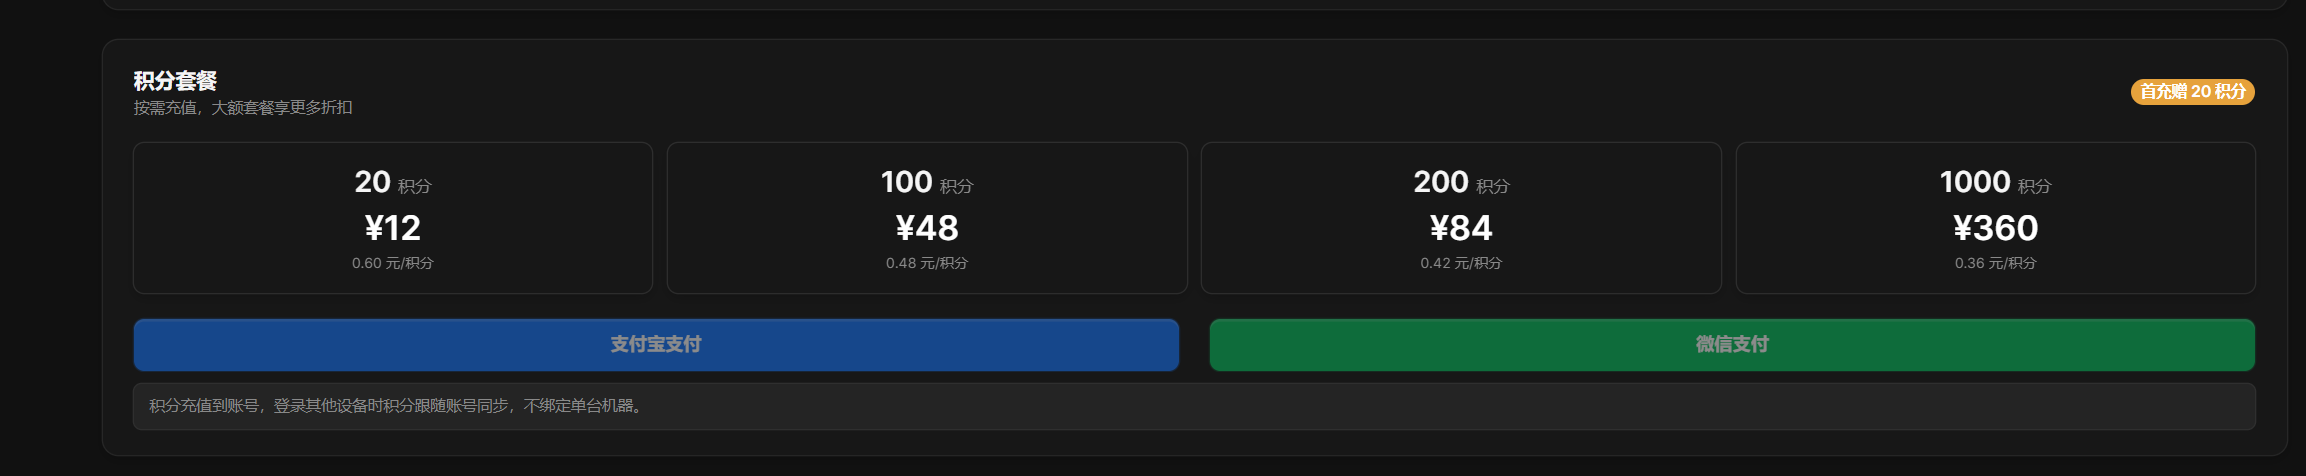
Buying and Using Credits
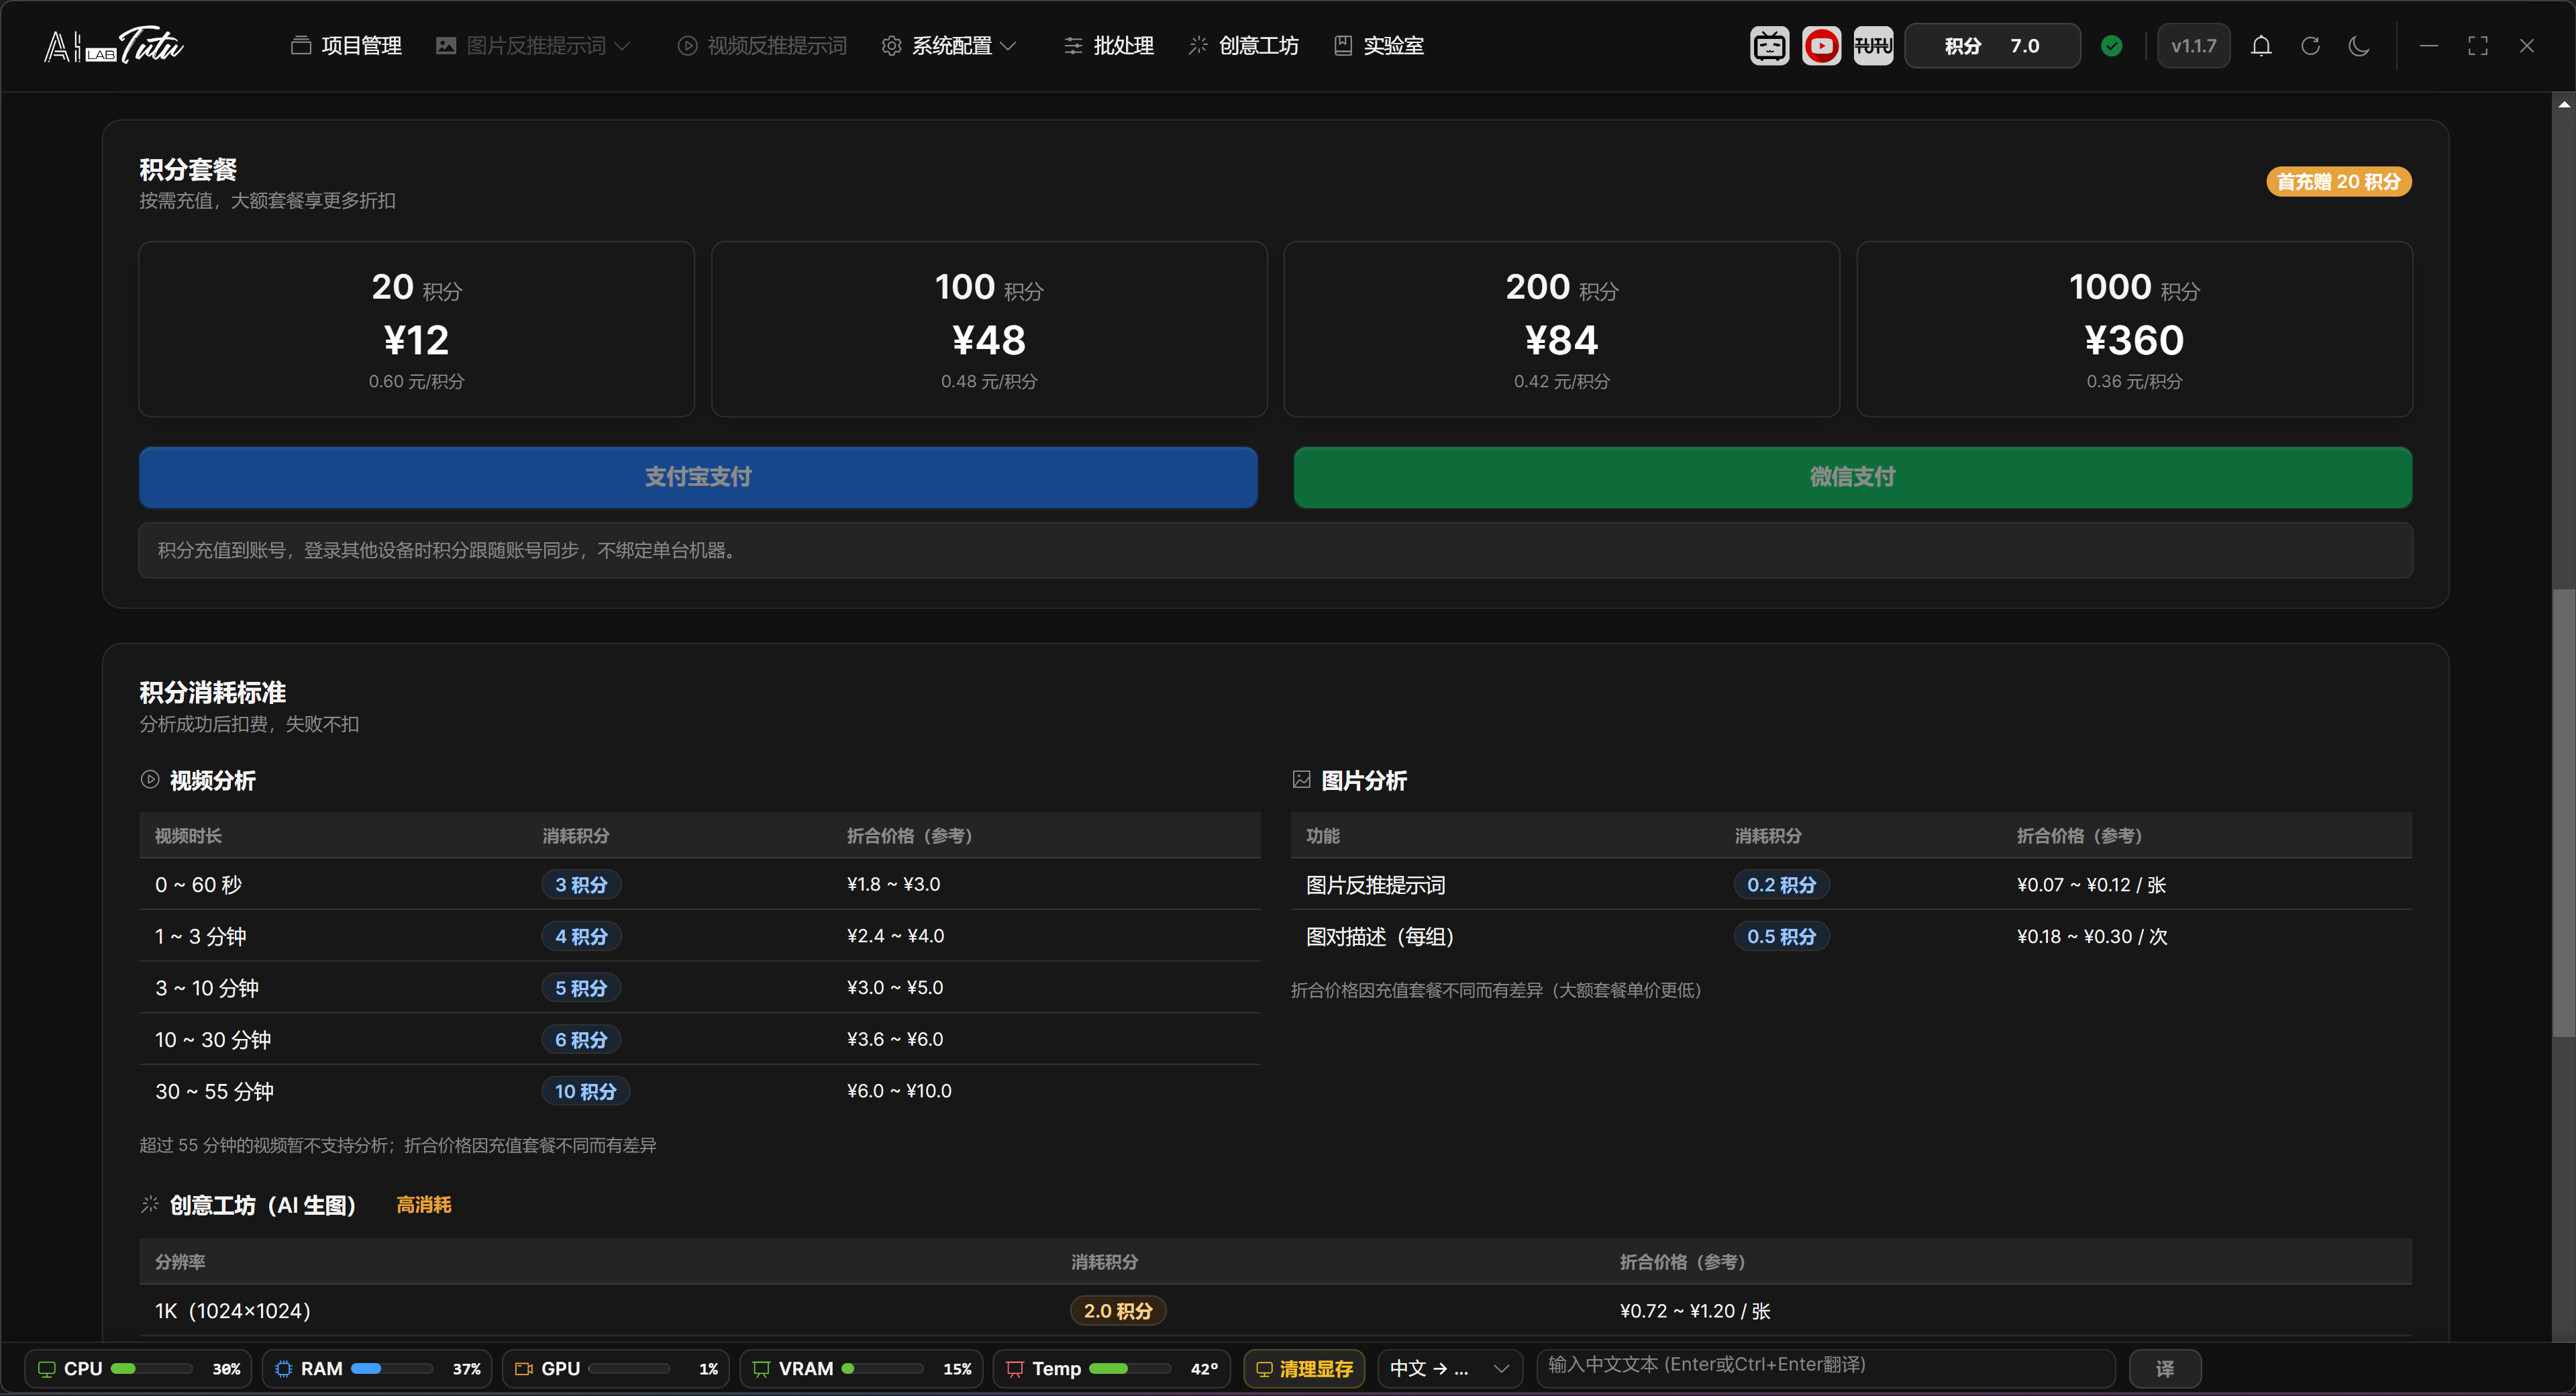
- For a first test, new users should start with the lowest-priced credit package available in their region. In the original Chinese flow, this is the 12 RMB package.
- After credits arrive, you do not need to configure an API key before using the default AI for image captioning.
- The default AI can process image prompt reverse captioning, natural-language descriptions, paired image descriptions, video understanding, and related tasks.
- Credits follow the account. As long as you log in with the same account, you can view credits and transaction history inside the account system.
- Transaction history can be viewed from the account page. It supports ranges such as the last 3 months, 6 months, 1 year, or all records.
Credit package page. For a first test, buy the smallest credit package first, then enter the image captioning workflow.
Older Paid Users and Historical Activation Codes
- Users who already purchased an older version do not need to buy an activation code again according to old documents.
- After logging in or registering an account, the app sends the current device information and tries to recognize the original device authorization.
- Device authorization follows the hardware. Credits follow the account. These two benefit systems are independent.
- If your historical authorization is not recognized automatically, prepare the original order information, activation code, or purchase account and contact support for verification.
- If you purchased an activation code from the website, paste it into the activation-code input area inside the app and click the Activate button.
- Activation-code benefits are stacked by time. For example, if you bought a monthly plan and then buy another monthly plan, the remaining time can extend from 30 days to 60 days.
Authorization Status
- The device authorization, subscription, or activation status shown on the account page is used to determine whether the current device already has historical benefits.
- Historical authorization may include permanent, yearly, quarterly, monthly, or trial types. The system recognizes the status according to server records.
- If the historical authorization has expired, has been disabled, or does not match the current device, the account page displays the corresponding status. Follow the page instructions or contact support.
When Advanced Configuration Is Needed
- New users who use the default AI do not need to configure a model.
- Open System Configuration only when you want to use your own API key, a custom provider, a local model, or GPU features.
- If you only want to complete image captioning, log in, buy credits, and enter the captioning page.
Common Exceptions
- Login fails: check the email, verification code, network status, and confirm that you are using an account from the Tutu software system.
- Credits do not arrive: return to the account page and refresh, or reopen the app later. If credits still do not arrive, keep the payment proof and contact support.
- Old authorization is not recognized: confirm whether the current device is the originally authorized device, and prepare historical order information or activation codes for support verification.
- Default AI reports insufficient credits: buy credits first or confirm that you are logged in to the correct account.
Project Management
Page Location and Purpose
Project Management is located in the top navigation bar. A project is the working container for images, videos, prompts, natural-language descriptions, reference reverse-caption data, and exported content.
After login, if you do not have a project yet, click New Project first. Use Import Labeled Dataset only when you already have an existing prompt or natural-language caption dataset and want to continue editing it.
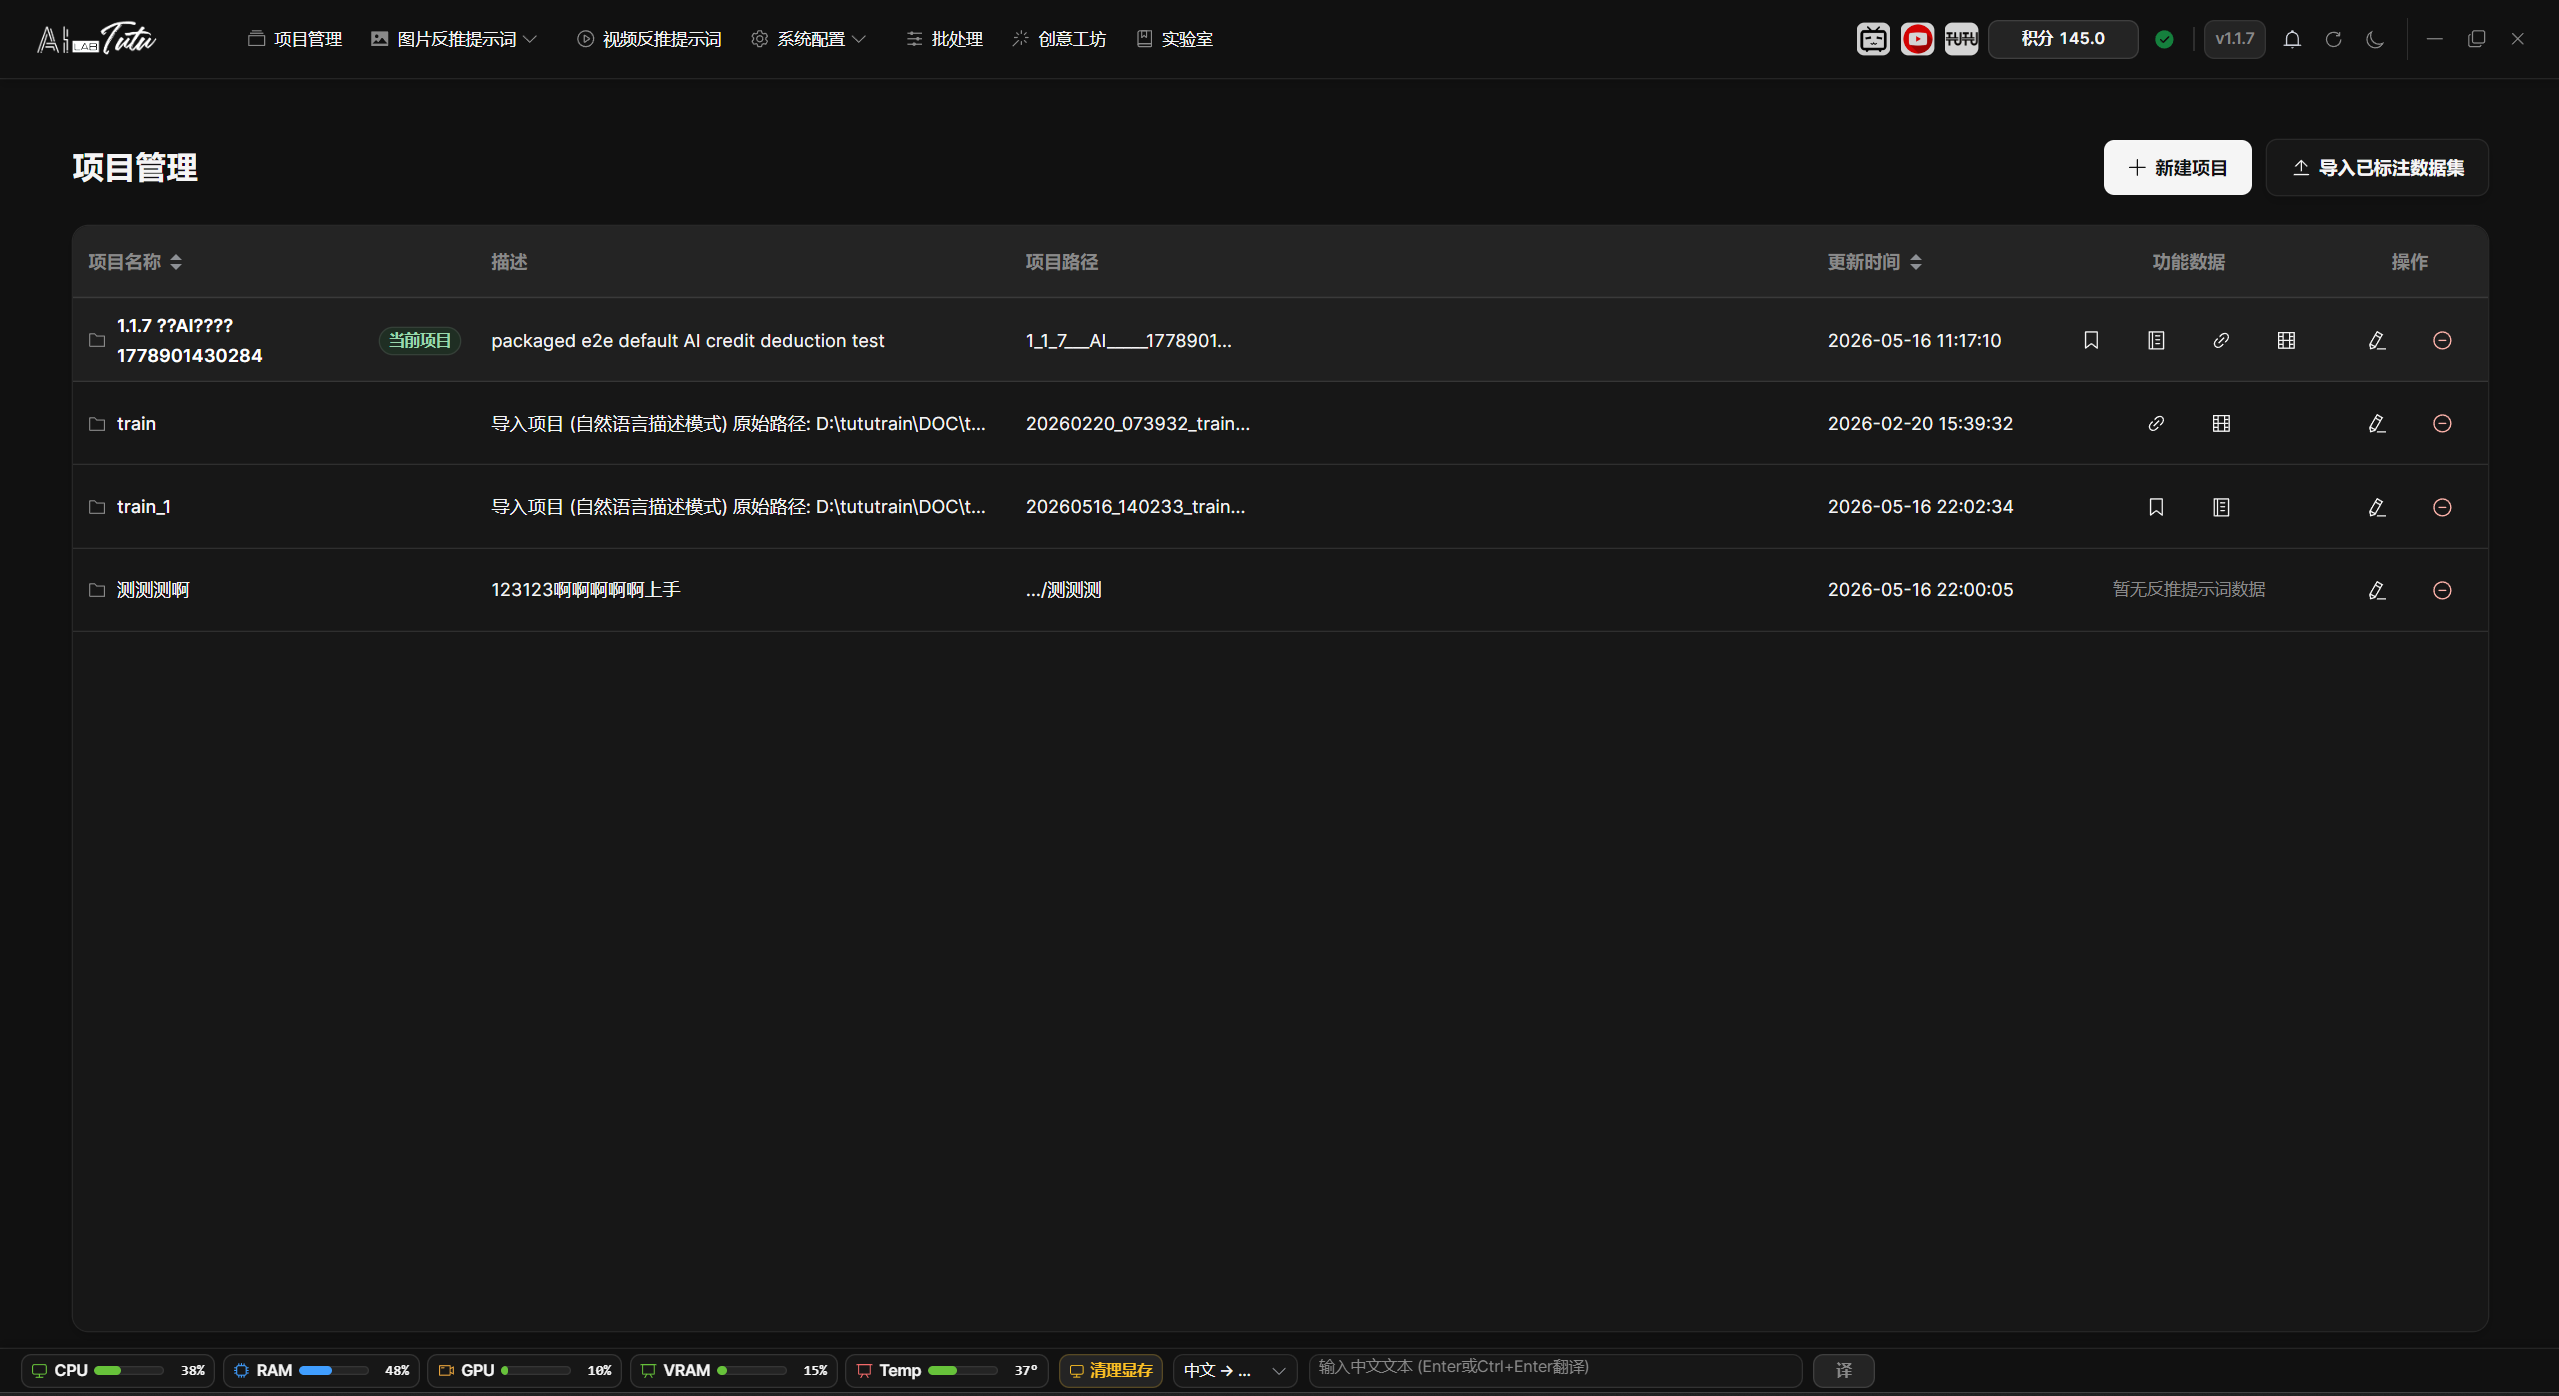
Project List
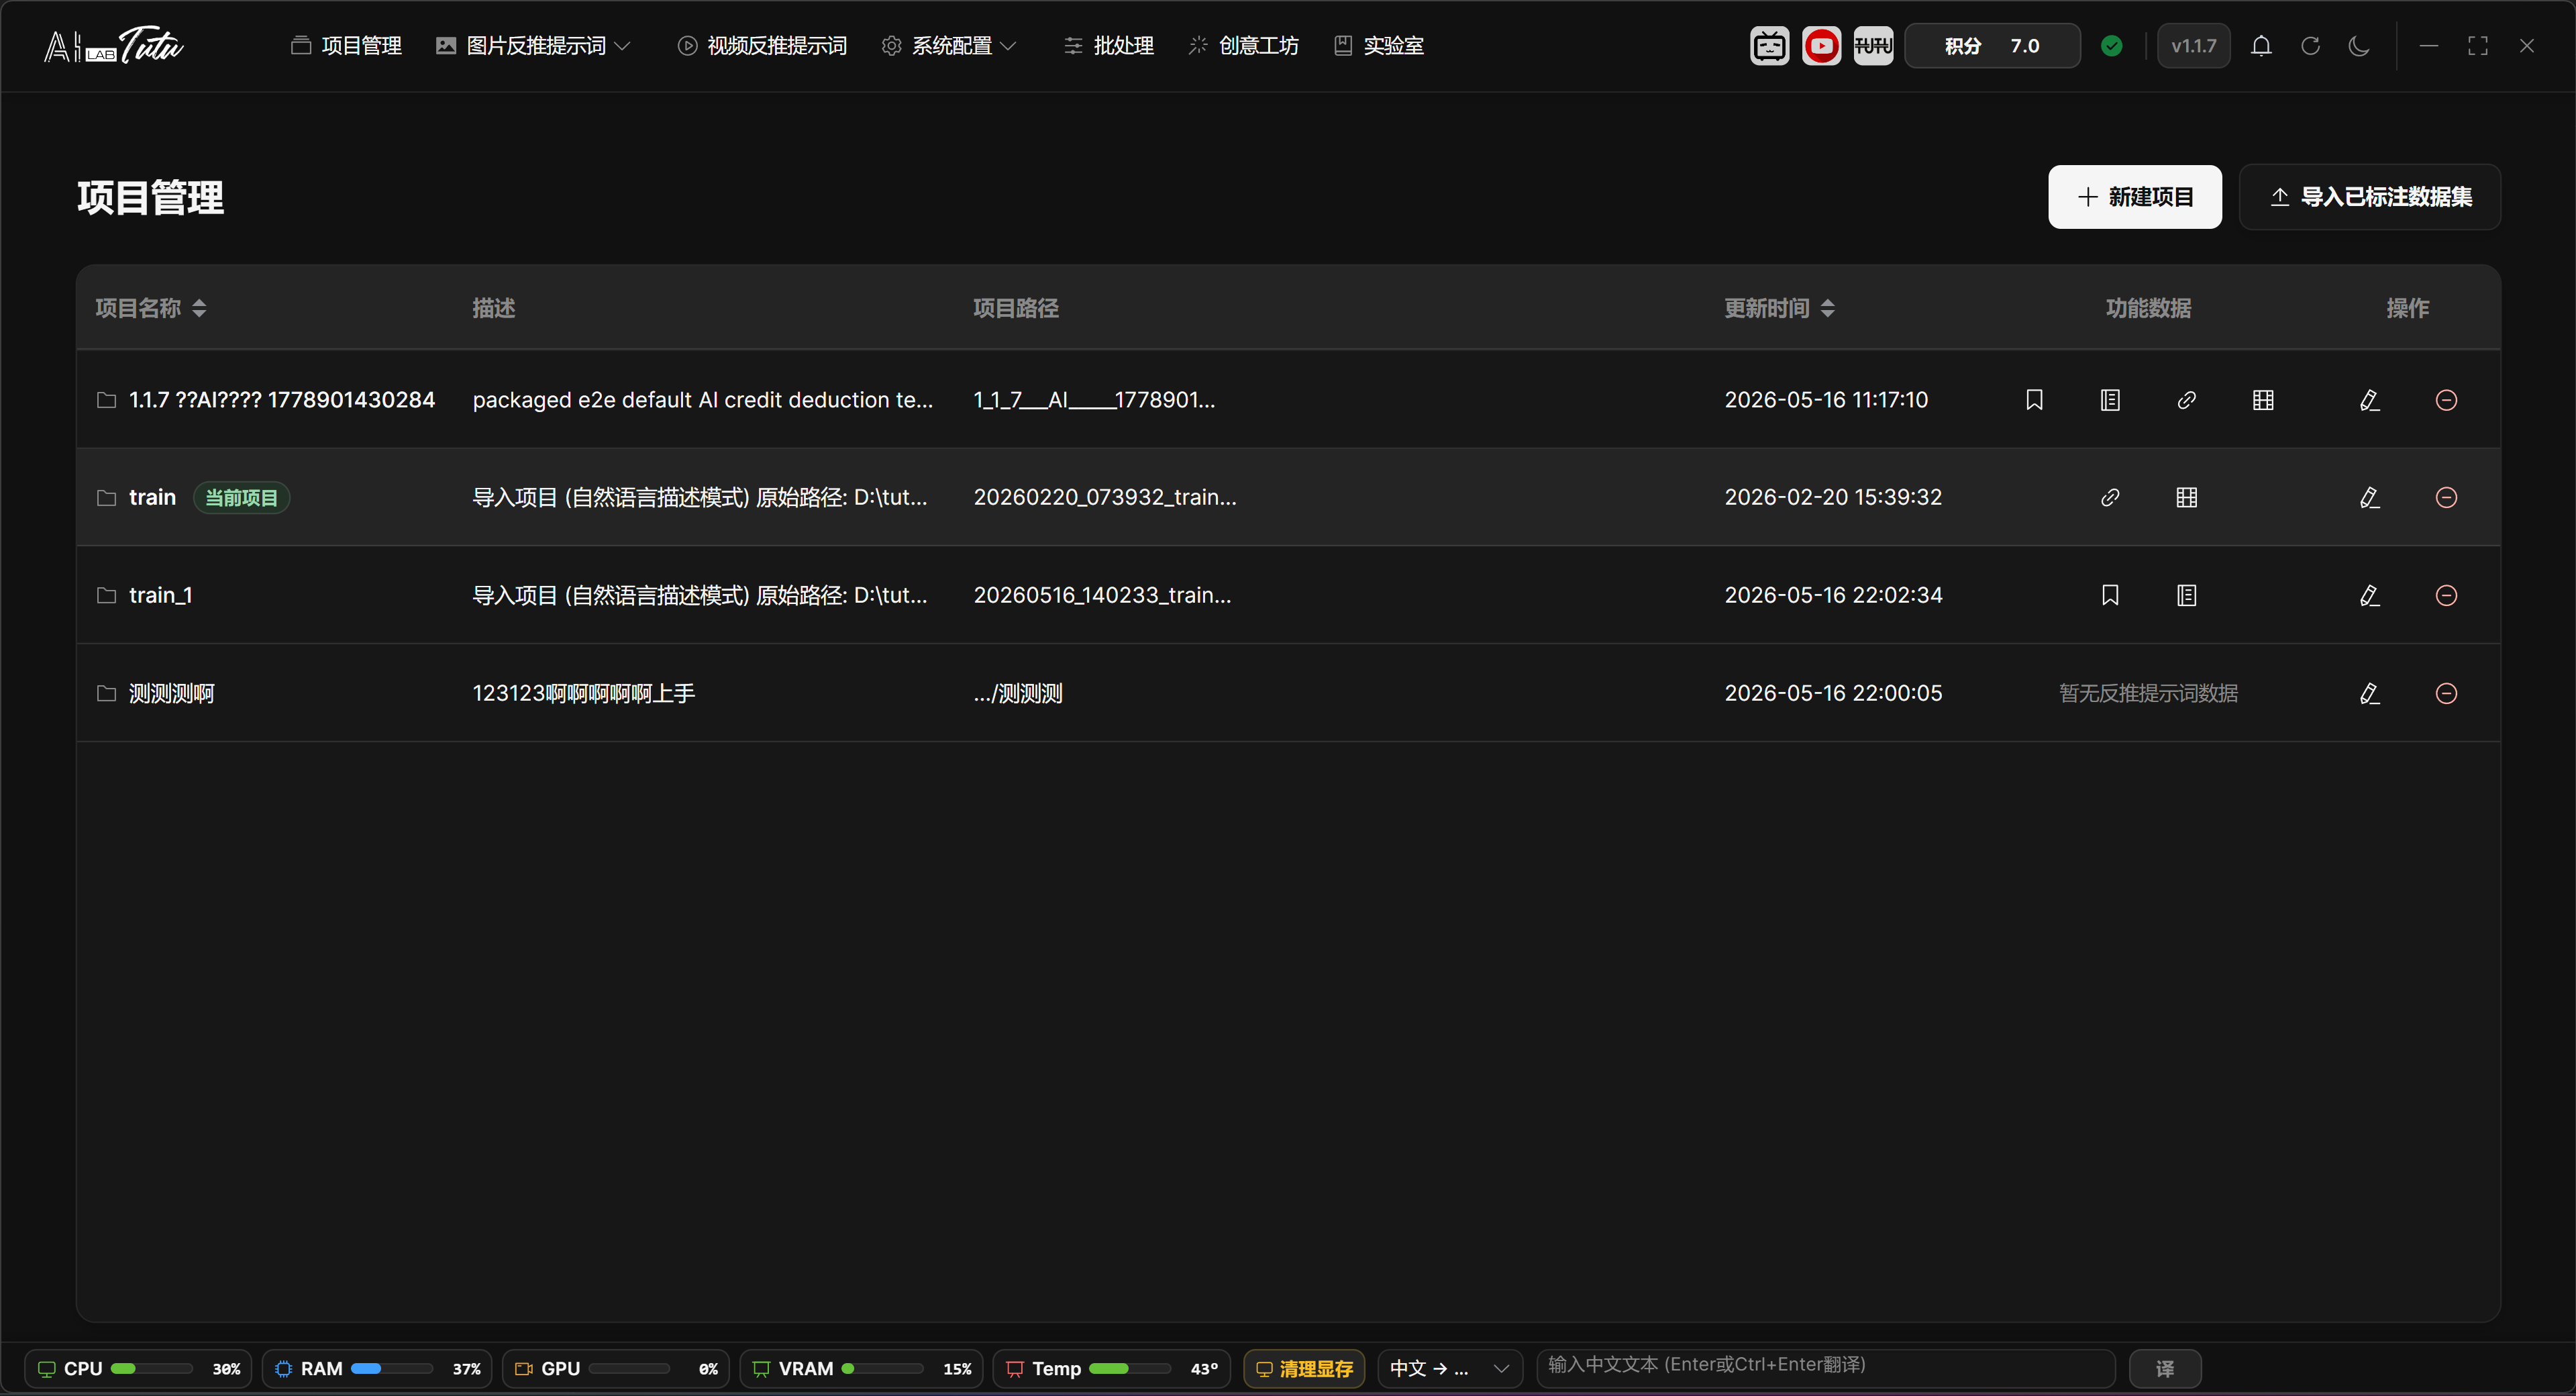
The project list shows the project name, description, project path, update time, feature data, and action buttons.
Click a row to set that project as the current project. The current project is highlighted and marked as Current Project.
The feature-data area shows whether the project already contains prompt tags, description labels, reference reverse-caption data, video reverse-prompt data, or video scene data. Click a corresponding marker to jump to the related feature page.
Project list. The current project, project path, feature data, and action buttons are shown together on the Project Management page.
Feature Data Markers
The feature-data column is not a quantity counter. It is a quick way to check whether the project already has a certain kind of data. It checks prompt tags, natural-language descriptions, reference reverse-caption images and descriptions, videos, and detected scenes.
When data exists, the corresponding icon is displayed. Click the tag icon to enter Prompt Phrase Mode, the description icon to enter Natural Language Mode, the link icon to enter Reference Reverse Captioning, or the video icon to enter the Video Prompt Reverse Captioning page.
If the page says that no reverse-prompt data exists, the project currently has no jumpable image, description, reference reverse-caption, or video data. Enter the related feature page first to import materials or start generation.
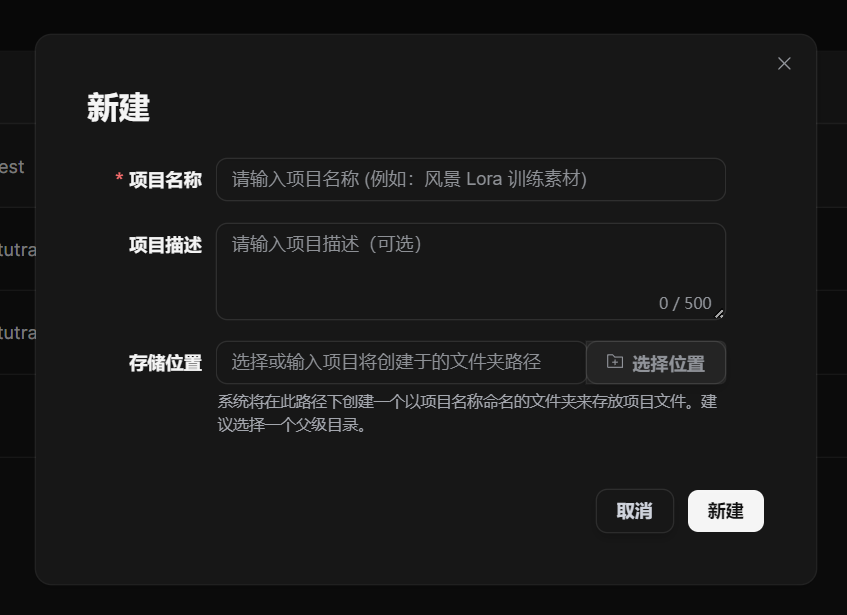
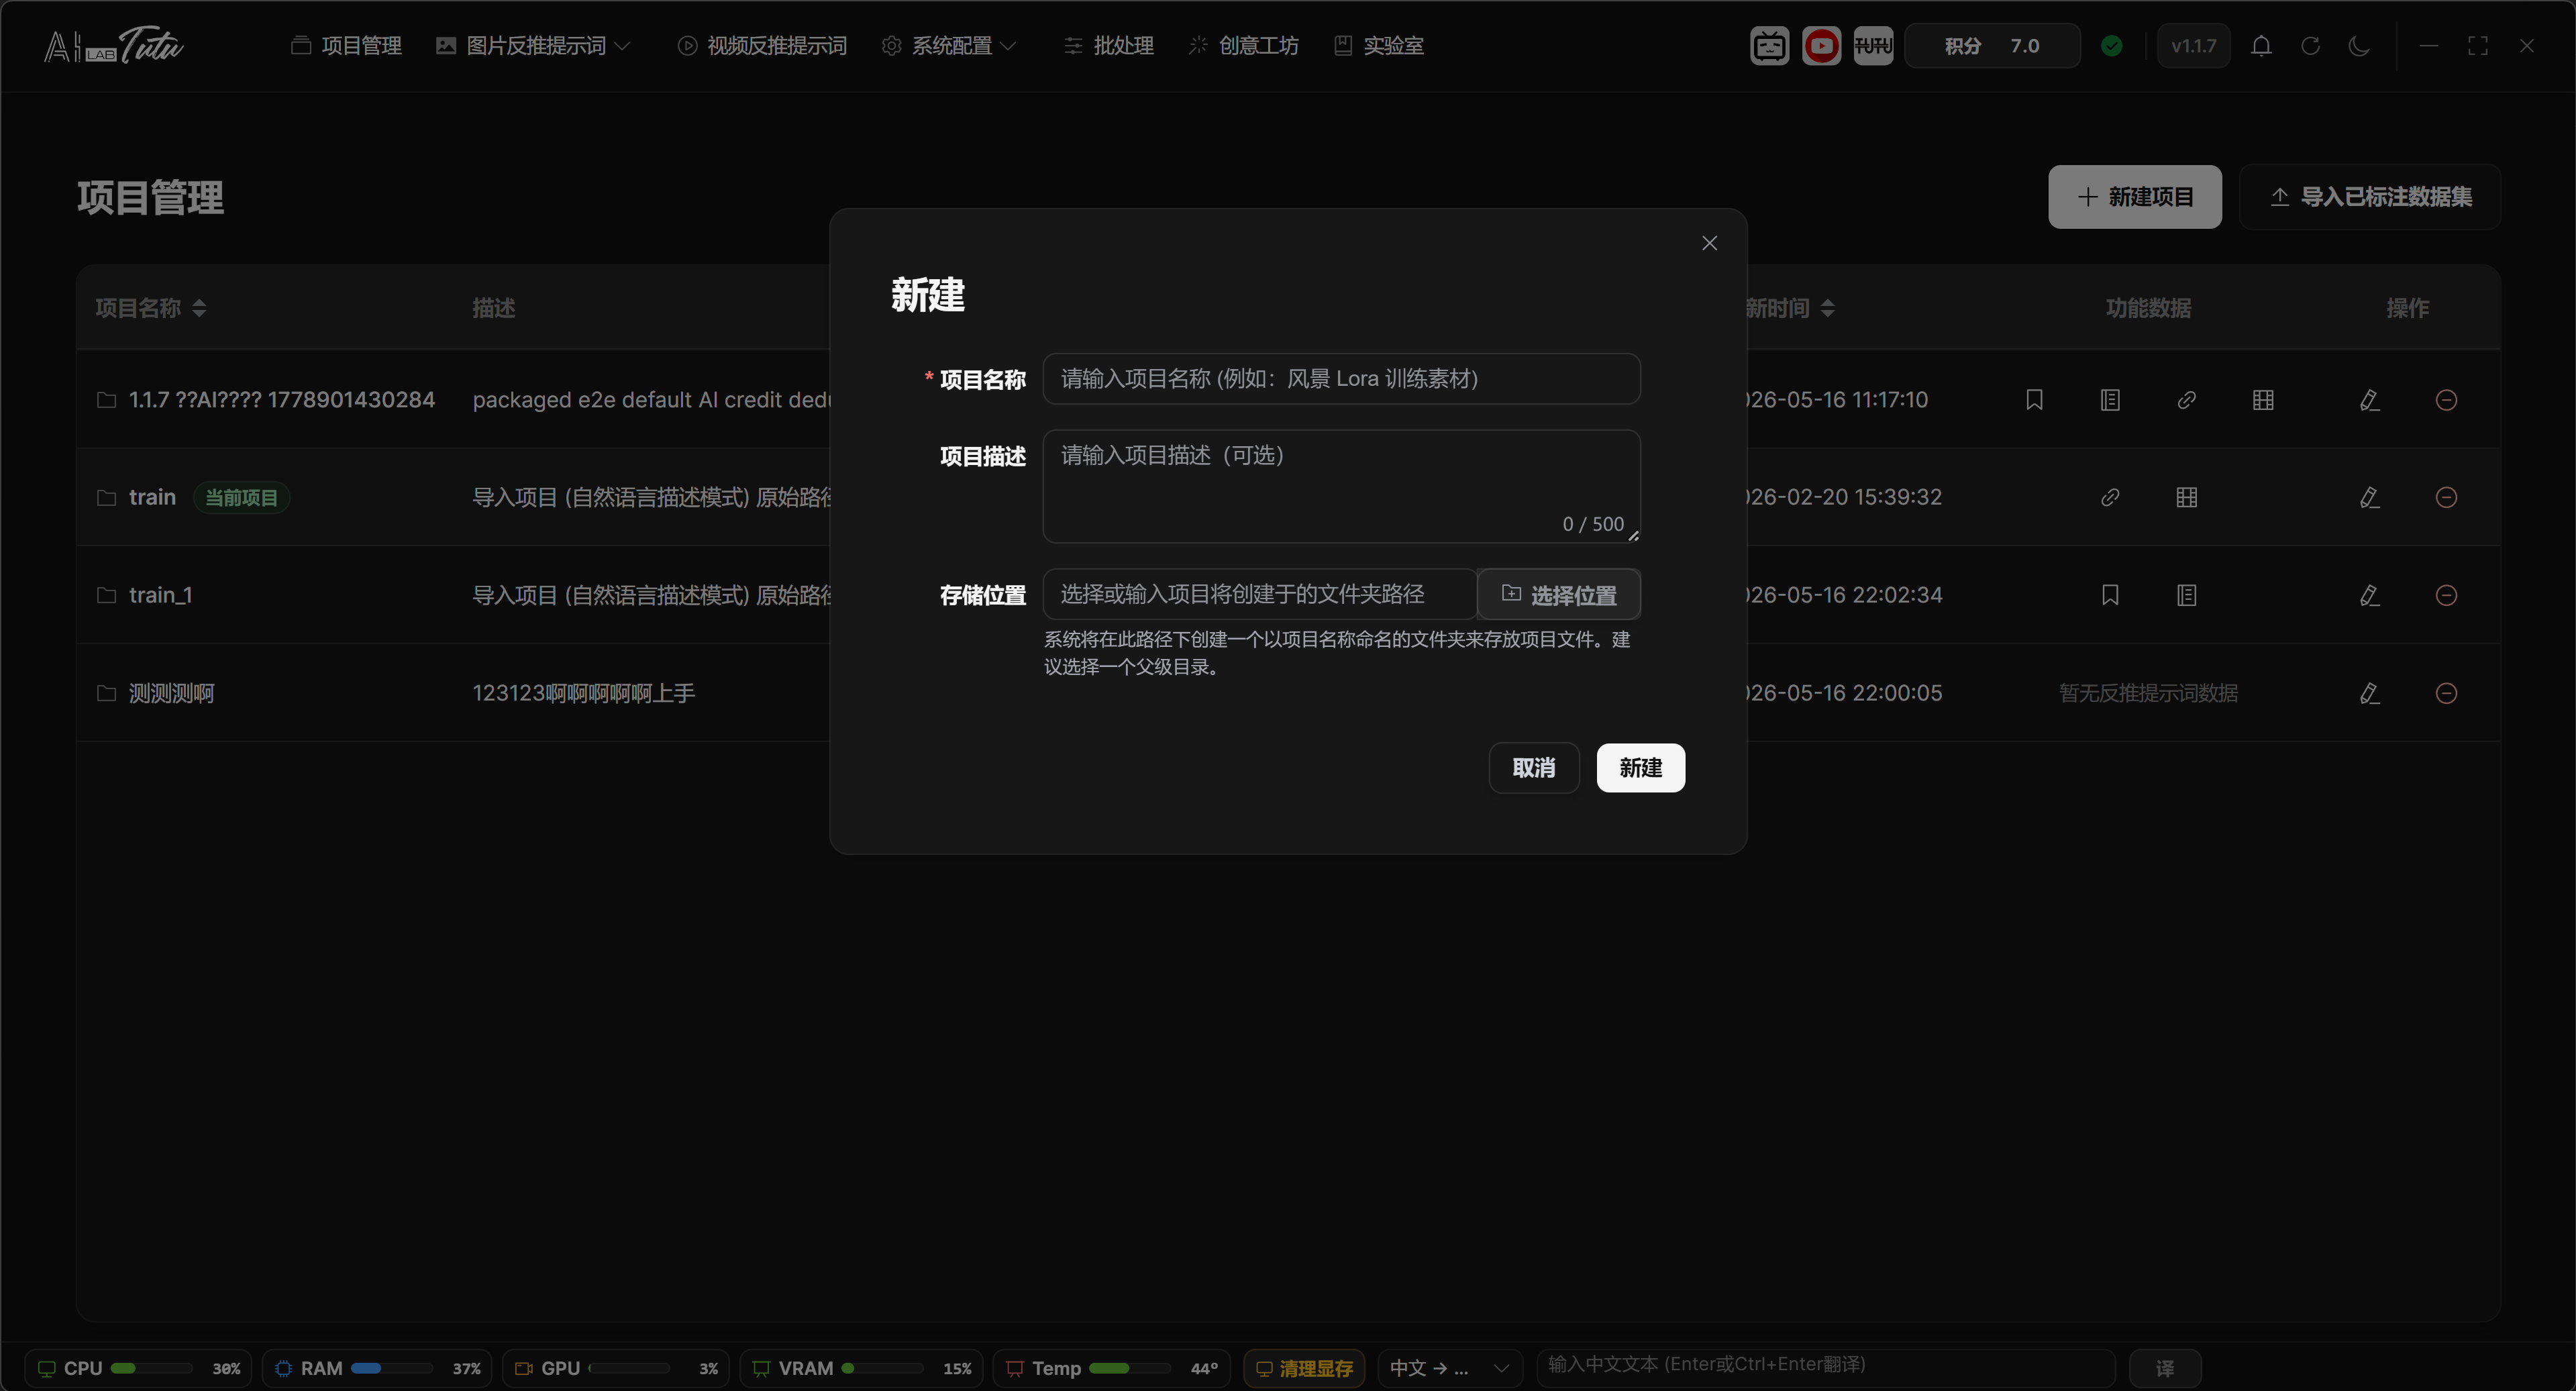
Create a New Project
- Click New Project in the upper-right corner.
- Enter a project name. The name should reflect the material topic or training purpose.
- The description is optional. Use it to record the material source, dataset purpose, processing requirements, or notes.
- You can manually choose the storage location. If left empty, the backend uses the default project directory.
- After creation, return to the project list and click the project to make it the current project.
New Project dialog. Fill in the name, description, and storage location to create the project.
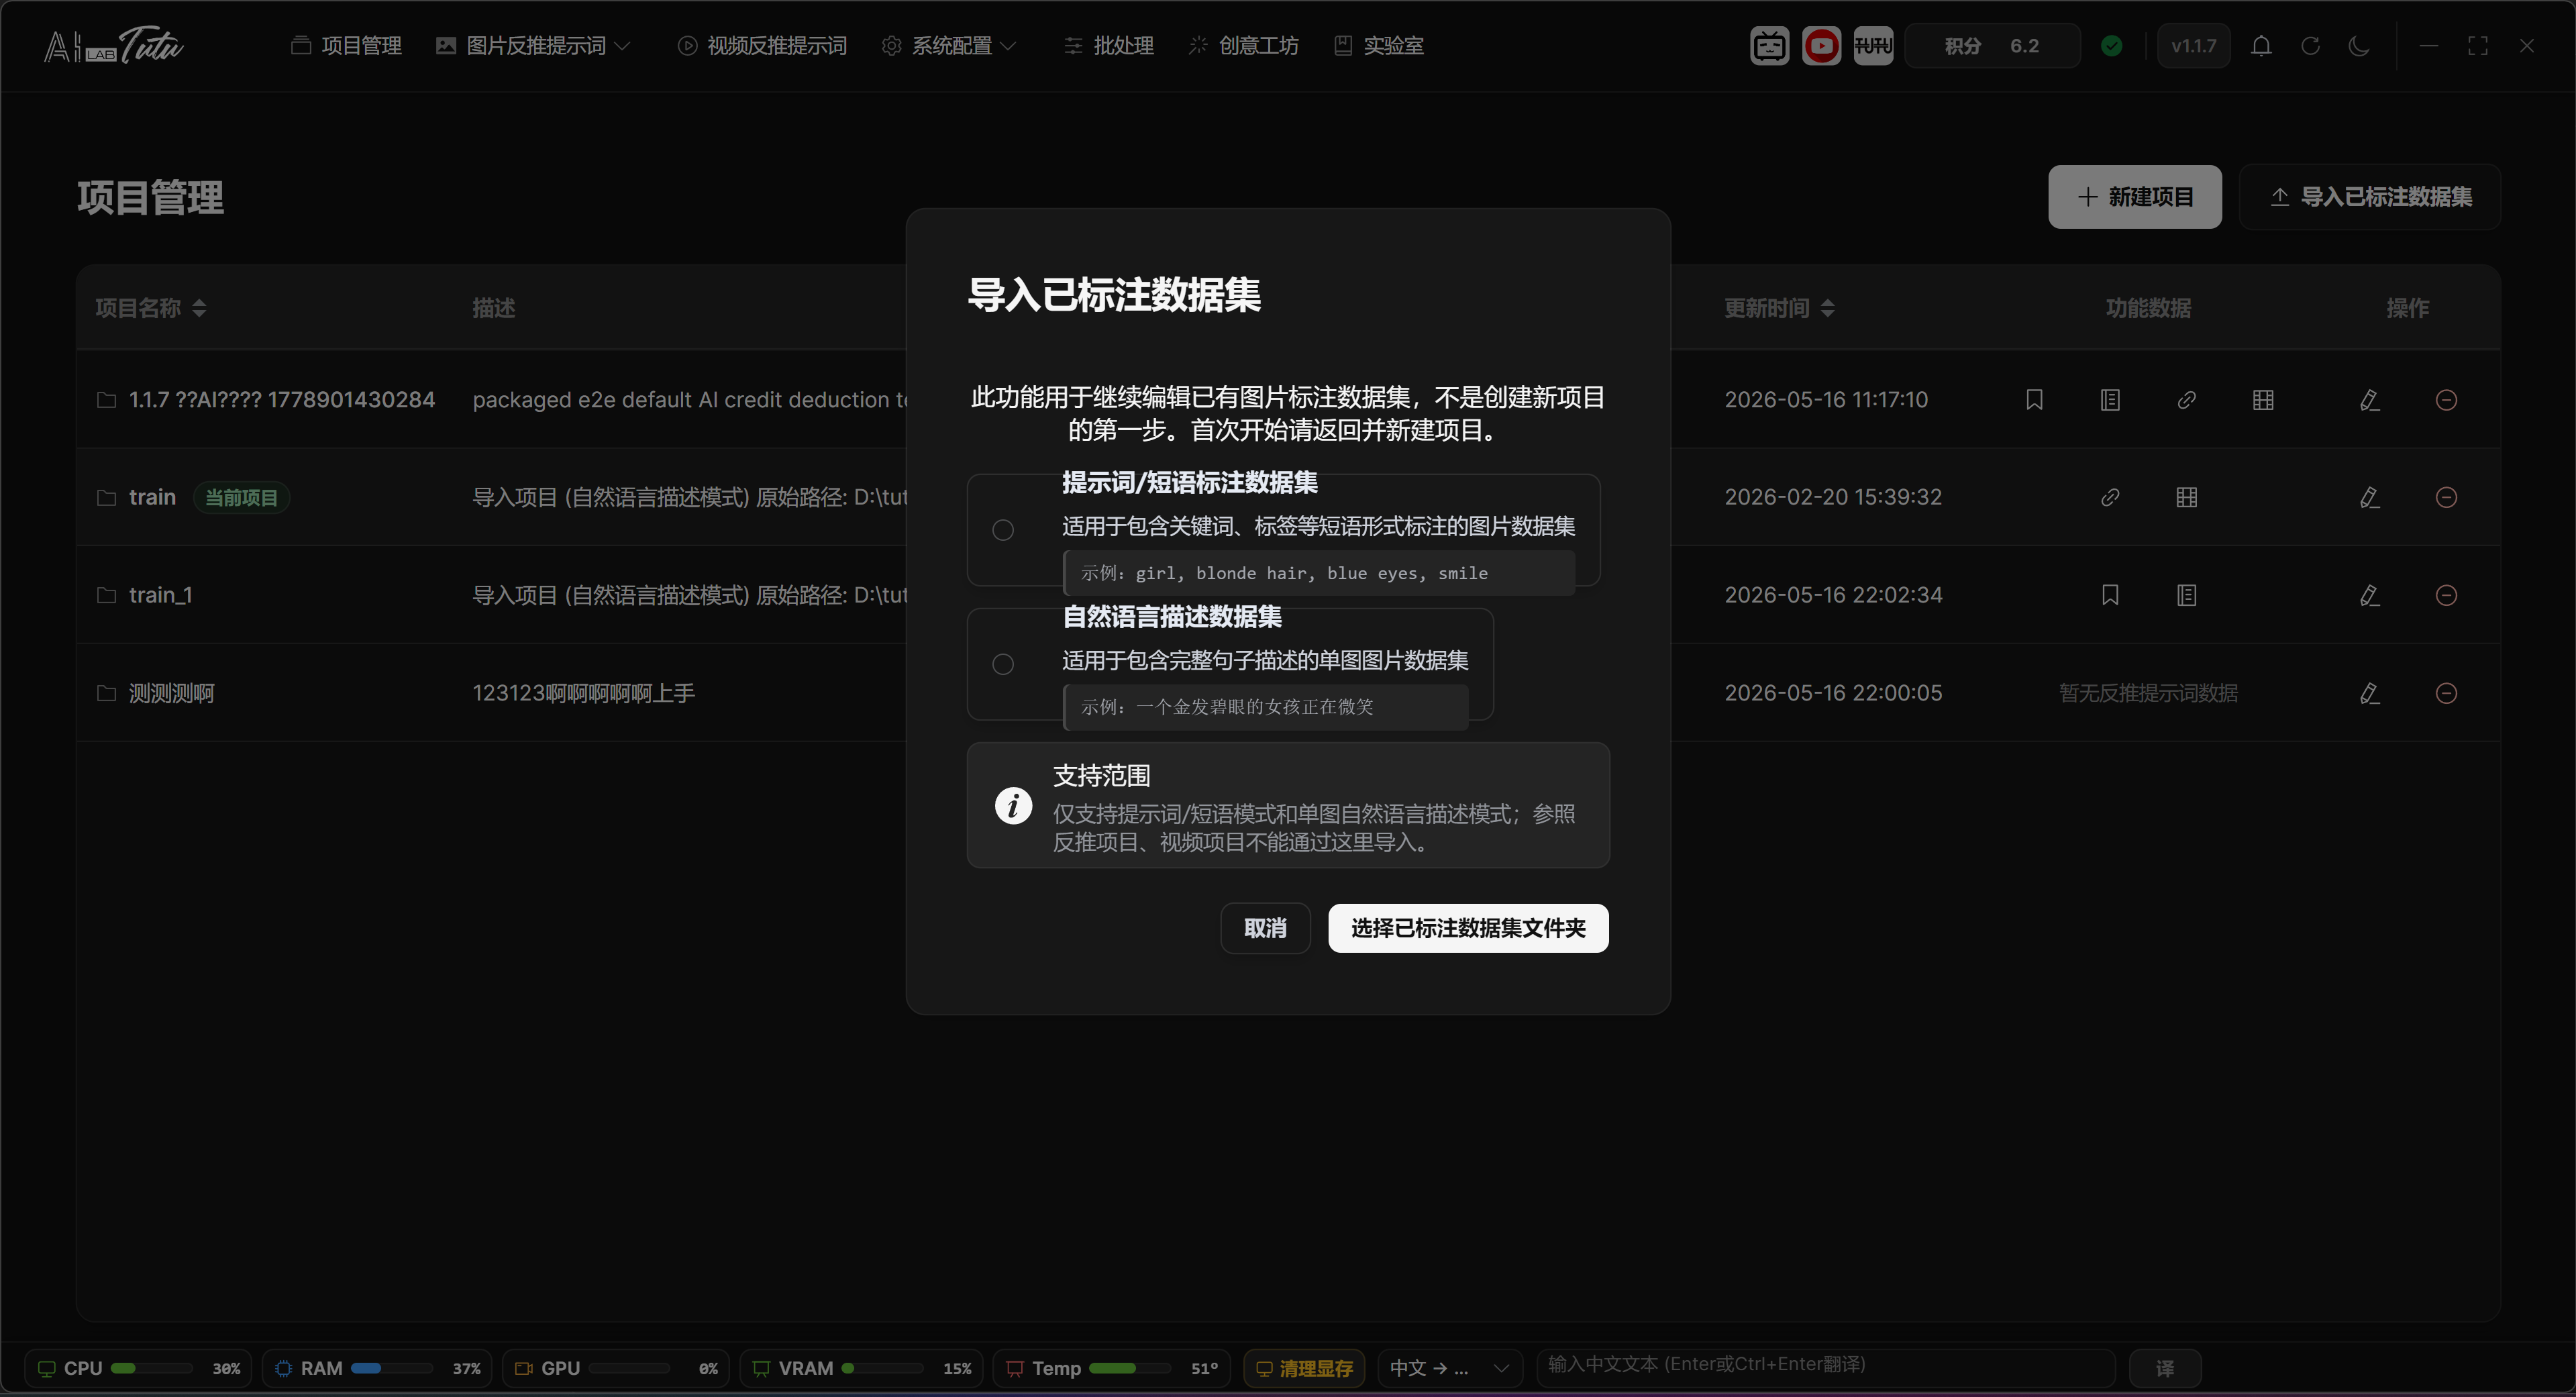
Import a Labeled Dataset
Import Labeled Dataset is only for continuing to edit existing data. It is not required for first-time use.
During import, choose the dataset type first: prompt or phrase caption dataset, or natural-language description dataset.
After choosing the type, select the existing dataset folder. The app displays import progress and organizes the data into the app's own data system.
If you are starting from scratch with image reverse prompts, natural-language descriptions, or video organization, create a project first and then go directly to the related feature page.
Import Labeled Dataset. Use it only when you want to continue editing an old dataset. First-time users usually do not need it.
Save Location and Progress After Import
The import button is available only in the desktop version. Choose the import mode first, then select the existing dataset folder. The import flow shows progress for scanning, analysis, record creation, image and tag import, and final setup.
To avoid accidentally modifying the user's original data, the app first copies the selected folder to the imported_projects folder under the app data directory, then imports from that copy. The copied folder includes a timestamp. The project name uses the original folder name by default. If another project already has the same name, the app automatically appends a number.
Prompt or phrase mode imports same-name .txt content as tags or keywords. Natural-language description mode imports same-name .txt content as description sentences. If import fails, the app reports whether the path does not exist, permissions are insufficient, the file system failed, or another specific error occurred.
Edit and Delete Projects
The right side of the project list provides edit and delete buttons.
Edit is mainly used to change the project name and description. The project path is not changed casually in edit mode, which prevents existing material references from breaking.
Deleting a project is a high-risk operation. Before deleting, confirm that you have exported or backed up the data you need to keep.
Editing, Deletion, and Data Retention
Click the edit button on the right side of a project to modify its name and description. The project path cannot be modified in edit mode, so that imported images, videos, and thumbnails do not lose their references.
The delete button opens a confirmation dialog first. After confirmation, the app removes the project from the project list and database records, and clears the app's internal records for related images, tags, sentences, and folders.
Deleting a project does not actively delete the project folder on disk. The original files remain in the project path. Even so, the project record is no longer visible inside the app after deletion, so confirm export or backup before deleting.
Project Selection Rules
Image Prompt Reverse Captioning, Prompt Phrase Mode, Natural Language Mode, Reference Reverse Captioning, Video Prompt Reverse Captioning, and related pages all depend on the current project.
If a page says Please select a project first, return to Project Management and click the project row.
Image and video entries in the top navigation show a reminder when no project is selected, which prevents materials from being imported into the wrong project.
Project Selection and Entry Jumps
Clicking any row in the project list only sets that project as the current project. It does not automatically jump to an image or video page. After selection succeeds, the row is highlighted and marked as Current Project.
When you later enter image reverse captioning, natural-language mode, reference reverse captioning, video reverse prompts, or batch processing, the app uses the current project by default. If the page says Please select a project first, return to Project Management and click the correct project row.
Image Prompt Reverse Captioning
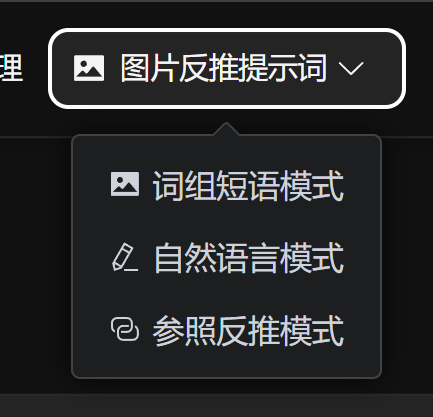
Top Entry and Three Modes
Image Prompt Reverse Captioning is a drop-down entry in the top navigation bar. It contains three modes:
- Prompt Phrase Mode
- Natural Language Mode
- Reference Reverse Captioning
Prompt Phrase Mode is used to generate keyword, tag, and phrase-style training data.
Natural Language Mode is used to generate full-sentence descriptions for single images.
Reference Reverse Captioning is used to create image pairs from a source image and a result image, then describe the changes between them.
The default AI can handle these tasks directly. Regular users do not need to configure an API key before starting.
Image Prompt Reverse Captioning entry. The drop-down menu contains Prompt Phrase, Natural Language, and Reference Reverse Captioning modes.
Prompt Phrase Mode
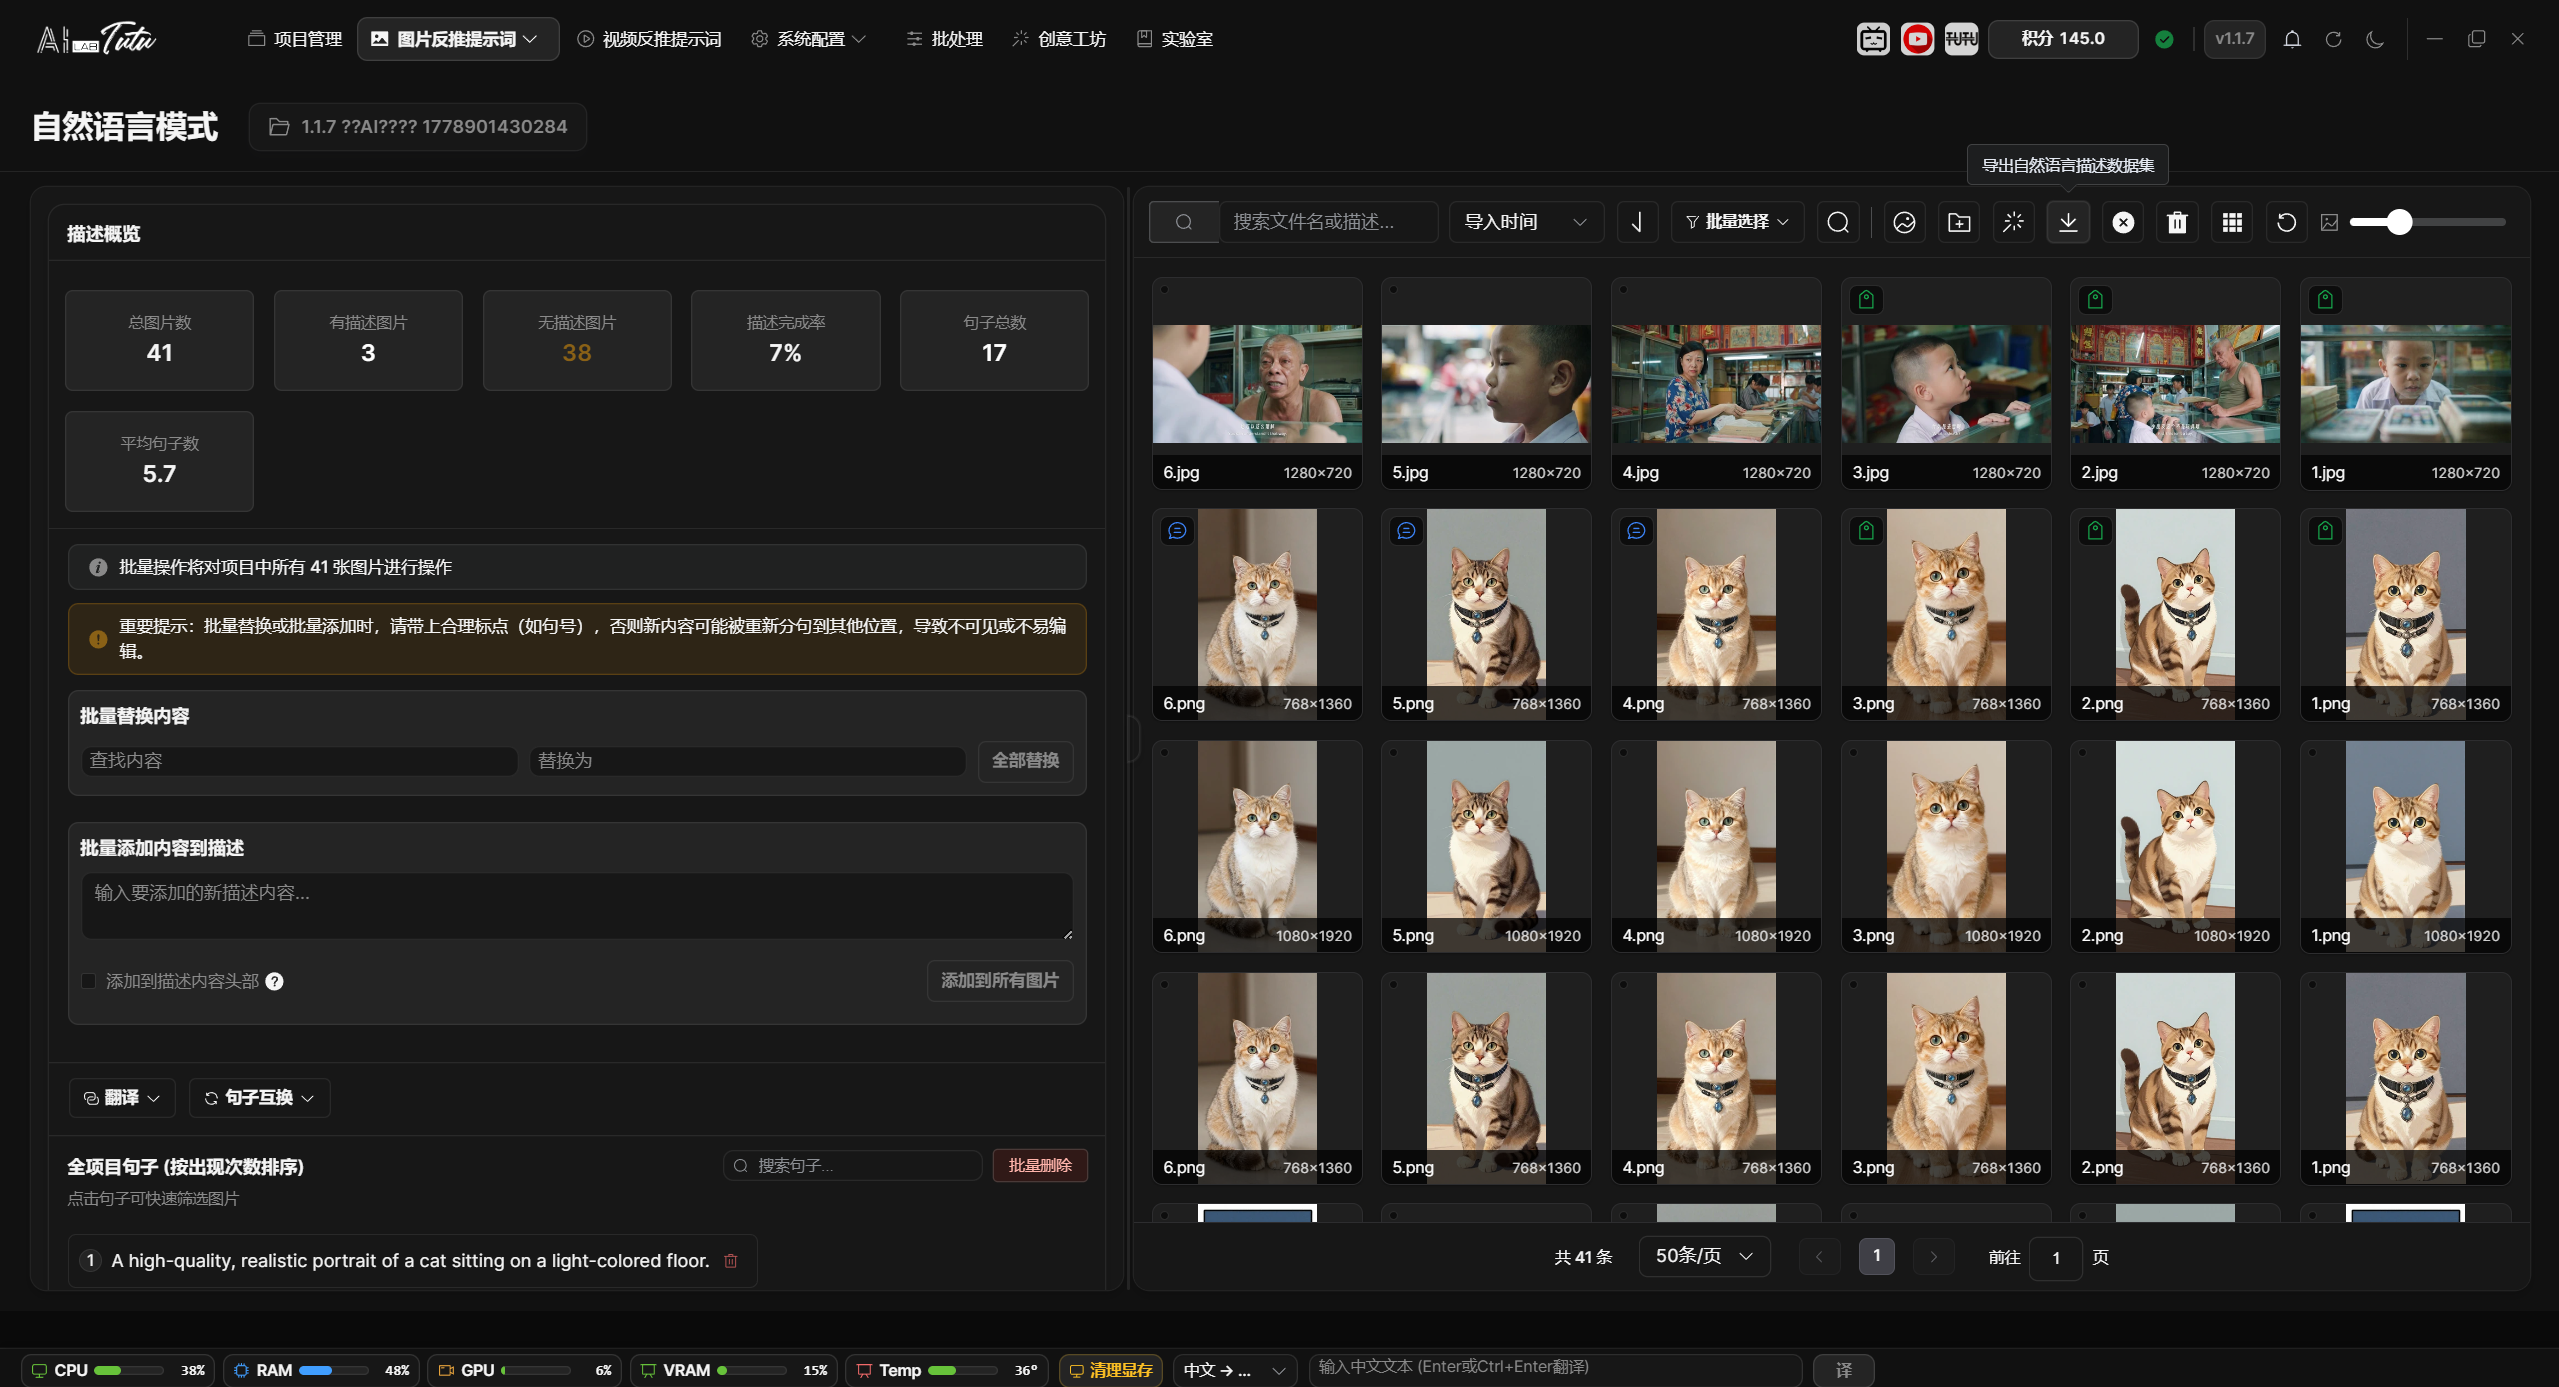
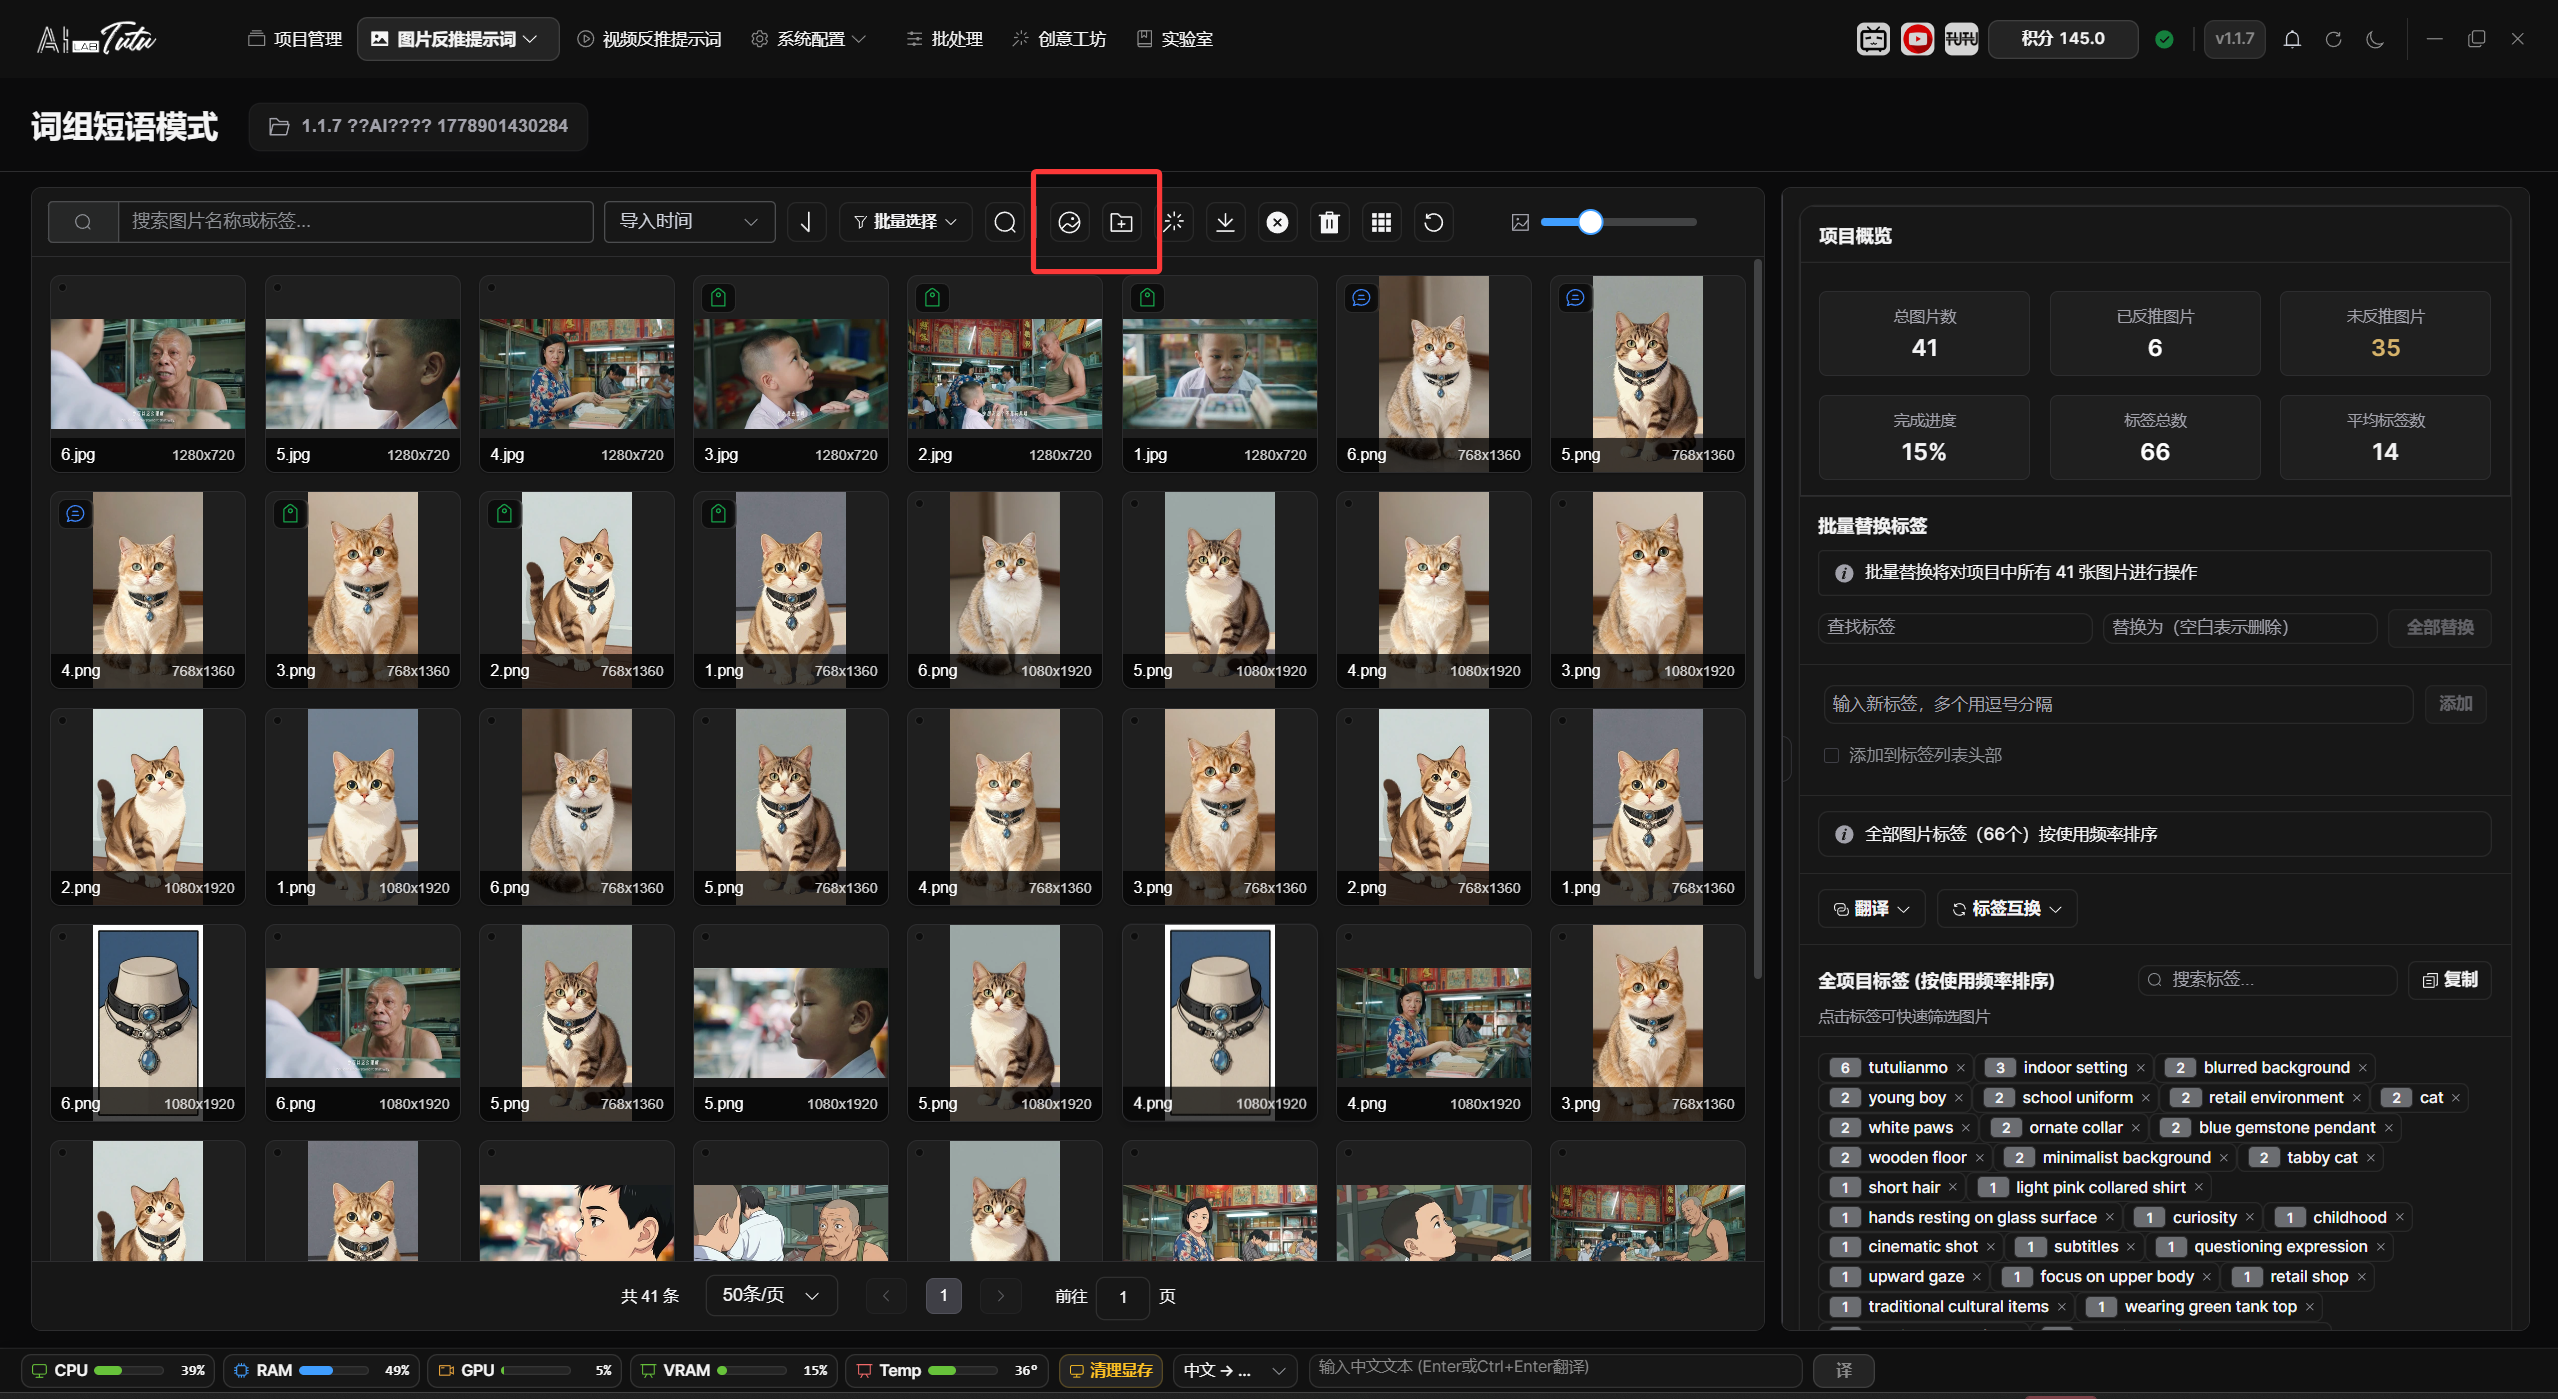
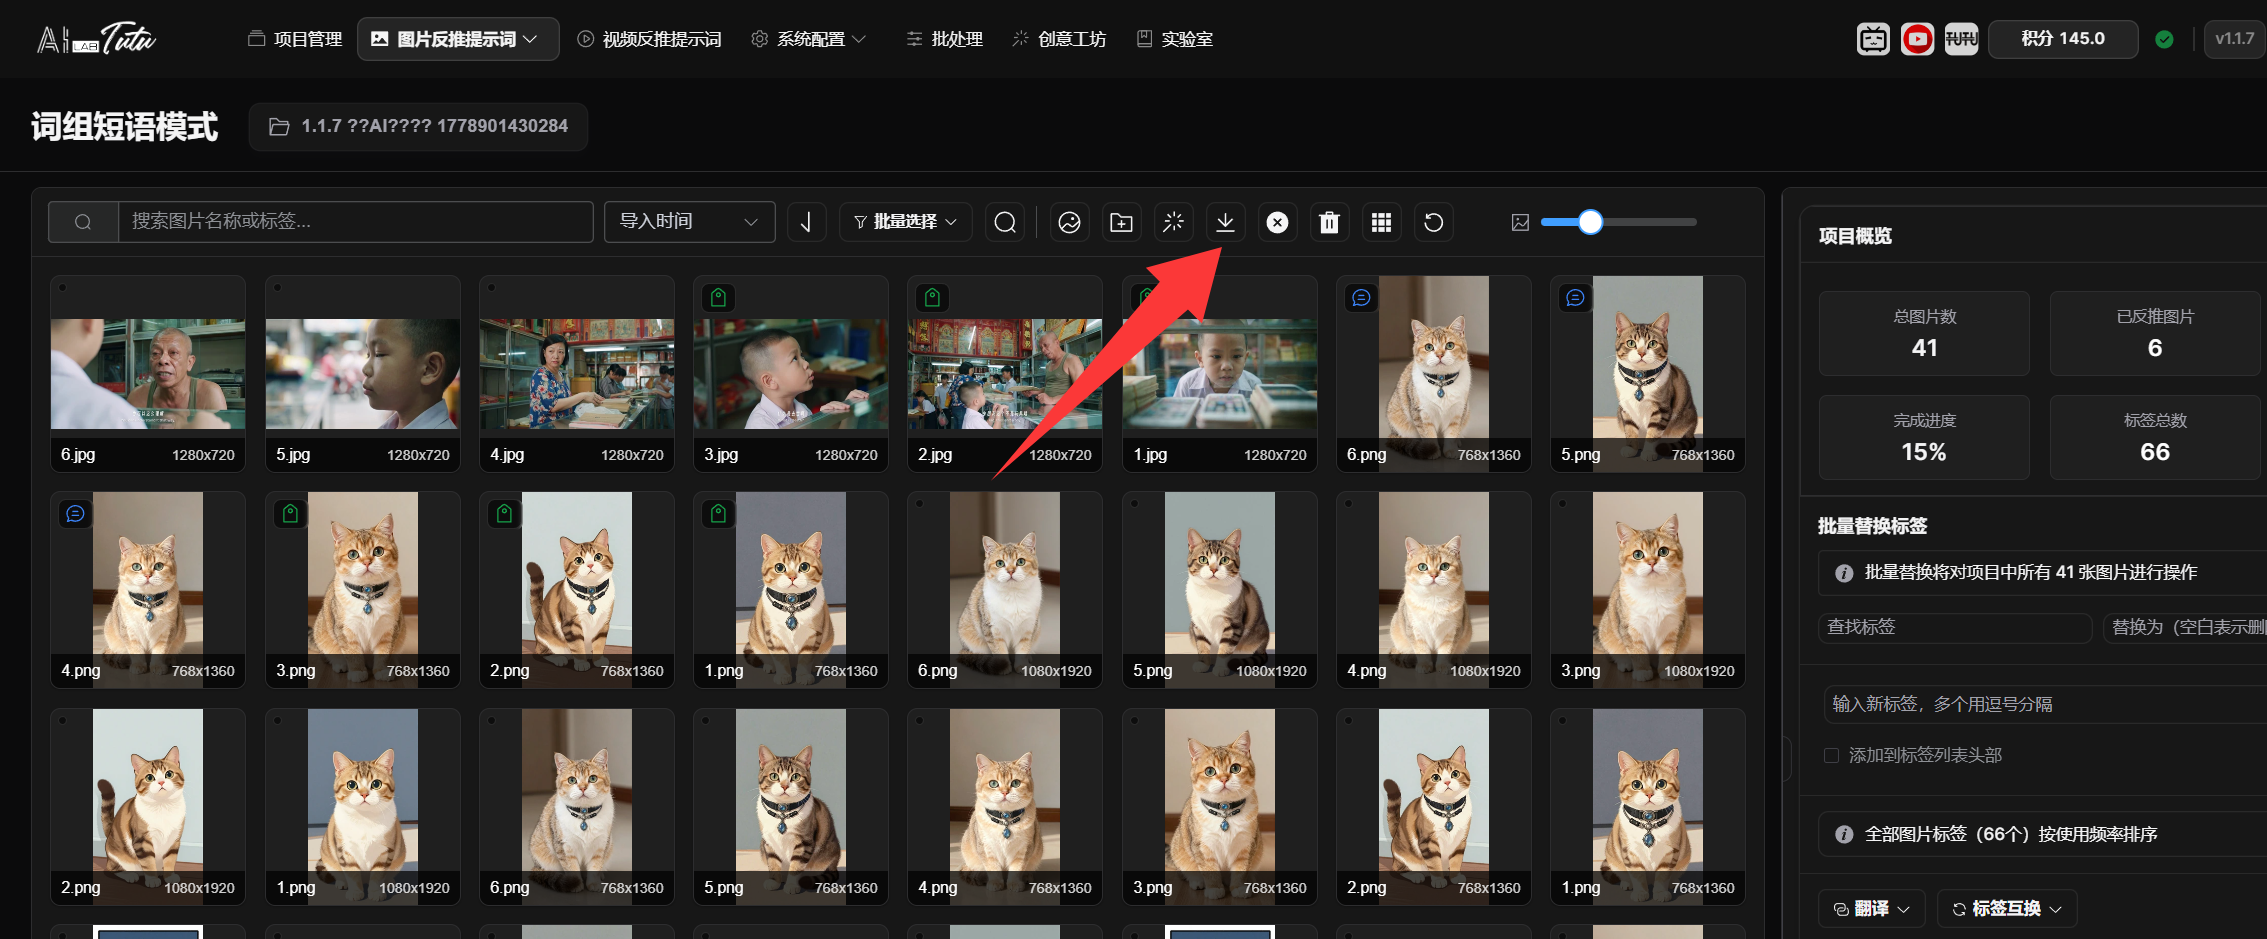
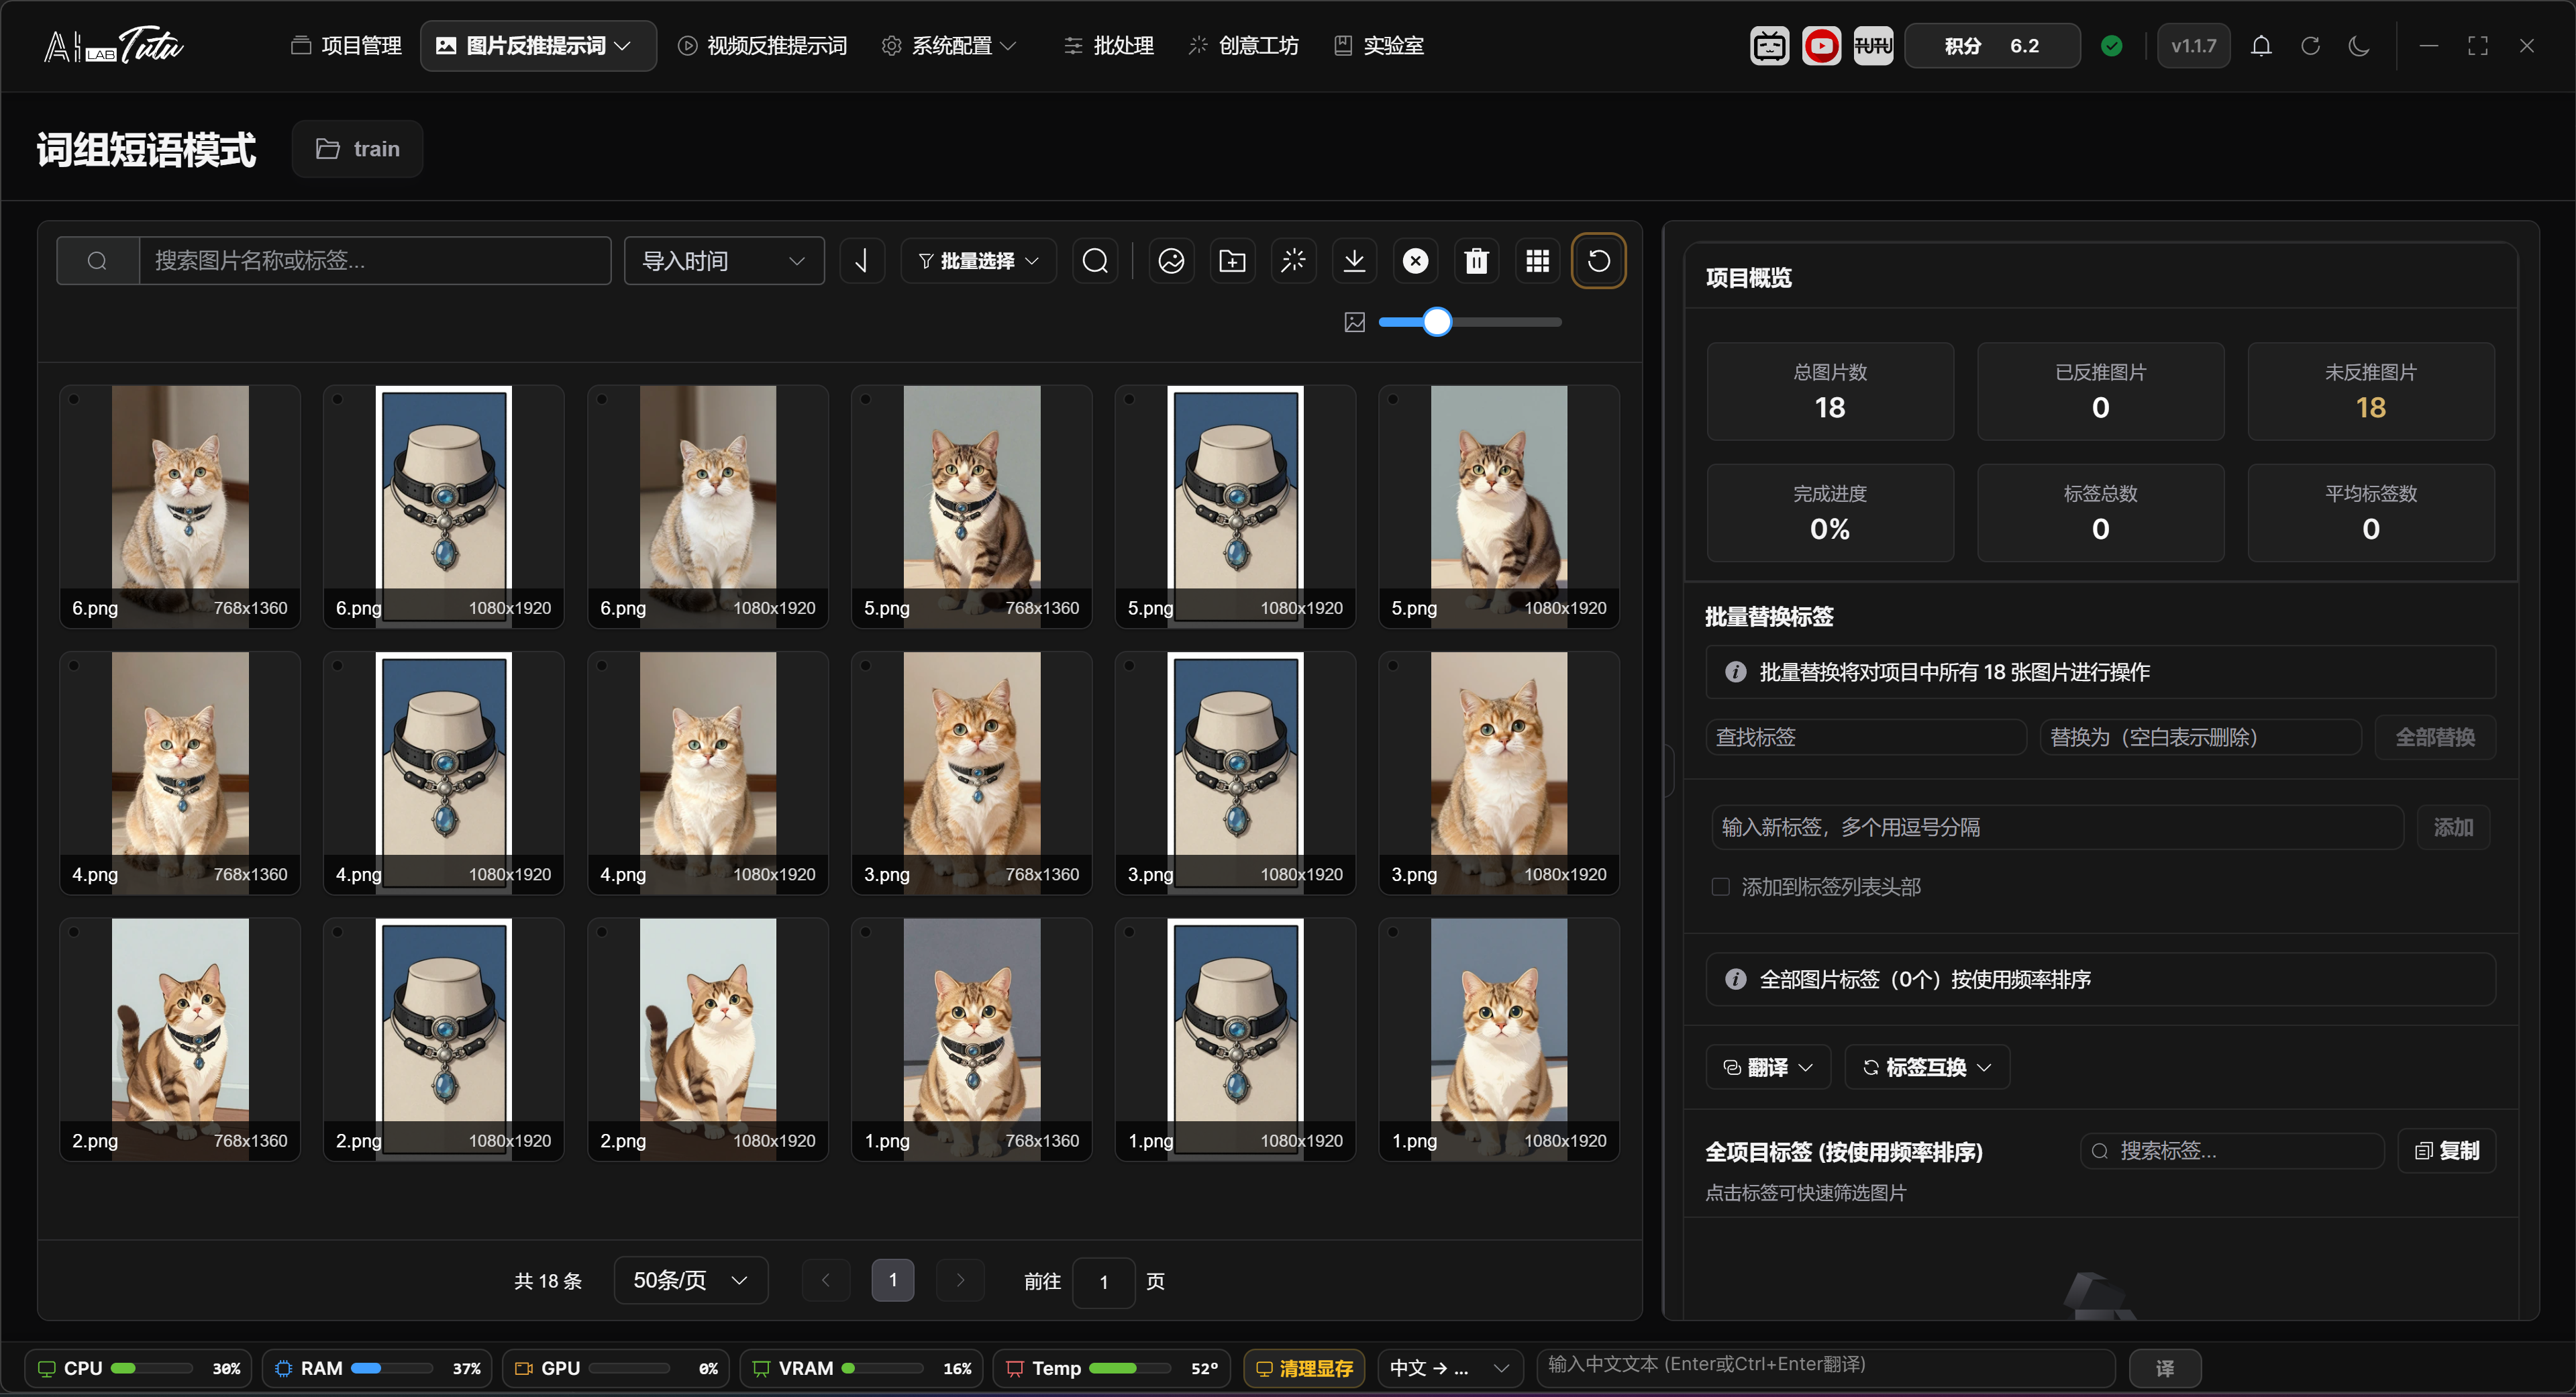
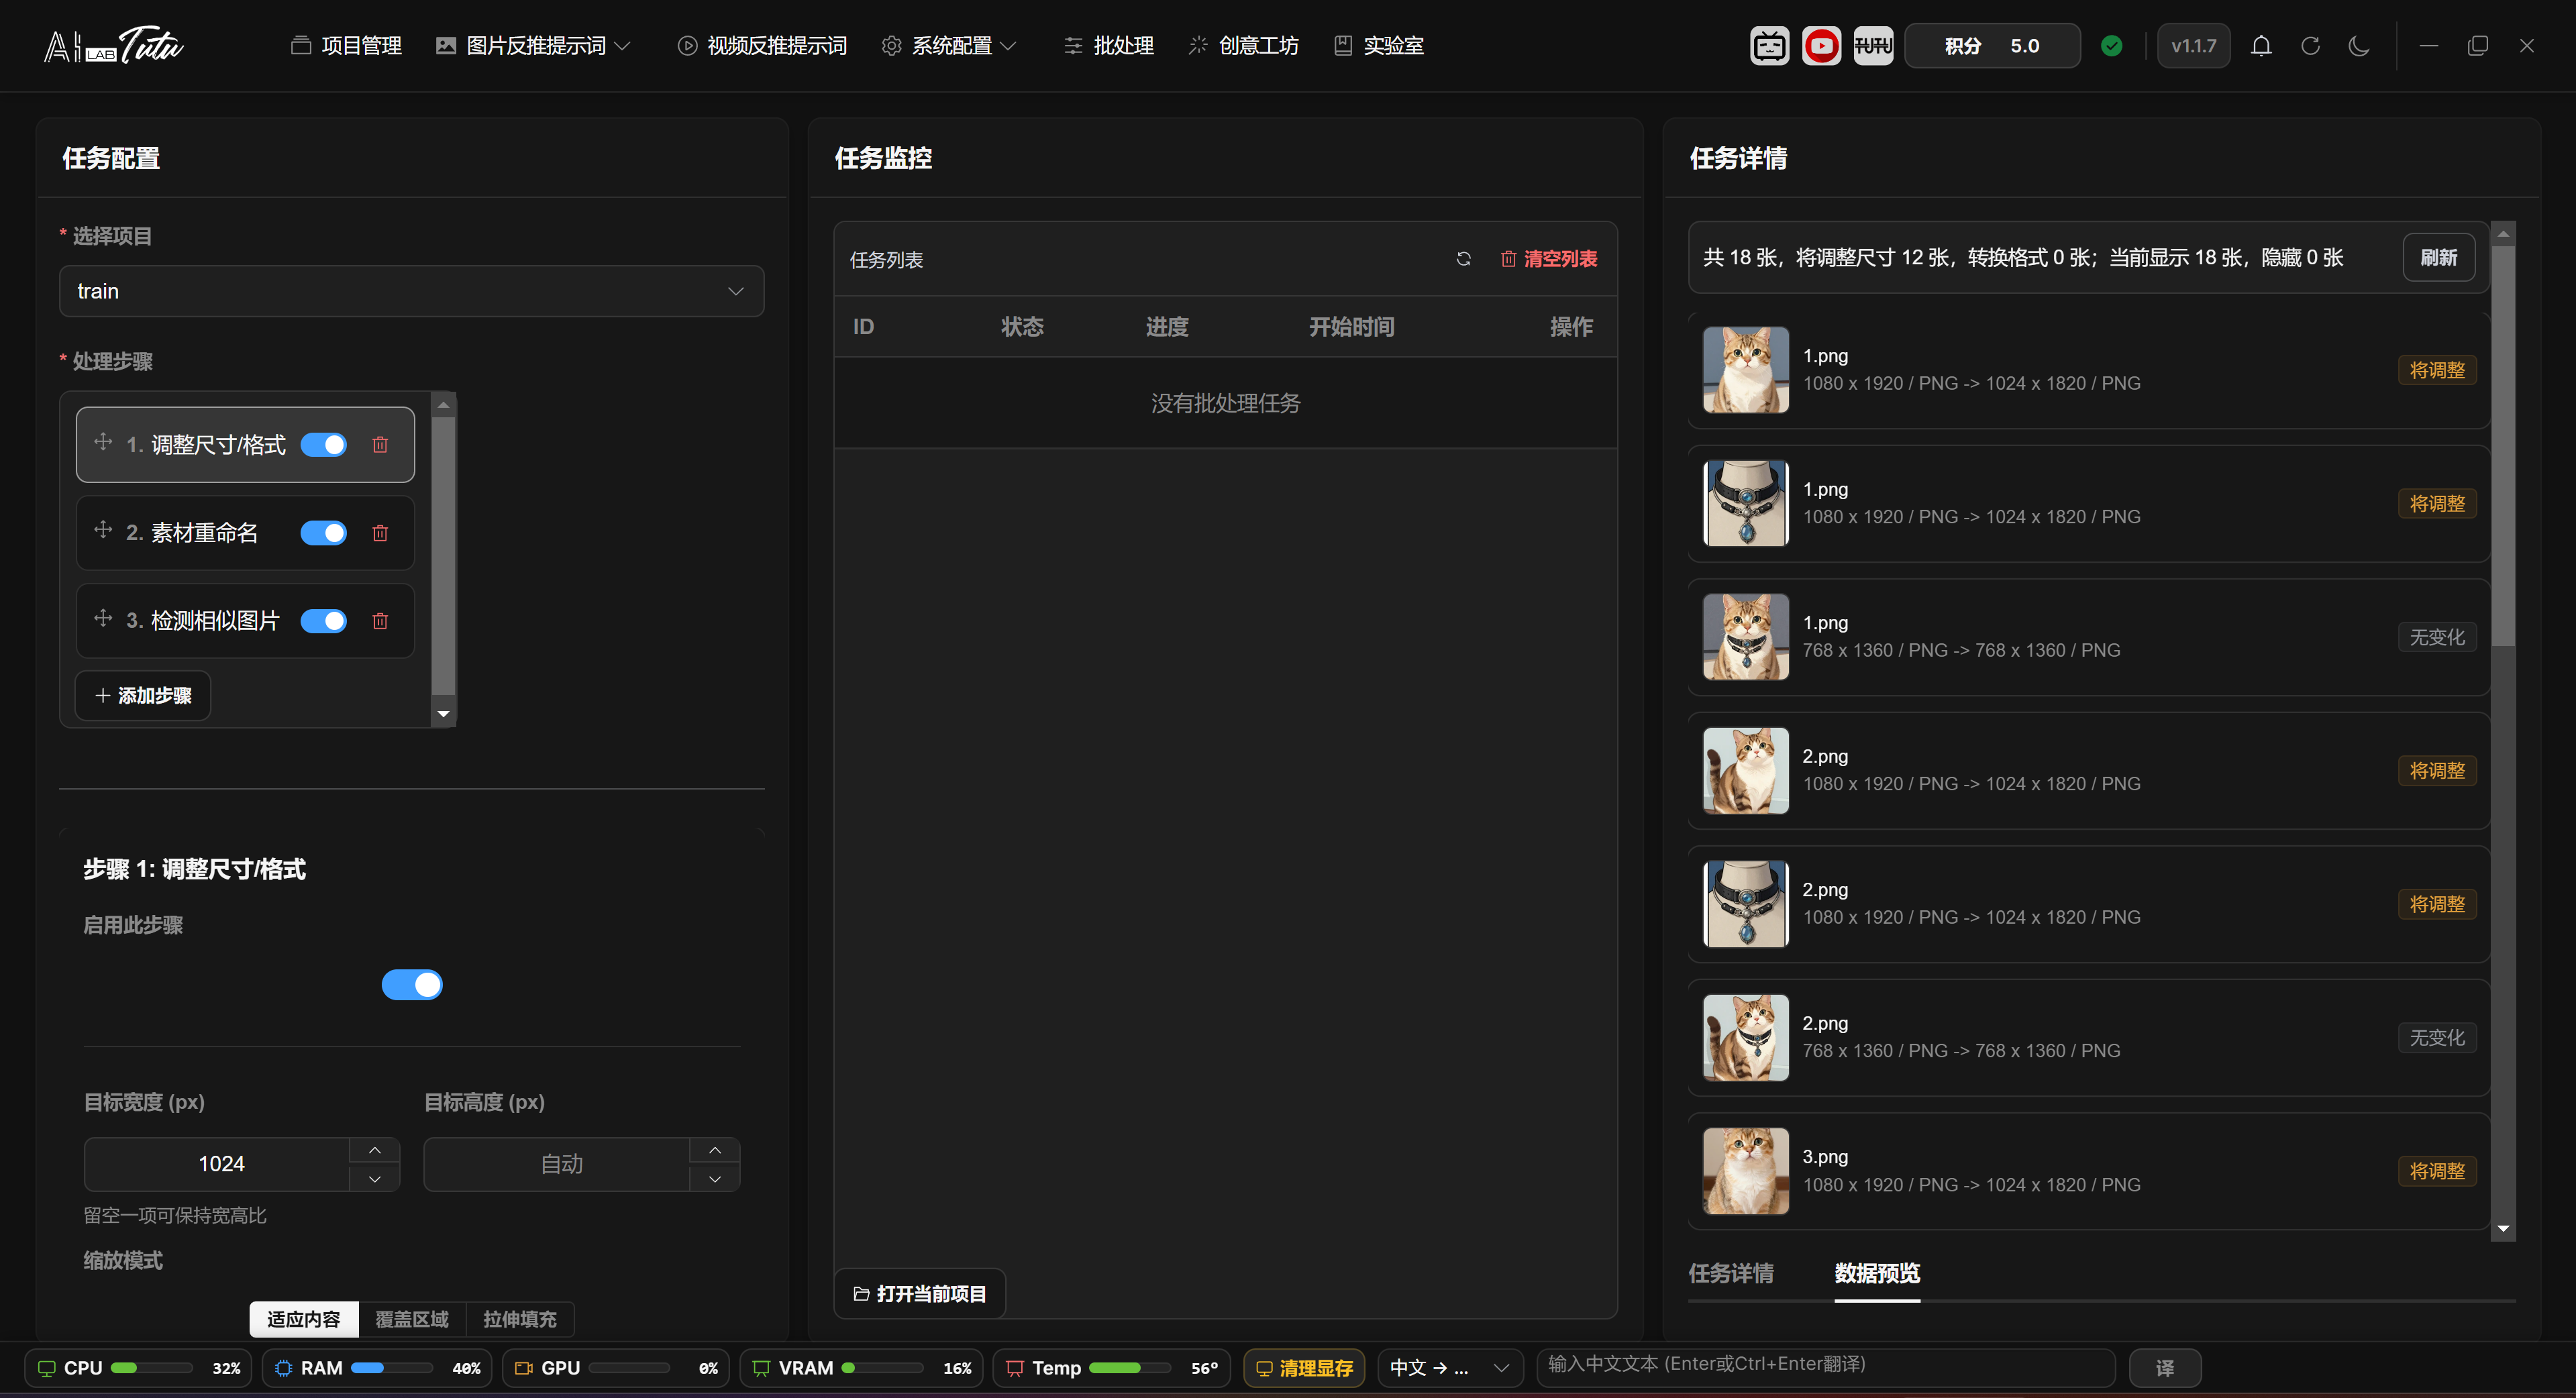
Prompt Phrase Mode is used to manage the image library and tag library. The common workflow is: select a project, enter Prompt Phrase Mode, import images, generate tags for one image or a batch of images, review the results, and export the dataset.
The page supports image search, sorting, pagination, thumbnail-size adjustment, single selection, multi-selection, batch selection, tag filtering, tag deletion, tag translation, and tag swapping.
When importing images, you can use the import button or drag images into the page in supported desktop environments. Before AI processing, large images automatically get temporary resized copies. This does not change the original images.
Prompt Phrase Mode main interface. You can import images, manage tags, filter materials, and adjust thumbnail size.
When generating tags with Smart Generate, the default AI uses account credits. If a task fails, credits are insufficient, or the returned result is abnormal, the app should not write a successful billing record.
Smart Generate tags dialog. The default AI generates prompt phrases for the selected range.
Before batch processing, always confirm the current range: selected images, current filtered results, or the whole project. The current version gives clearer range prompts, but it is still best to check once before running.
Prompt phrase generation result. After generation, check the image range and tag content.
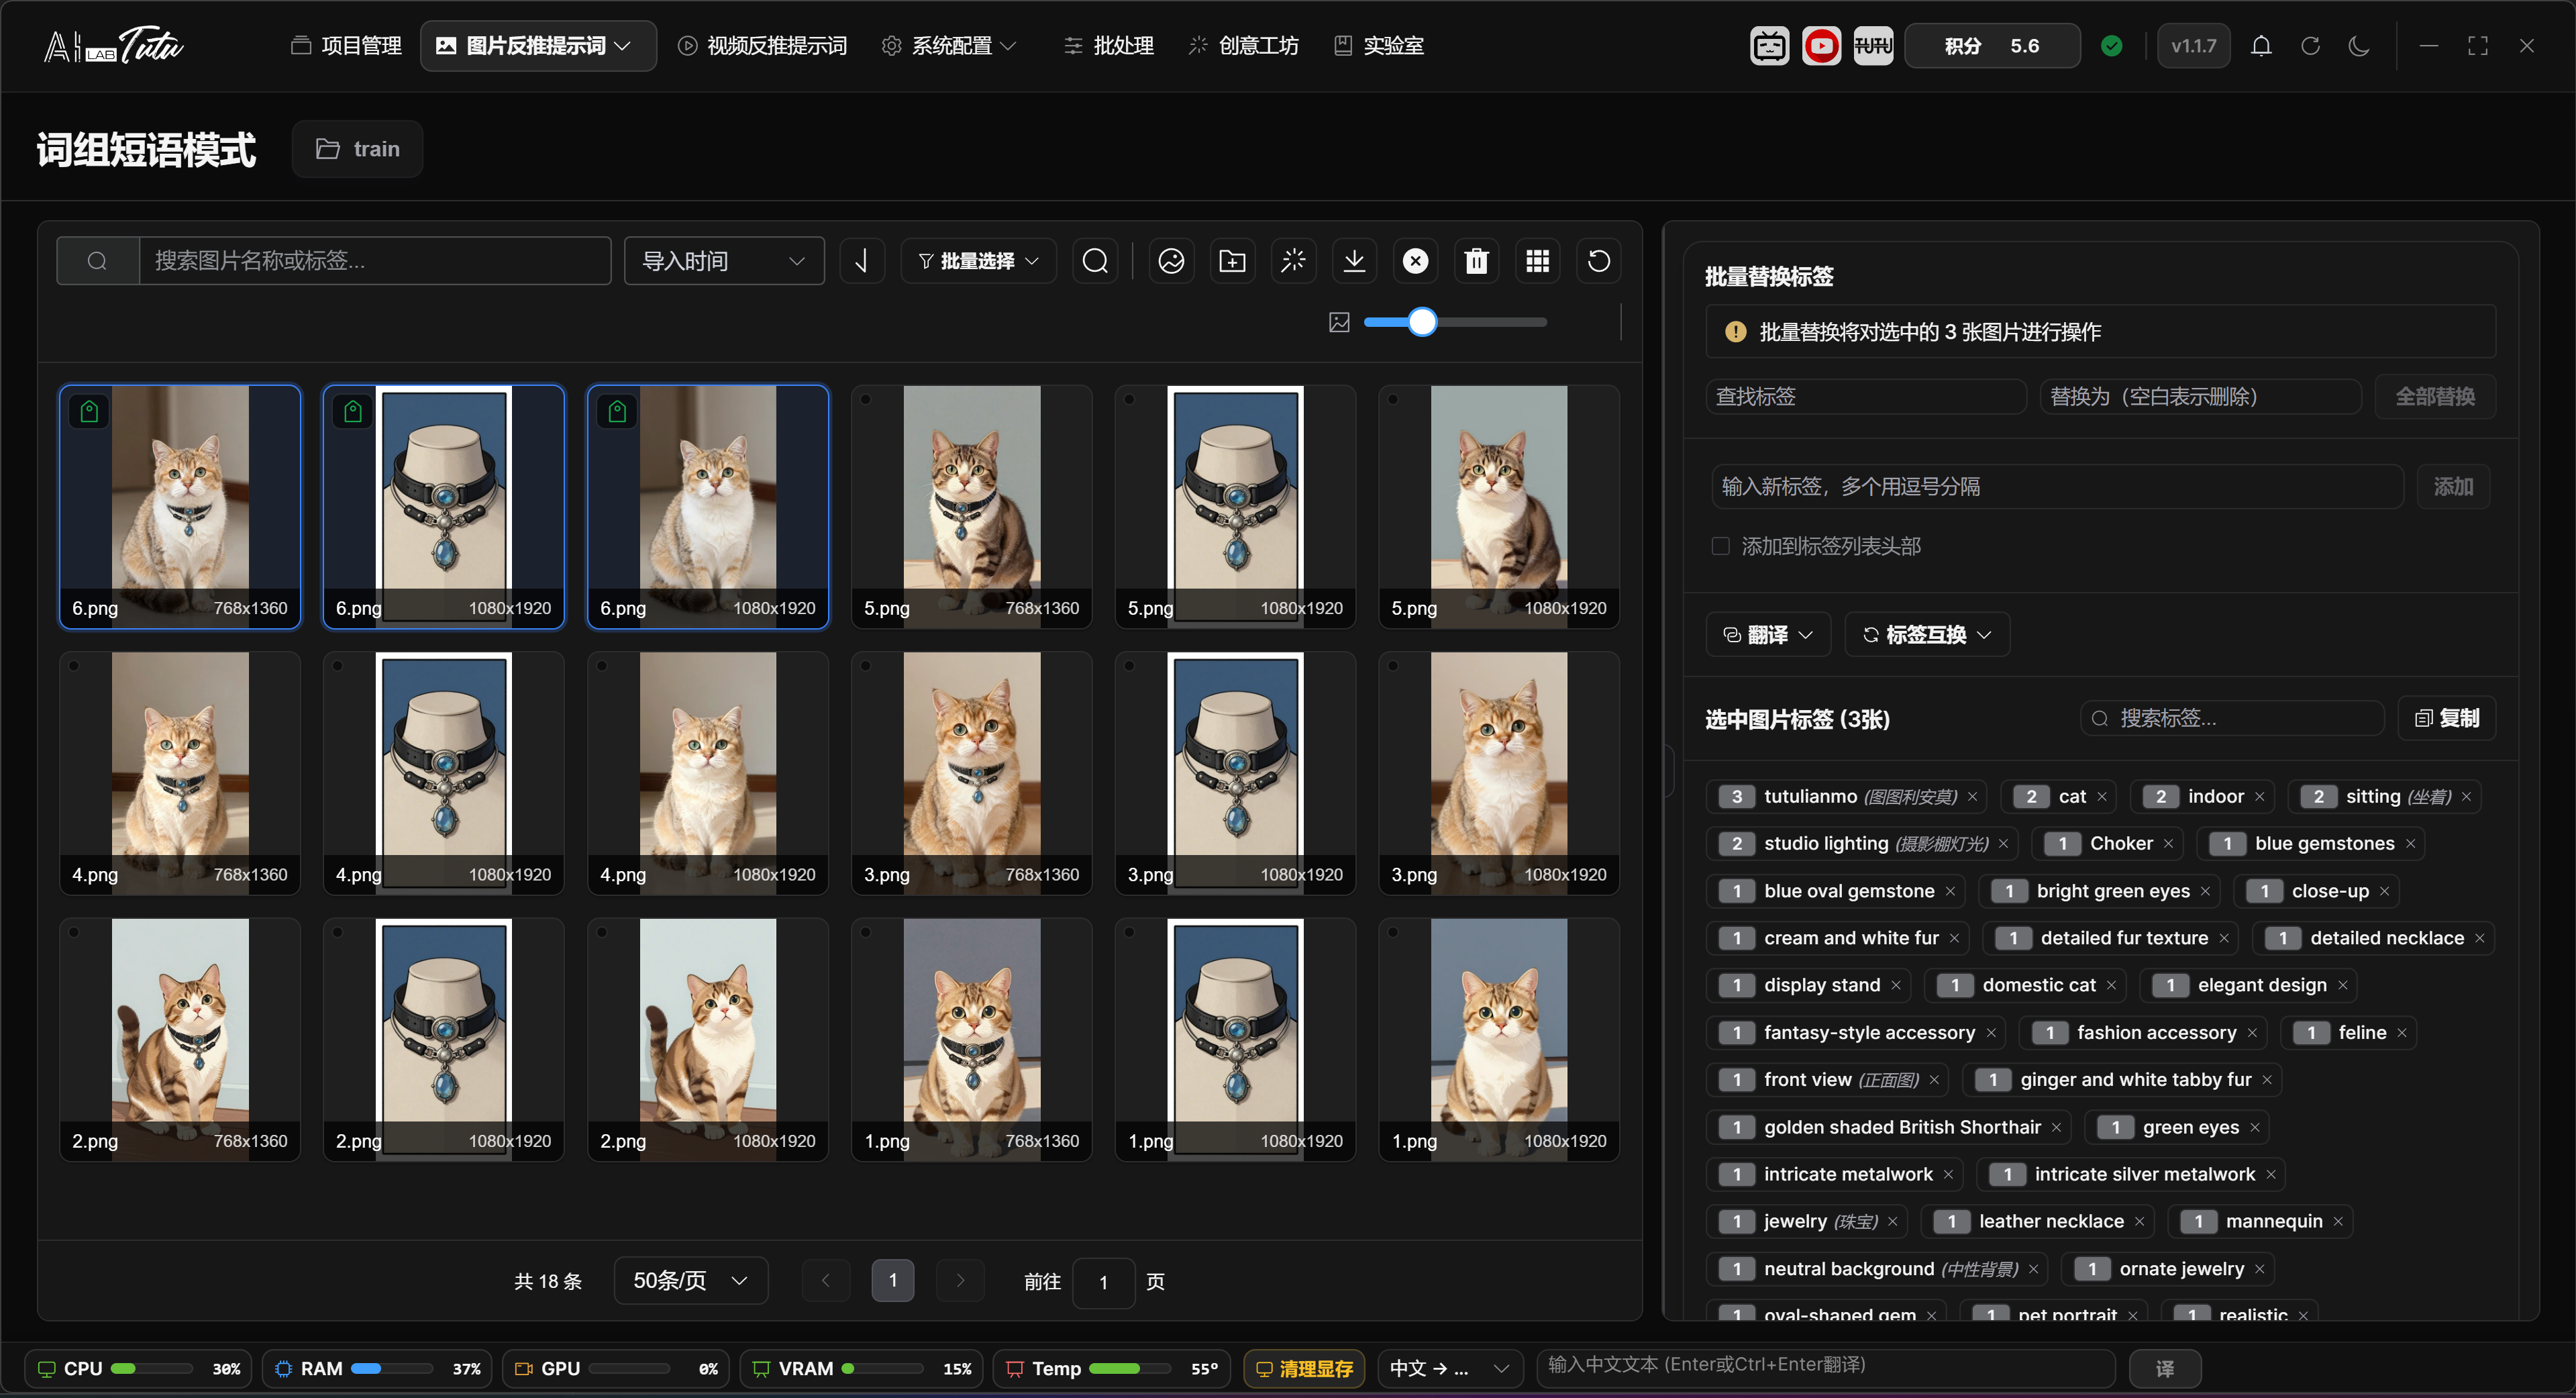
Image Grid, Selection, and Status Badges
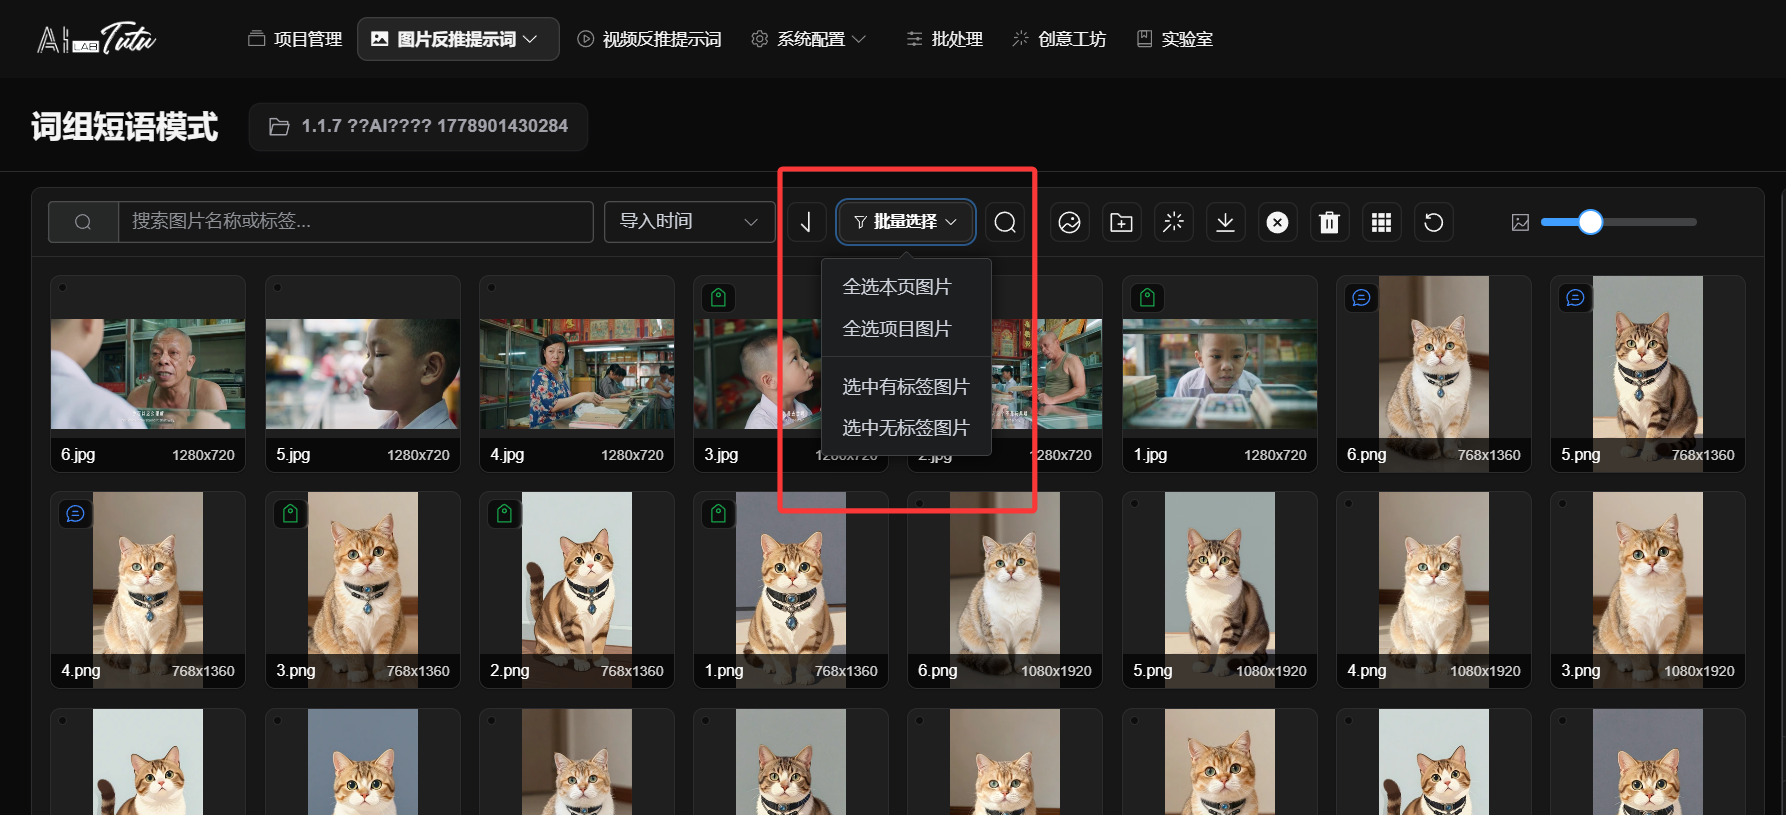
In Prompt Phrase Mode, the image grid on the left is used for browsing materials and selecting the processing range. At the top, you can search by file name, sort by import time, file name, or file size, change sort direction, select the current page or all project images, and choose only tagged or untagged images. The thumbnail-size slider changes the grid card size directly.
Image import supports multiple entry points: select image files, import a folder, drag images into the page, or paste screenshots or image files from the clipboard. Common formats such as png, jpg, jpeg, gif, webp, bmp, and svg are supported.
The badges in the upper-left corner of an image card help you quickly identify data status. A tag badge means prompt phrases have been generated or written. A description badge means the image already has a natural-language description. The duplicate marker in the upper-right corner means the image has been marked as duplicate material. The bottom of the card shows the file name and image dimensions.
Click an image to select it. Click the only currently selected image again to cancel the selection. Hold Ctrl and click to add or remove an image from the selection. Hold Shift and click to select a continuous range from the last selected image to the current image. You can also drag a selection box over empty space. Hold Ctrl while box-selecting to keep the previous selection.
Double-click an image to open a large preview for detail checking. Right-click an image to open the shortcut menu. Common actions include delete, copy, paste, select current page, select all project images, mark or unmark as duplicate, find similar images, and rename. Common shortcuts include Delete, Ctrl+C, Ctrl+V, and Ctrl+A.
Right-Side Tag Editor and Batch Range
The right-side area changes with the selection state. When no image is selected, it shows the project tag overview, tagged and untagged statistics, and the global tag library. When one image is selected, it shows file information, storage path, original path, pHash, and that image's tags. When multiple images are selected, it shows common tags shared by the selected images and batch-editing entries.
For a single image, tags can be added, deleted, reordered by dragging, or edited by clicking the tag. Right-click a tag to translate or delete it. When adding a new tag, enable Add to Beginning if you want the new tag inserted at the front of the tag list.
The global tag library supports search, copy, translation, and swapping. Click a tag to filter the image list to images that contain that tag. Close a tag to remove it from related images.
Before running batch replace, batch add, clear tags, or similar operations, read the range prompt shown on the page. The actual range is affected by the current tag filter first, and then by manually selected images. If no clear selection exists, the operation may apply to the current list or the whole project range. Before batch operations, use the top batch-selection buttons to make the target range explicit.
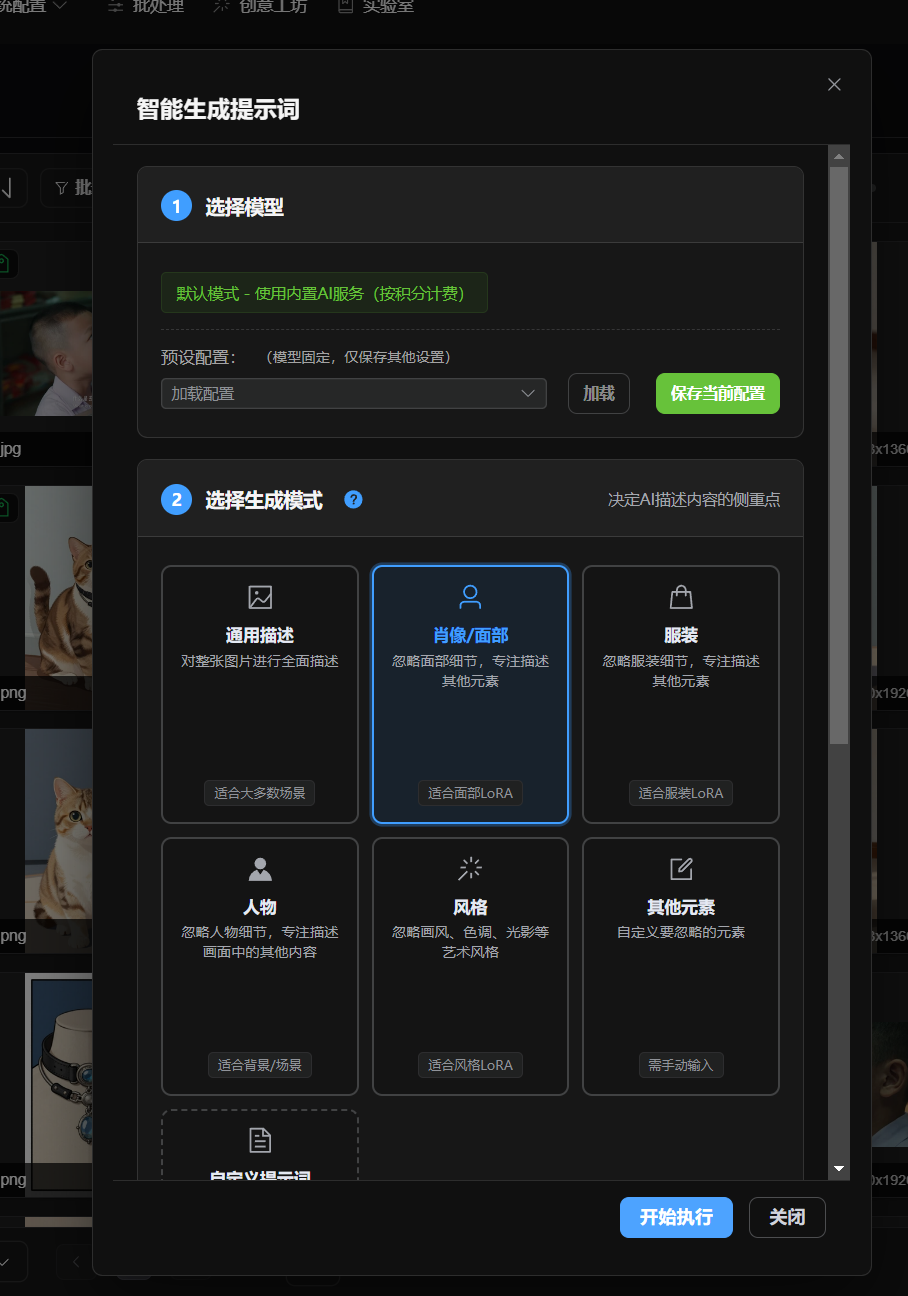
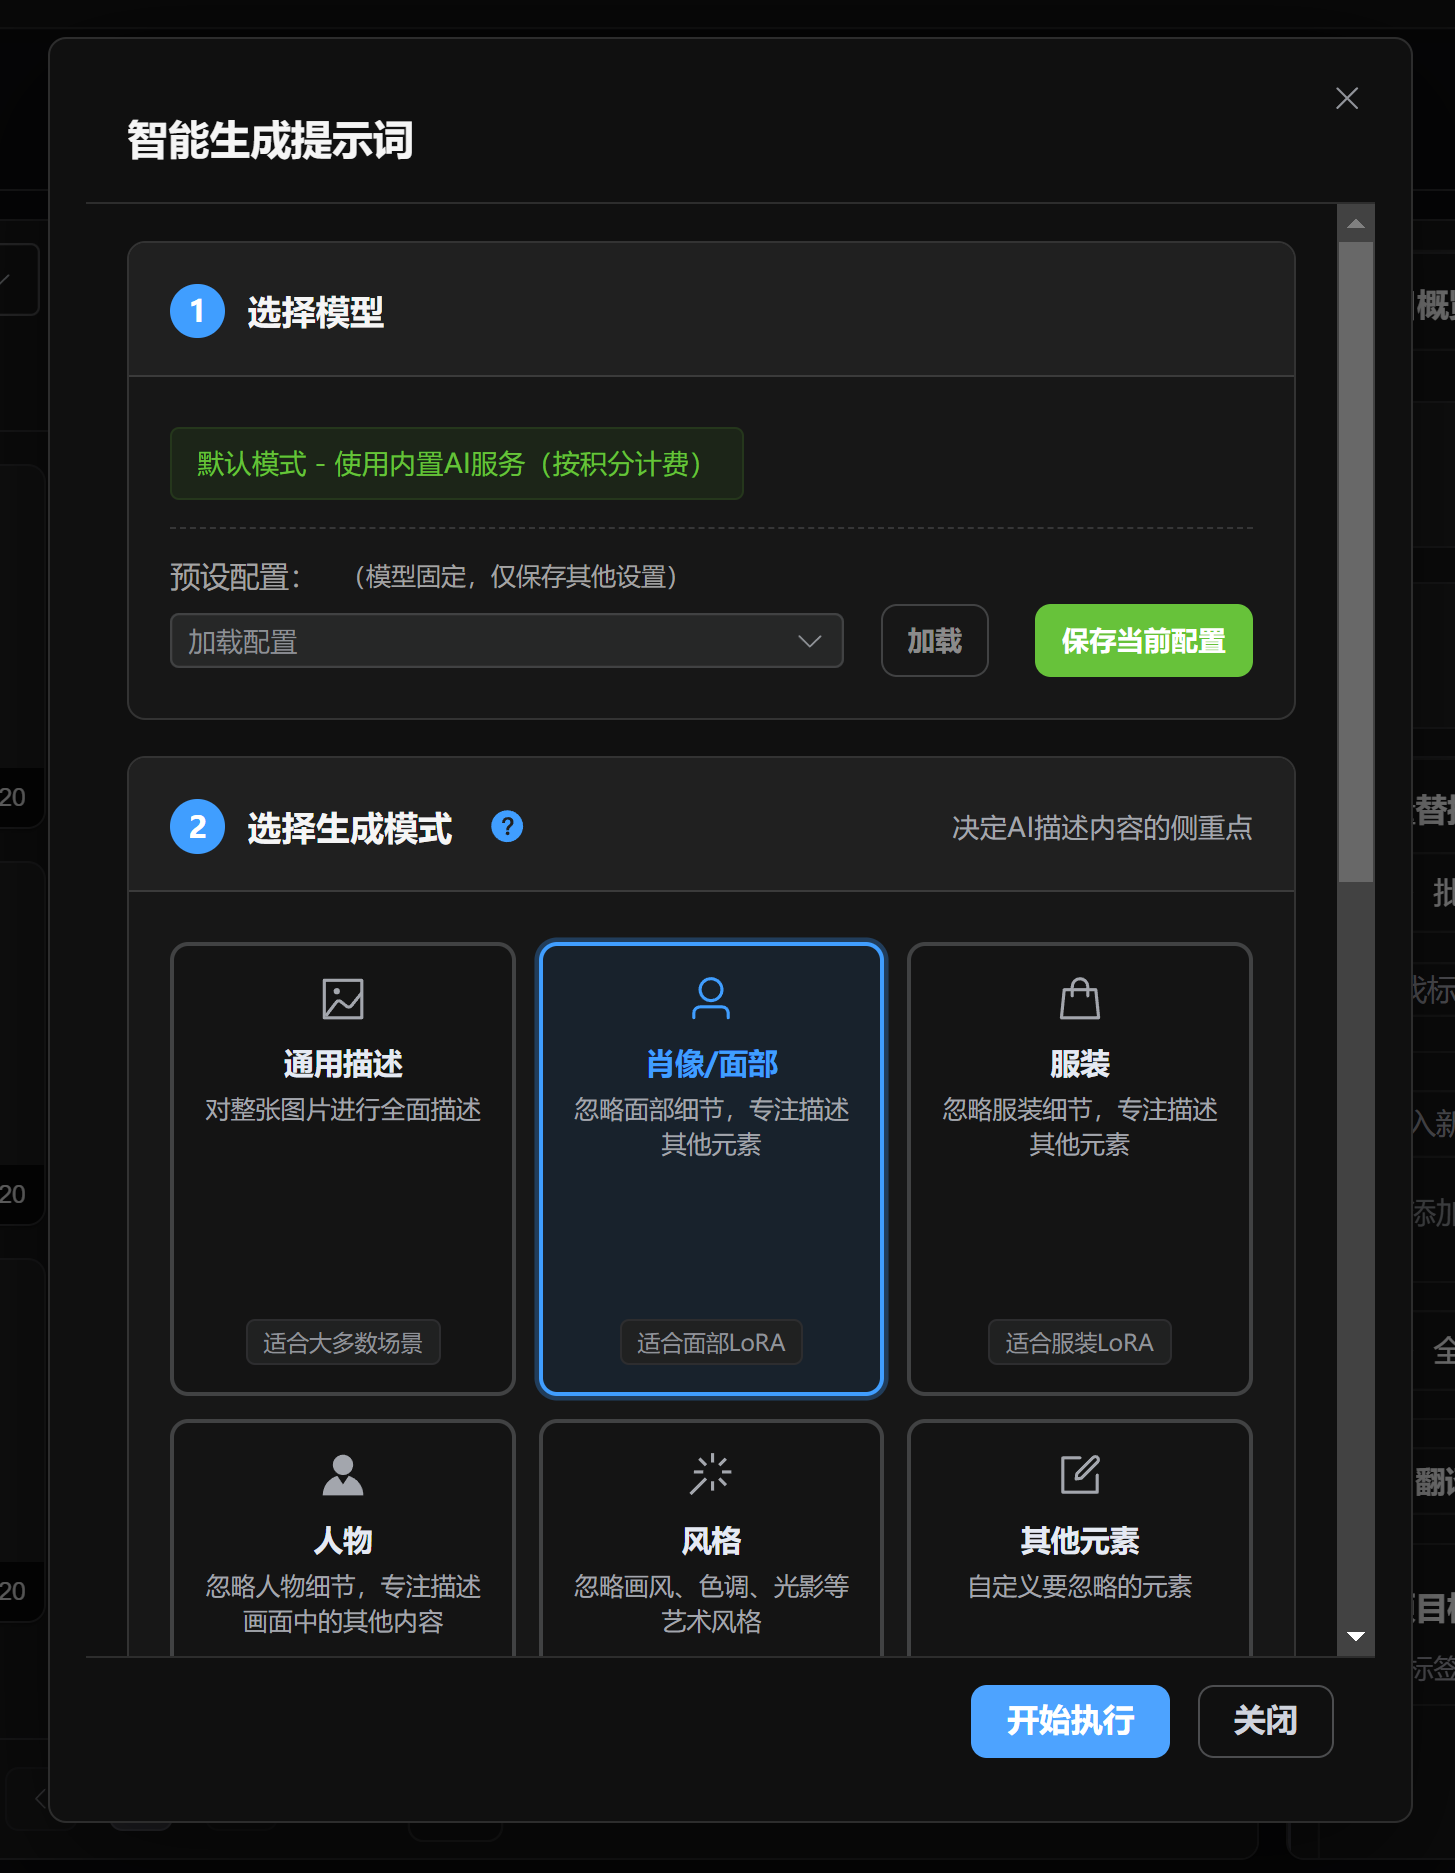
Smart Generate Tags Dialog
The Smart Generate dialog is organized by steps.
Step 1 selects the model. Regular users can use the default AI and do not need to configure an API key. Local or external model entries appear only in advanced mode.
Step 2 selects the generation focus. You can guide the reverse-prompt direction by choosing general description, face, clothing, character, visual style, other elements, or a custom prompt. When an element or style focus is selected, the app passes the corresponding keywords into the generation task.
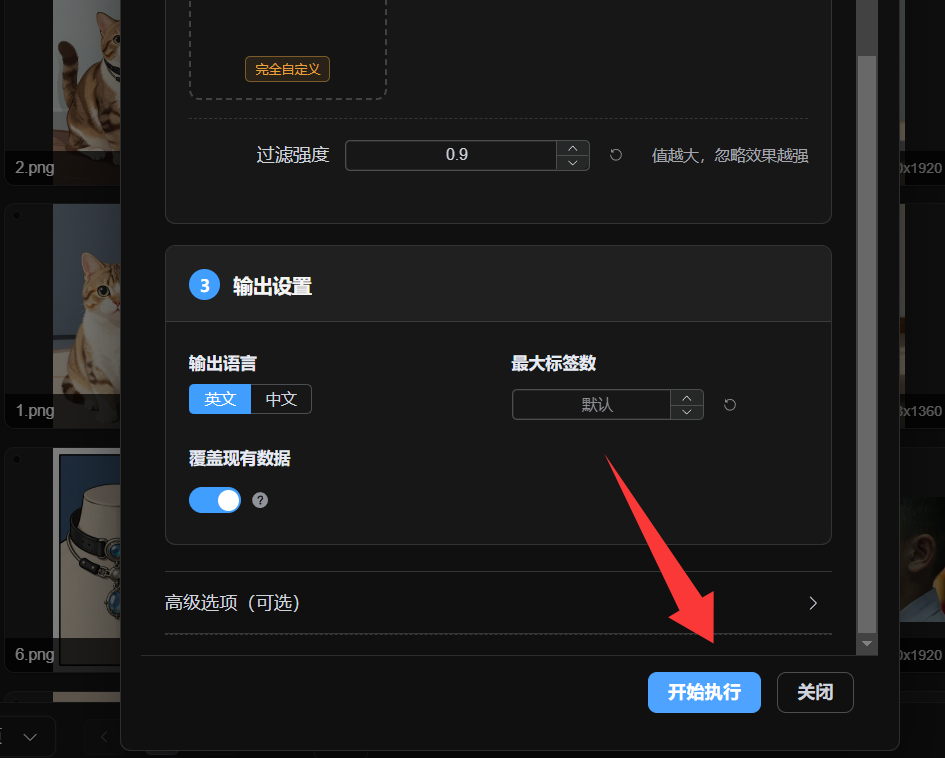
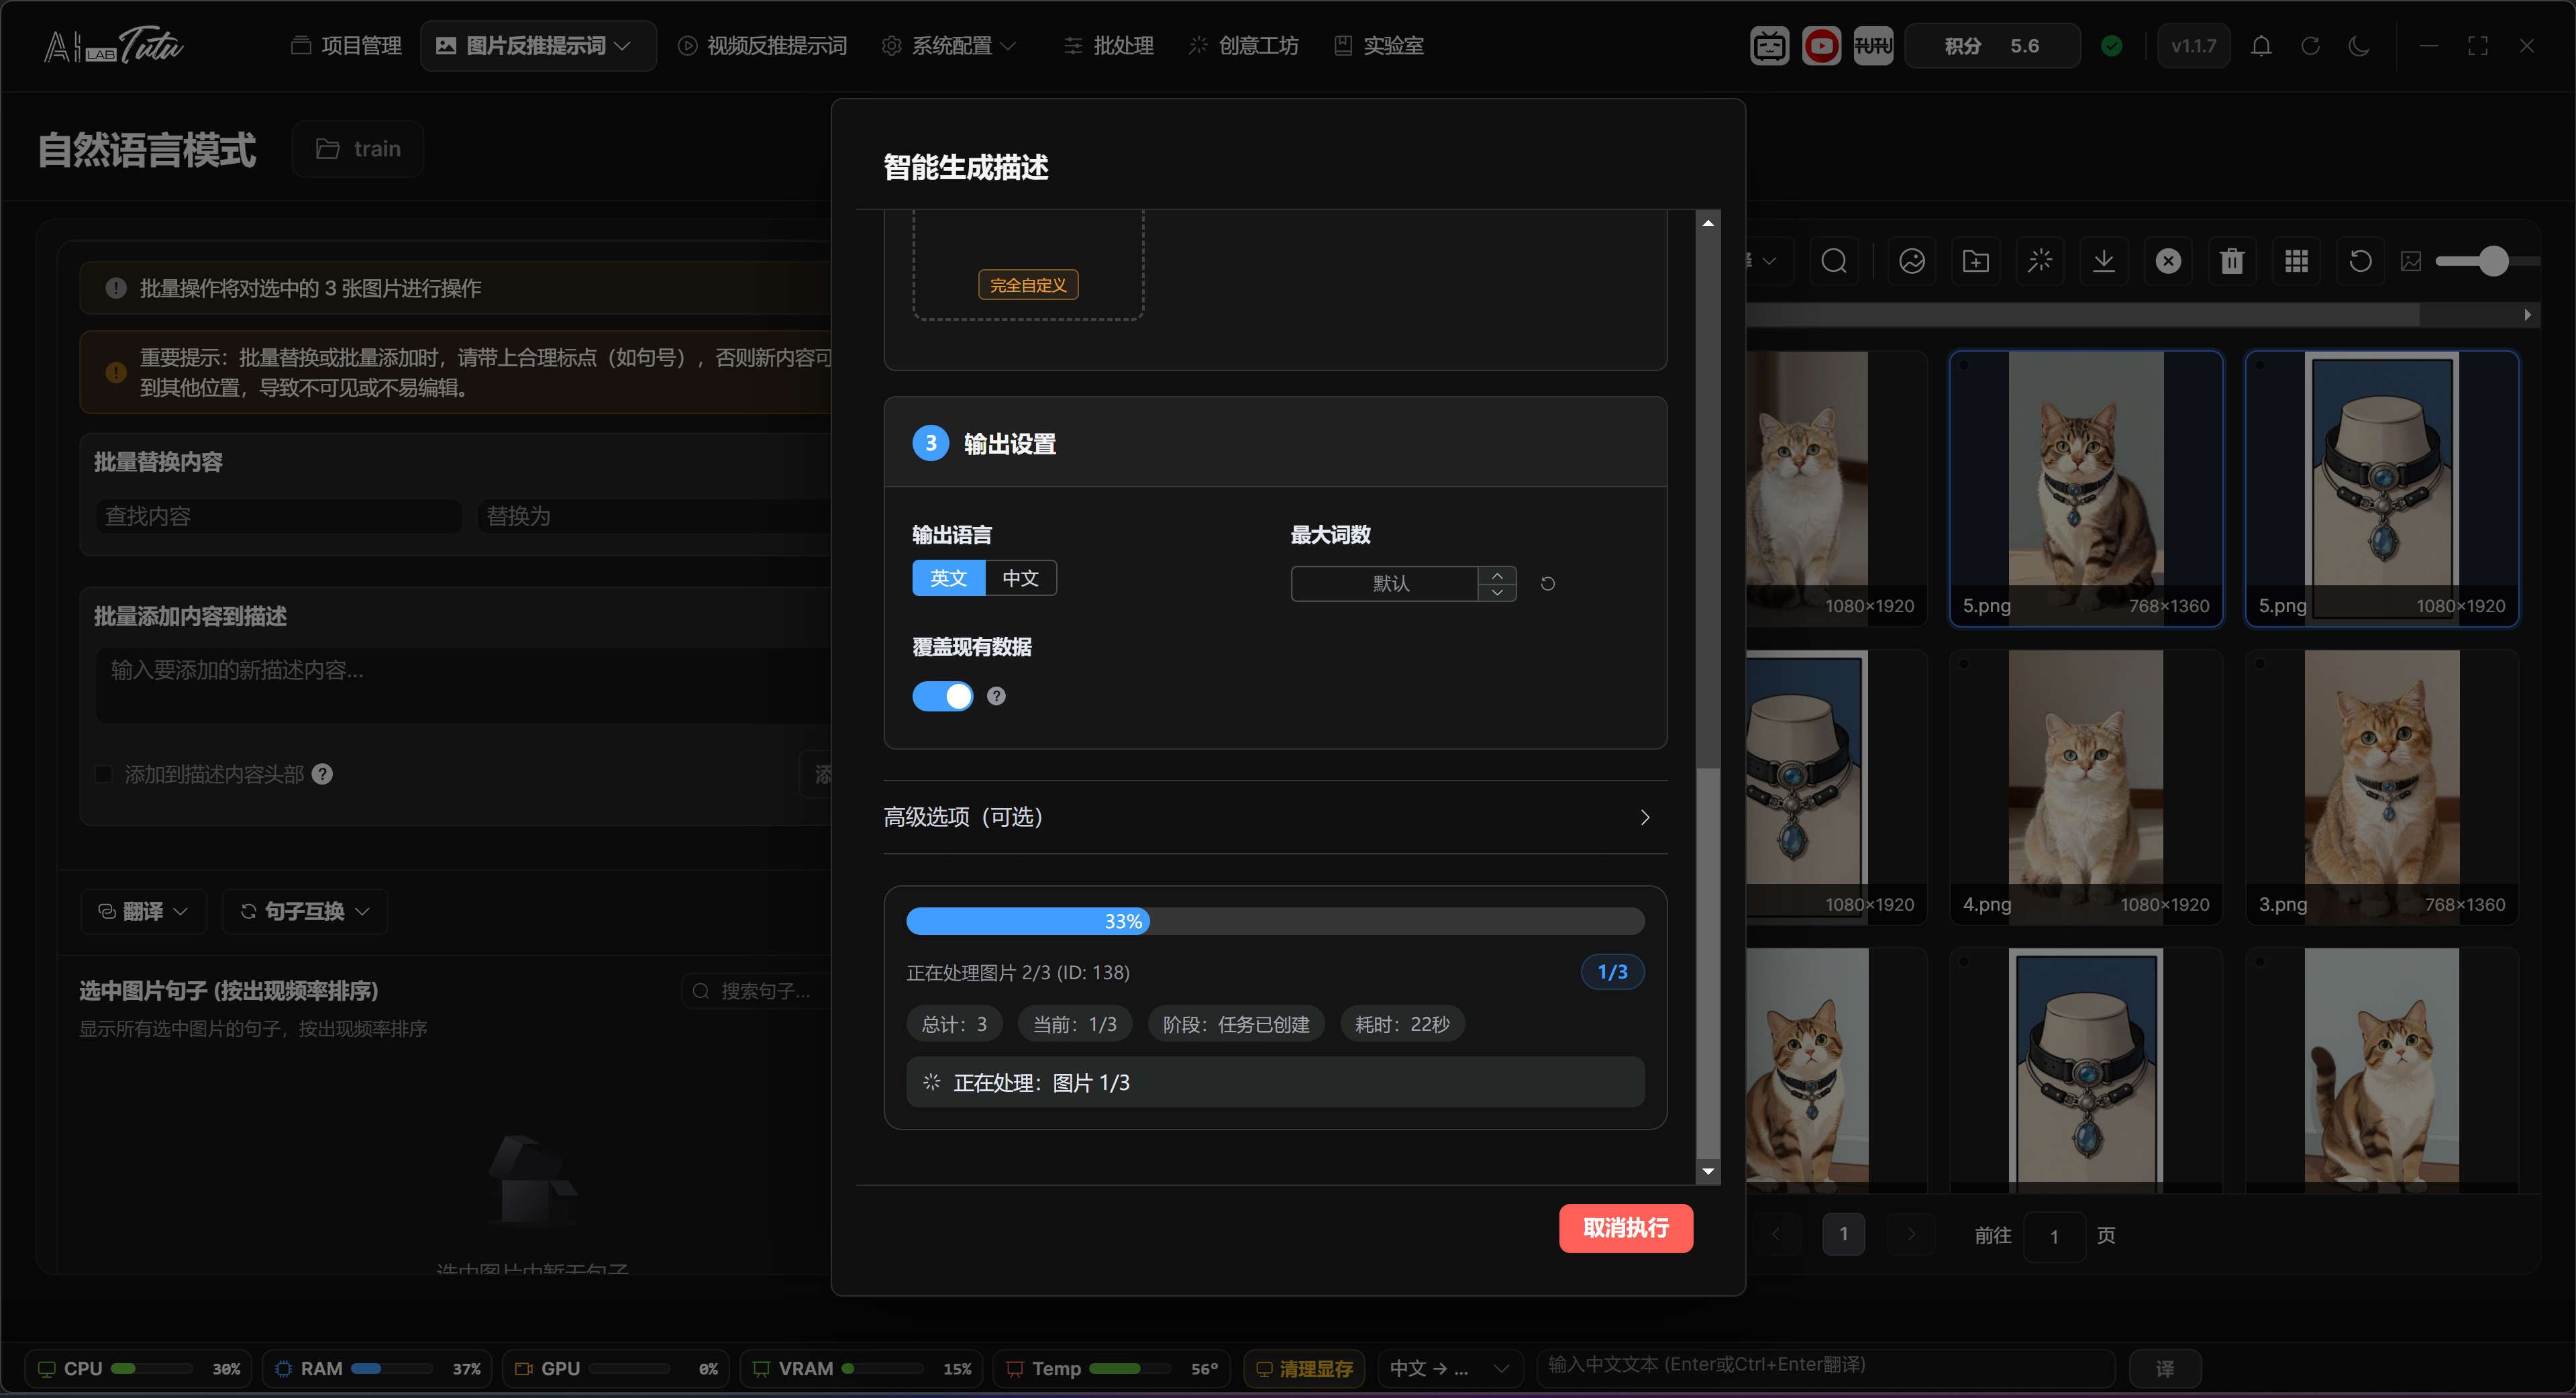
Step 3 configures output language, maximum tag count, whether to overwrite existing tags, and whether to revise based on existing data. Overwrite clears old tags first. Revision tries to preserve existing content while adding and improving tags.
Step 4 appears only when a local advanced model is available. It is used for local-model options such as person recognition, technical information, and content-control settings.
The generation range prioritizes selected images. If no image is selected, the app processes candidates from the current image list. To avoid accidental processing, before batch generation use Current Page, All Project, Tagged, Untagged, or similar buttons to make the range clear.
Natural Language Mode
Natural Language Mode generates complete descriptive sentences for single images. It is suitable for image-description training, image-text alignment, or dataset documentation.
To enter it, open the Image Prompt Reverse Captioning drop-down menu and choose Natural Language Mode. If there is no current project, the app prompts you to select a project first.
The left side of the page contains the natural-language description editor and sentence library. The right side contains the image list and filters.
Natural Language Mode main interface.
You can type descriptions manually or click Smart Generate to let the default AI generate full descriptions from the image.
Smart Generate descriptions dialog. The default AI can generate complete descriptive sentences for selected images.
After generation, you can edit, delete, translate, and reorder sentences one by one. You can also use the sentence library to filter images that contain a specific description sentence.
Natural-language description result. After generation, descriptions can be edited, translated, filtered, and exported.

When exporting, use the natural-language description dataset export entry. You can export all images or the selected range.
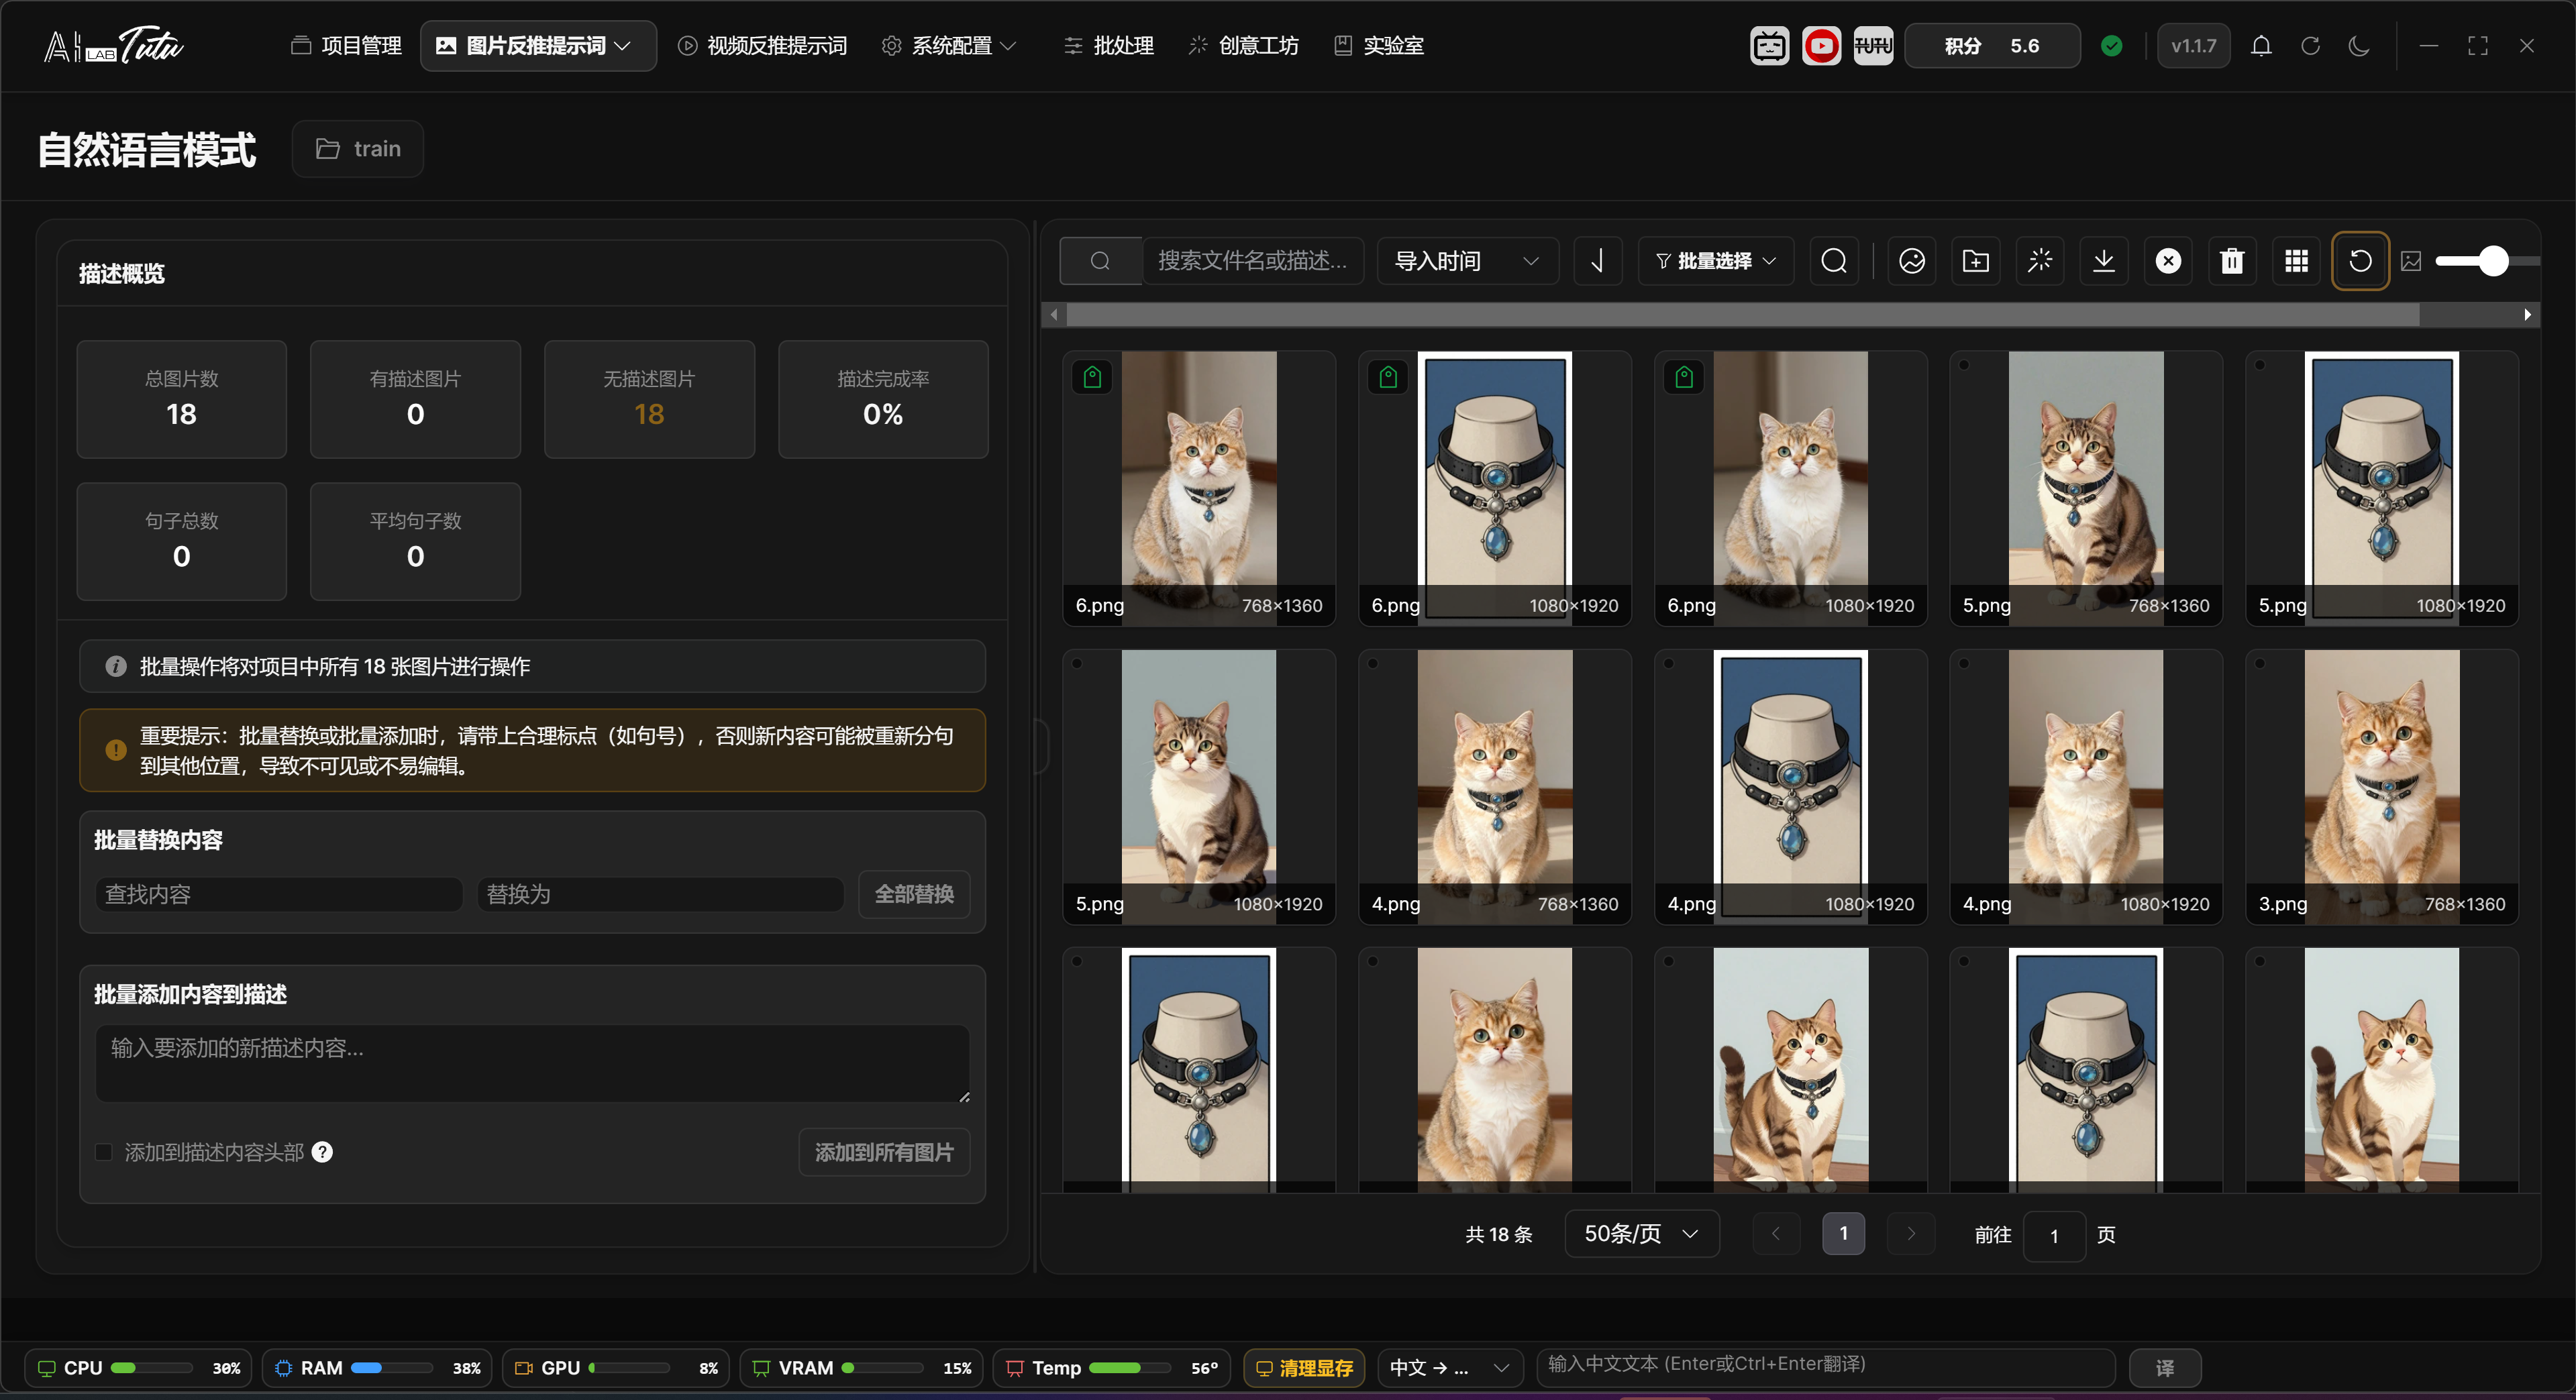
Natural Language Page Layout and Selection
In the current interface, the left side of Natural Language Mode contains the description editor and sentence library, while the right side contains the image grid. The center divider can be dragged left or right. The page also provides a layout reset entry, which helps you adjust space between viewing images and editing descriptions.
The image grid on the right uses the same selection logic as Prompt Phrase Mode: click for single selection, Ctrl-click to add or remove, Shift-click for range selection, drag over empty space for box selection, and double-click for large preview. Search, sorting, pagination, and thumbnail-size adjustment are also handled on this side.
When one image is selected, the left side shows that image's information and natural-language description input box. You can type or edit the description manually, then click Save. Description length is limited, so overly long descriptions should be compressed and cleaned up first.
When multiple images are selected, or when no image is selected, the left side switches to batch editing and sentence-library views. Clear description, batch replace, batch add, and similar operations run according to the current selection or filter range. Confirm the range prompt before executing.
Sentence Library, Filtering, and Batch Editing
When no image is selected, the page shows a project description overview, including total image count, described image count, undescribed image count, completion rate, total sentence count, and average sentence count. The sentence library below summarizes description sentences that already appear in the project.
Click a sentence in the sentence library to filter images that contain that sentence. When editing a sentence, the app synchronizes the replacement inside the current affected range. If you only want to change a small number of images, select those target images before editing.
Sentences can be translated individually into English, translated into Chinese, or cleared from translation state. The whole description also supports batch translation and sentence swapping. Translation, swapping, and batch replacement may affect many images, so confirm the current filter and selection state before running them.
Batch add description can insert content at the beginning or end of descriptions. The page warns about punctuation and sentence-splitting risk. Before batch adding to many images, test on a small sample first and confirm that sentence boundaries look correct.
When generating descriptions with Smart Generate, the dialog enters natural-language output mode by default. You can set language, maximum word count, whether to overwrite old descriptions, and whether to revise based on old descriptions. Selected images are prioritized. If no image is selected, the app processes candidates from the current image list.
Reference Reverse Captioning
Reference Reverse Captioning manages the relationship between source images and result images. It is suitable for datasets that describe before-and-after image editing, style transfer, local modifications, or similar transformations.
To enter it, open the Image Prompt Reverse Captioning drop-down menu and choose Reference Reverse Captioning.
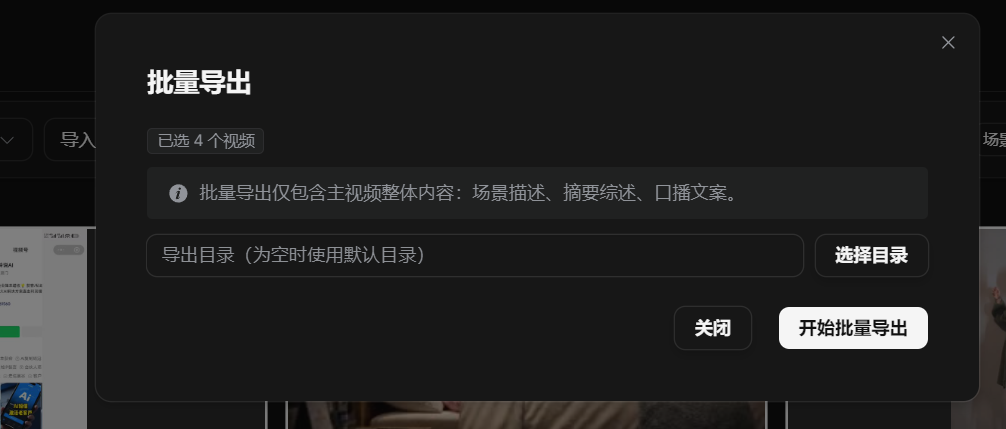
The page is centered on image pairs: import source images, import result images, pair them, check missing images, generate change descriptions, batch rename, and export the dataset. Up to 10 source images can correspond to 1 result image.
Reference Reverse Captioning. Source and result images are displayed as pairs for change-description generation.
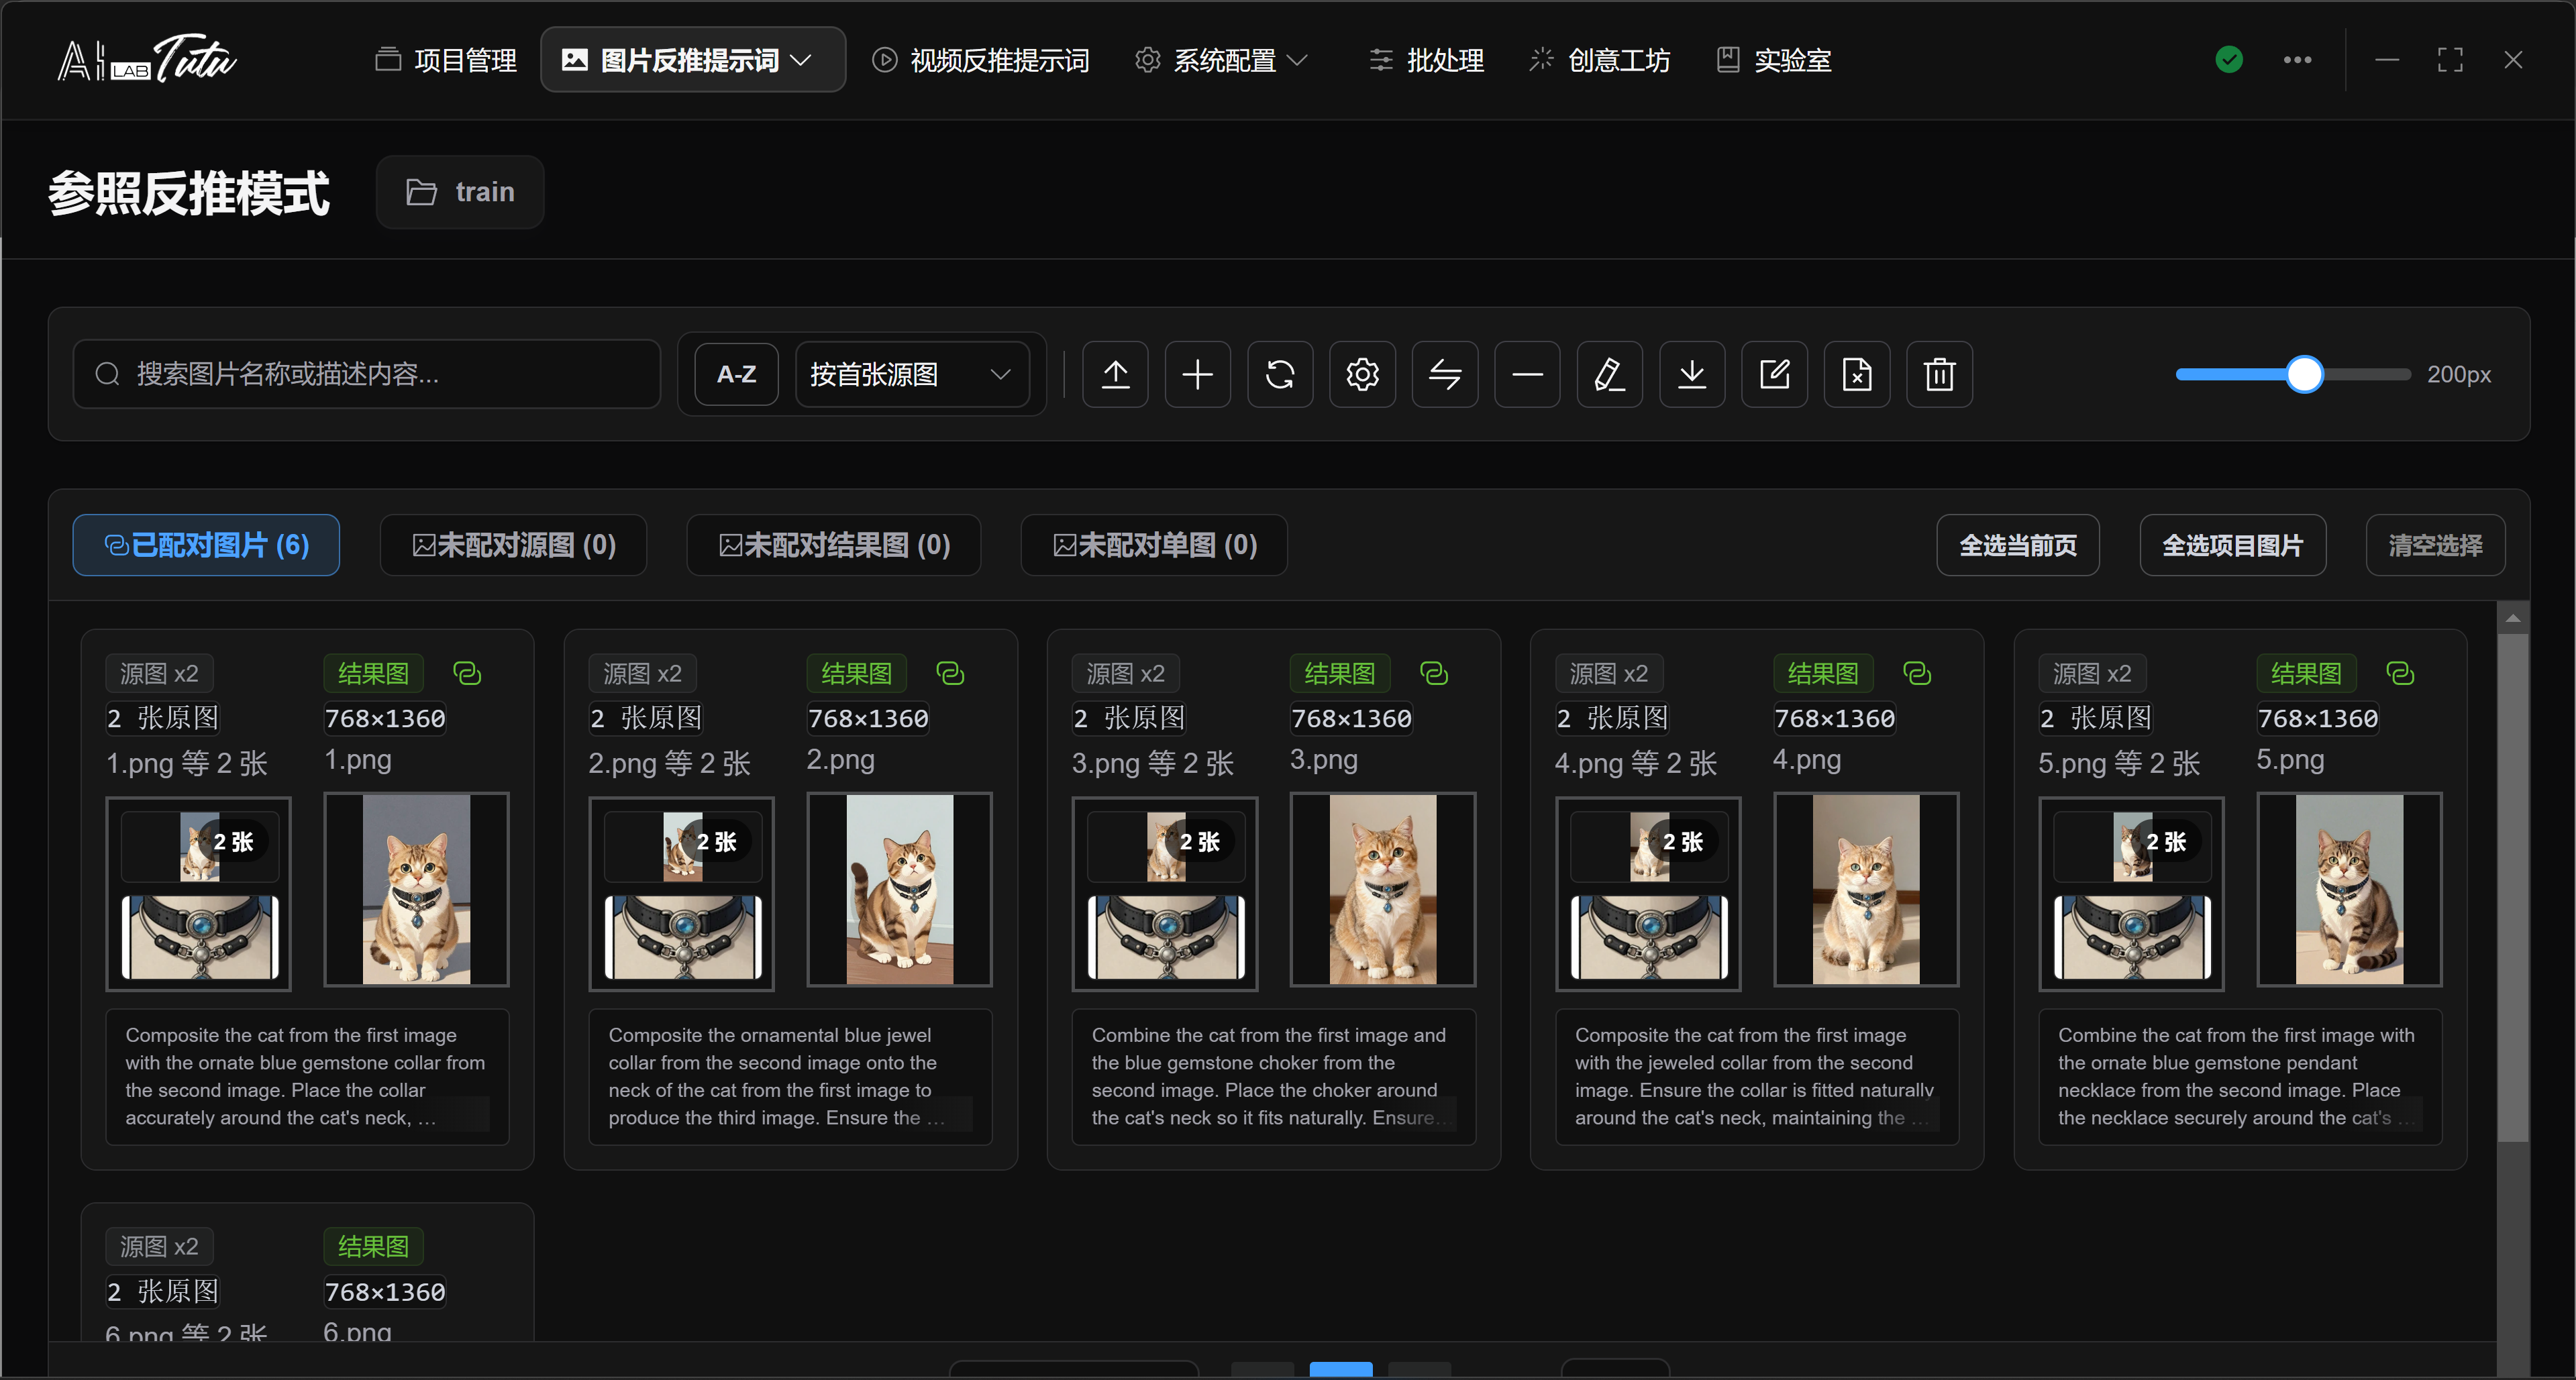
When AI generates a paired description, the default AI considers both images and describes the subject, composition, style, local changes, and final differences.
If an image pair is missing either the source image or result image, complete the pair before generating descriptions or exporting. Otherwise the result will be incomplete.
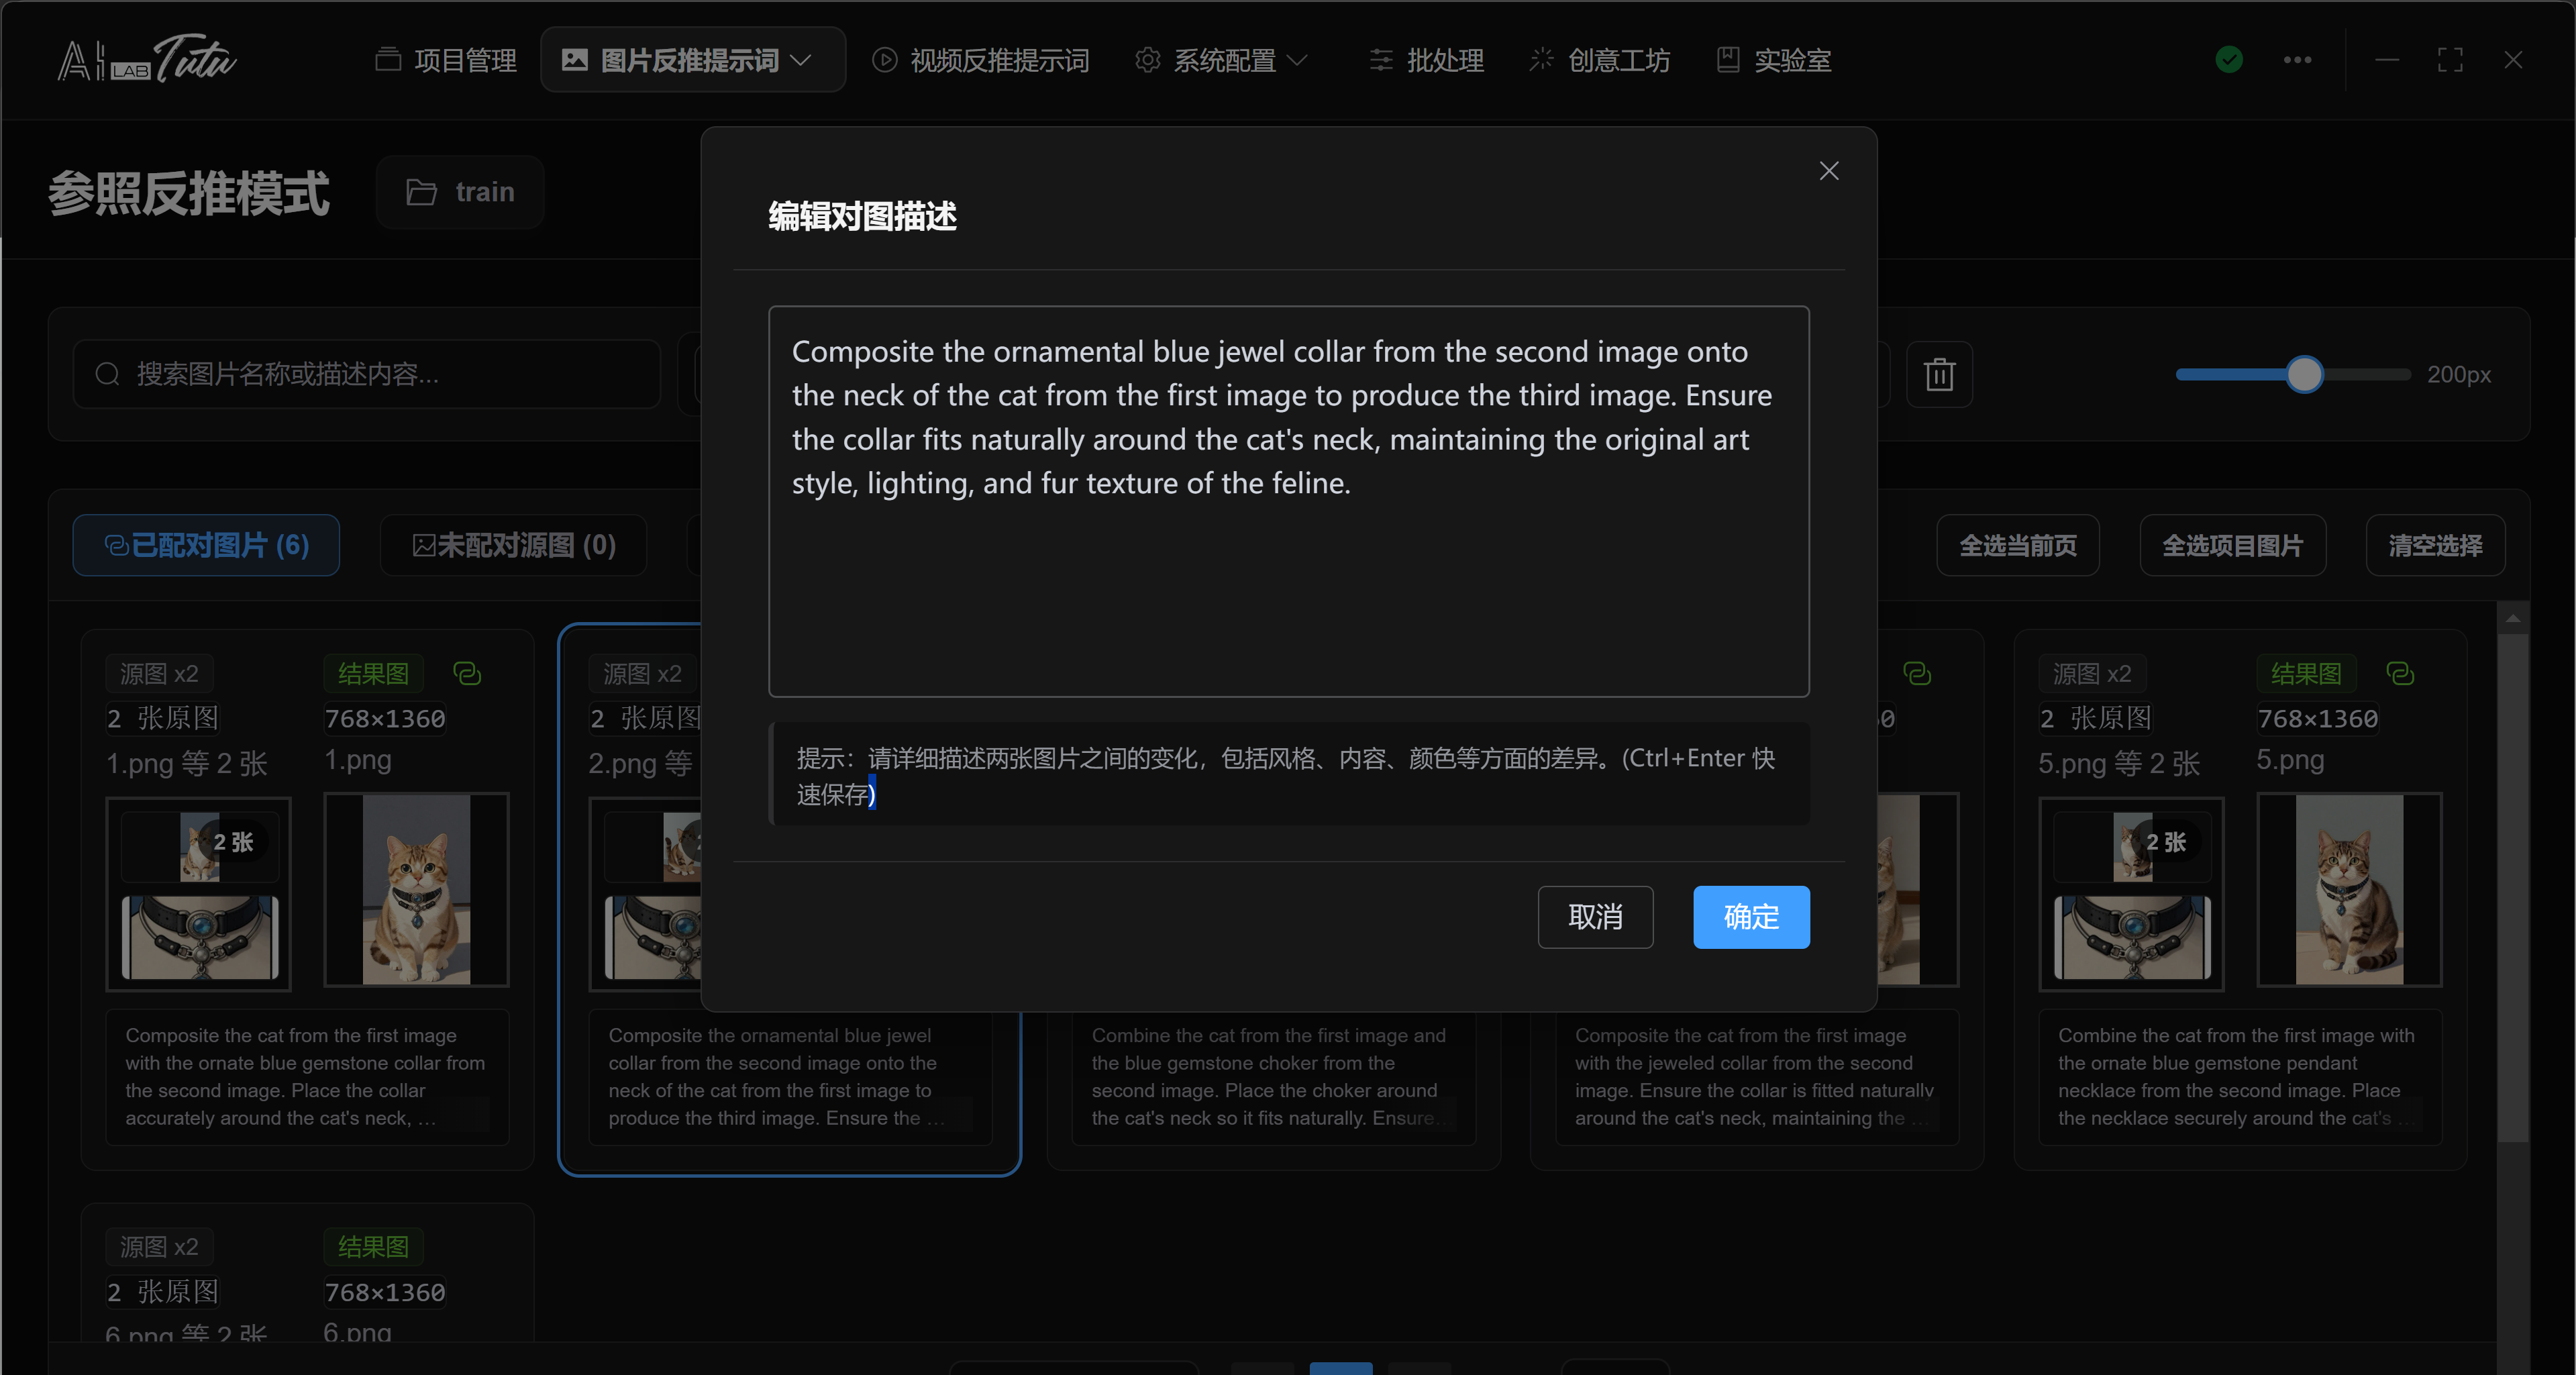
Edit paired description dialog. Reference reverse-caption results can be manually supplemented or corrected.
Four Lists in Reference Reverse Captioning
The Reference Reverse Captioning page separates image relationships into four lists: paired images, unpaired source images, unpaired result images, and unpaired single or unknown images. Each list has a different operation target, so confirm the current list before importing, generating, or exporting.
Dragging images into the unpaired source list or unpaired result list imports them according to that list's role. The single-image import dialog can also manually specify source image, result image, or unknown image. Unknown images can later be quickly classified as source or result images.
The paired list displays image pairs around source and result images. Description generation, batch renaming, and export usually process complete image pairs only. If a source image or result image is missing, use pair management to complete the pair first.
One result image can correspond to multiple source images, but some operations have extra limits. For example, swapping source and result images is only available for complete pairs with a single source image. Multi-source pairs cannot be swapped directly.
Selecting, Previewing, and Batch Operations for Image Pairs
The paired list supports file-manager-style selection: click to select one image pair, Ctrl-click to add or remove, Shift-click to select a continuous range, drag over empty space for box selection, and use top buttons to select the current page, select all project pairs, or clear selection.
The unpaired source, unpaired result, and unknown image lists also support multi-selection and box selection. Double-click an unpaired image to open a large preview so you can decide whether it should be classified as source image, result image, or single image.
Common operations include importing image pairs, importing a single image, pair management, swapping source and result images, unpairing, generating paired descriptions, exporting, batch renaming, deleting descriptions, and deleting selected images.
When generating paired descriptions, the app prioritizes currently selected complete image pairs. If no complete image pair is selected, it uses complete-pair candidates from the page. During the task, progress is displayed and results refresh periodically. After completion, return to the list and review the descriptions.
For operations such as unpairing, deleting descriptions, and deleting images, if there is no clear selection, the operation may expand to more objects in the current project or current list. Before executing irreversible operations, select the exact image pairs or images you want to process and check the confirmation dialog again.
Image Export and Result Checking
Prompt Phrase Mode, Natural Language Mode, and Reference Reverse Captioning each have their own dataset export entry.
Before export, check the current project, whether only the images you need are selected, whether tags or descriptions are empty, and whether the output directory has write permission.
Image dataset export dialog. Before export, confirm format, output directory, conflict handling, and compression options.
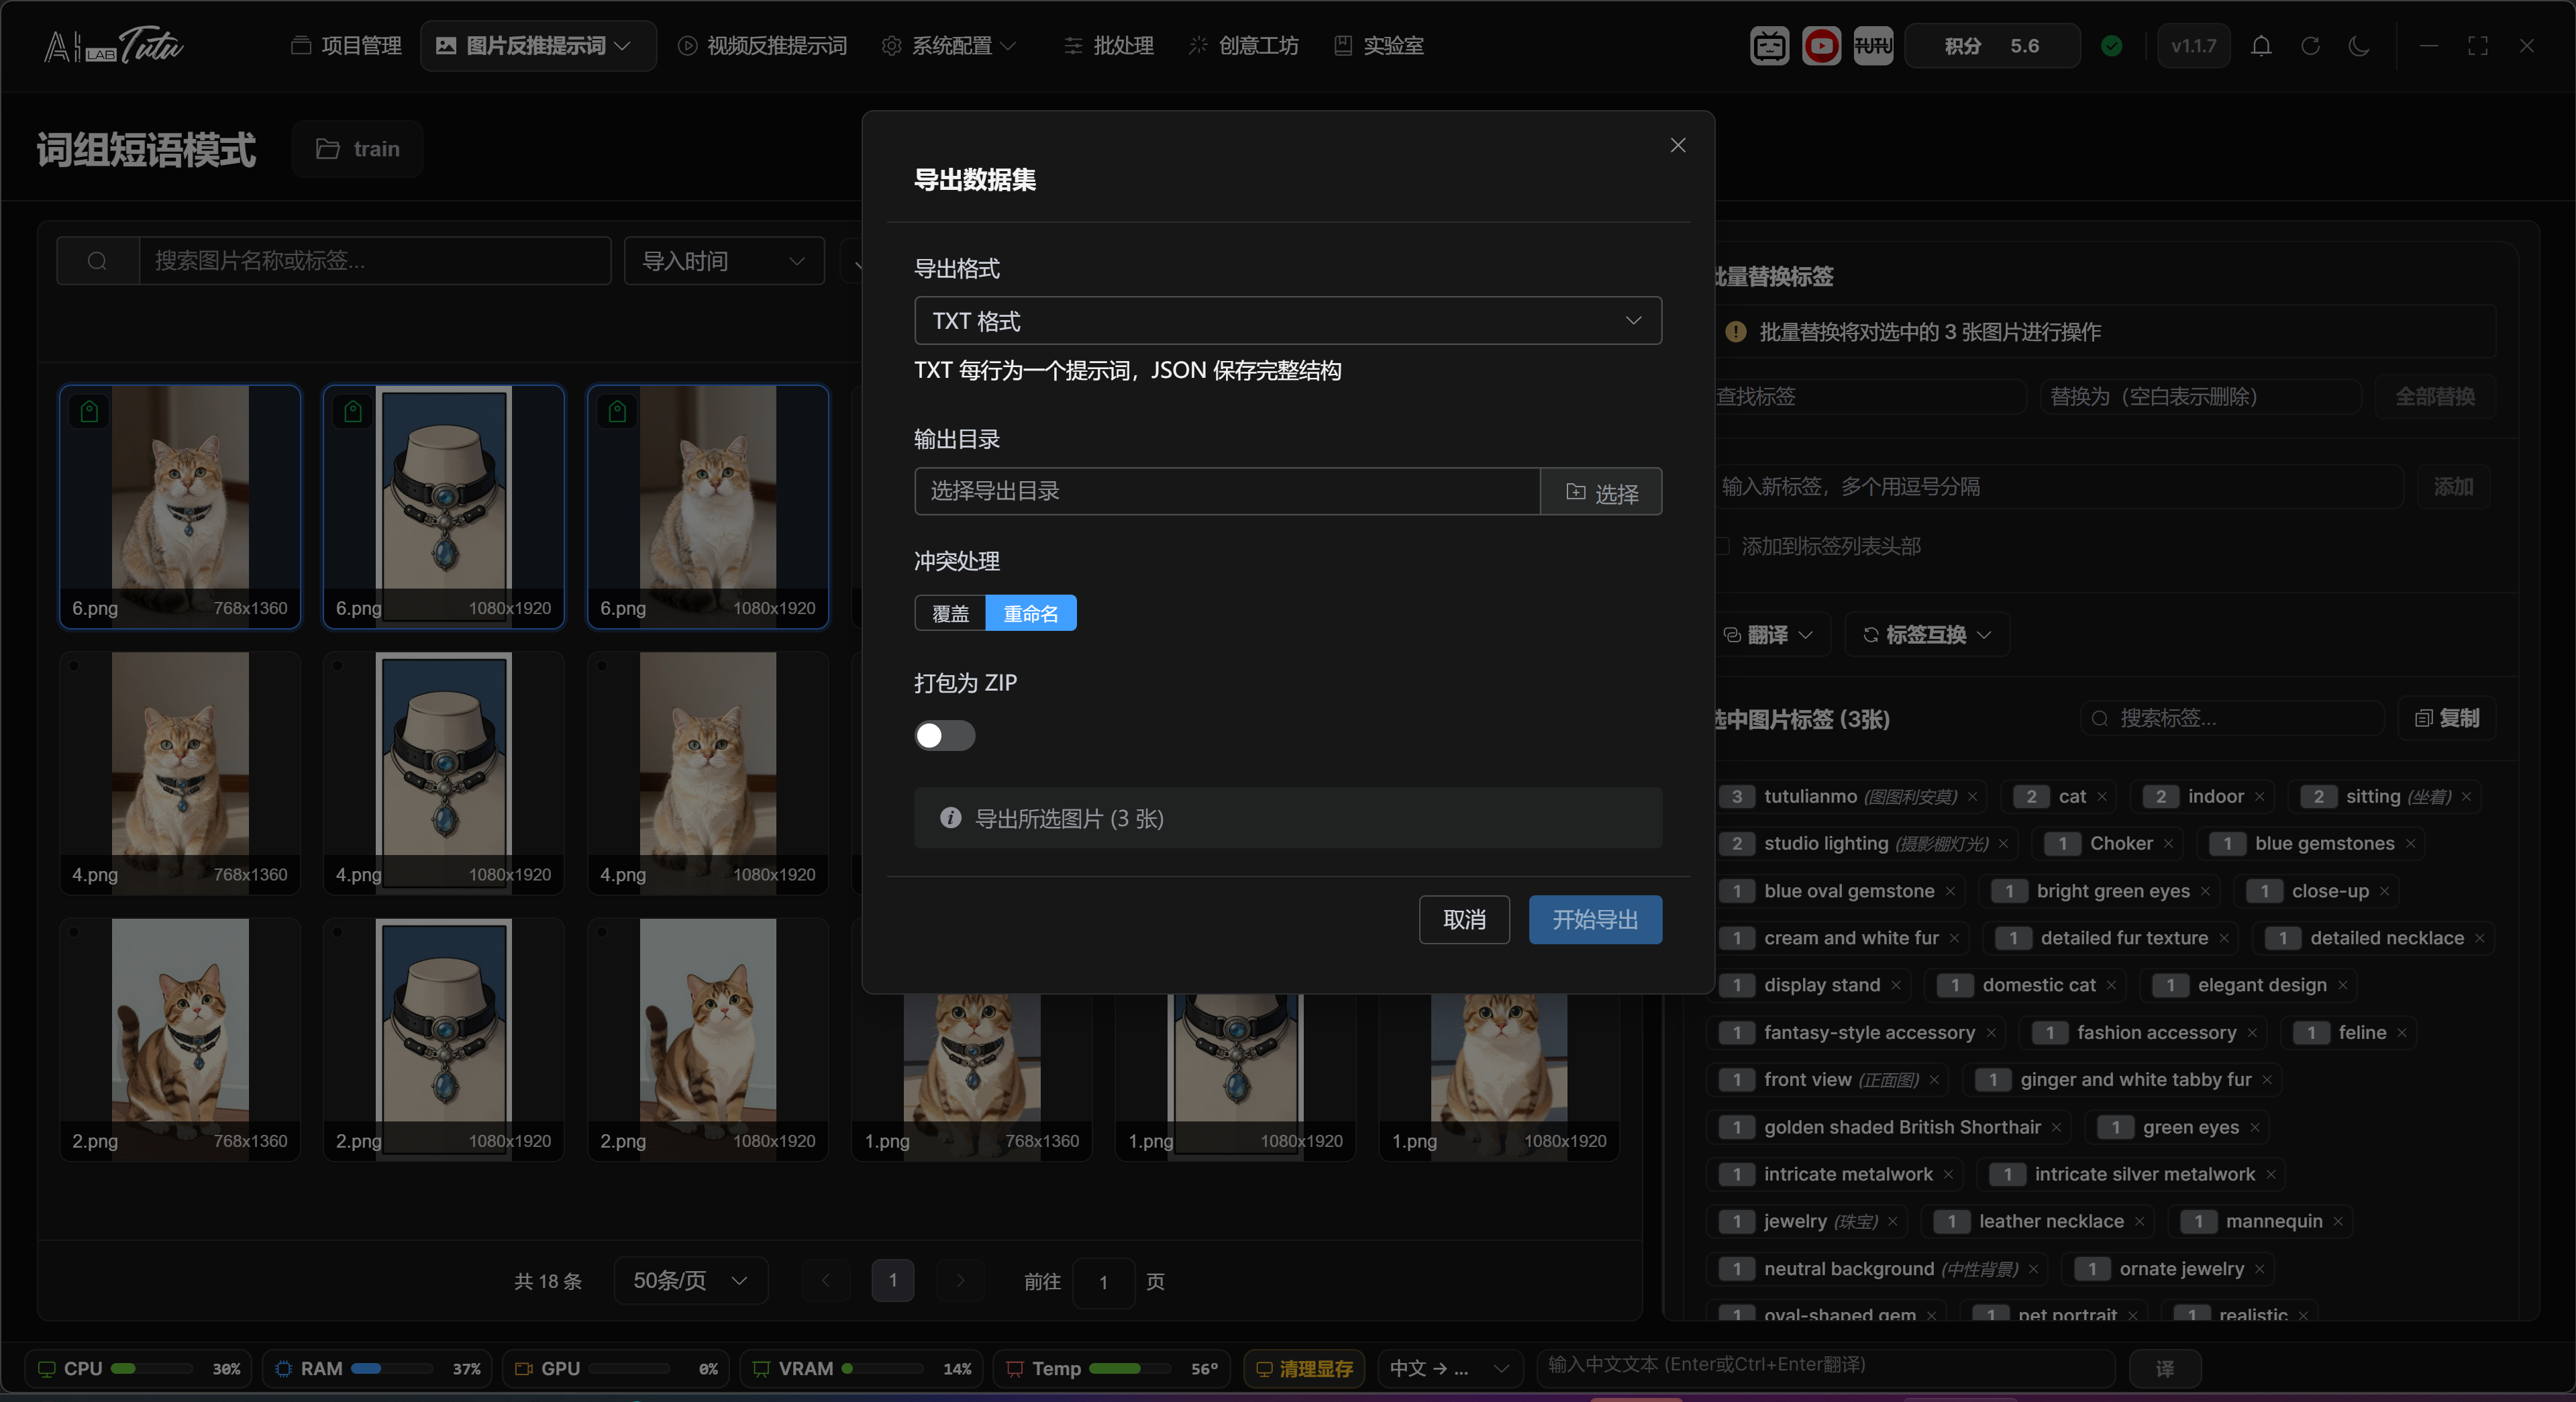
If the exported result is empty, first check whether tags or natural-language descriptions have actually been written in that mode.
Confirming the Export Range
The three image reverse-captioning modes export different objects. Prompt Phrase Mode exports images and tags. Natural Language Mode exports images and full descriptions. Reference Reverse Captioning exports source images, result images, and paired change descriptions. Do not treat one mode's export result as data for another mode.
Before export, confirm the current project, current mode, current filters, and selected range. Then confirm export format, output directory, file-conflict handling, and compression options. The output directory must have write permission.
If the export result is empty, check four things first:
- Whether the current images actually have tags or descriptions written.
- Whether images are hidden by search, tag, or sentence filters.
- Whether only empty-data images are selected.
- Whether image pairs are complete in Reference Reverse Captioning.
For Reference Reverse Captioning export, especially check whether both source and result images exist. Organize unpaired images in the corresponding lists first. Export after pairing is complete and descriptions have been confirmed.
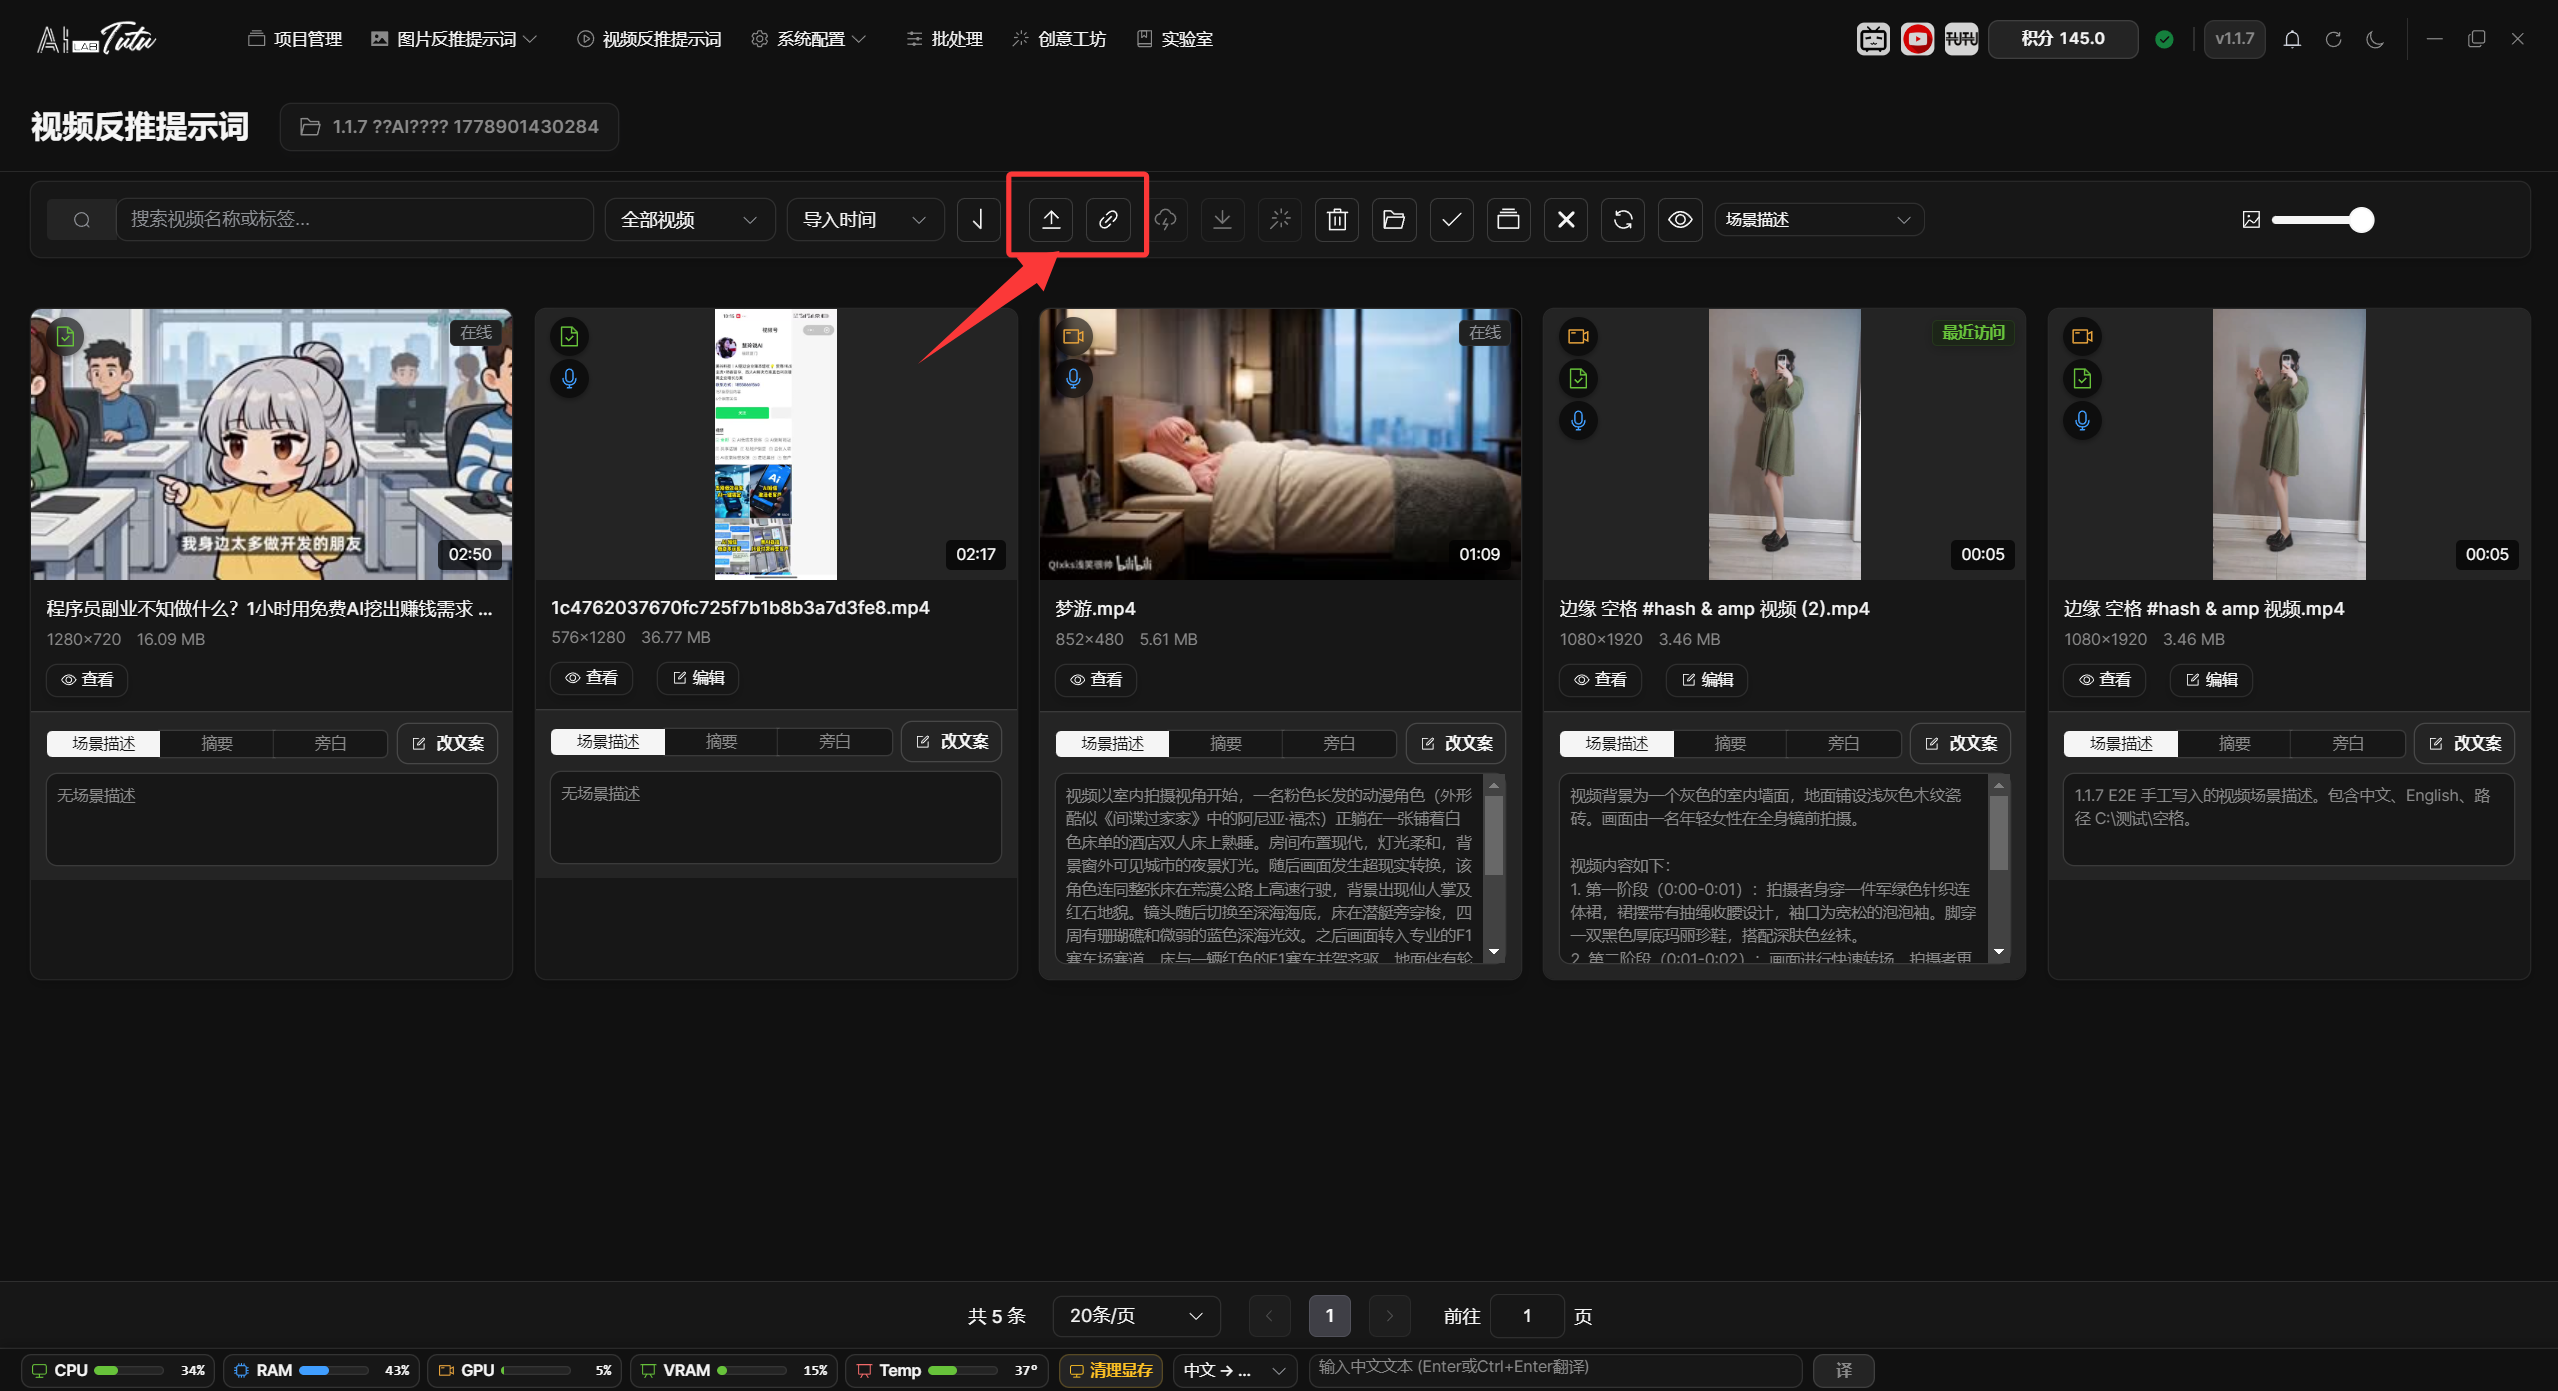
Video Prompt Reverse Captioning
Page Location and Project Requirement
Video Prompt Reverse Captioning is located in the top navigation bar. Select a project before entering this page, because local videos, online video records, scene descriptions, summaries, and spoken-script drafts all belong to a project.
If the page says that a project must be selected, return to Project Management, click the project row, and then enter the video page again.
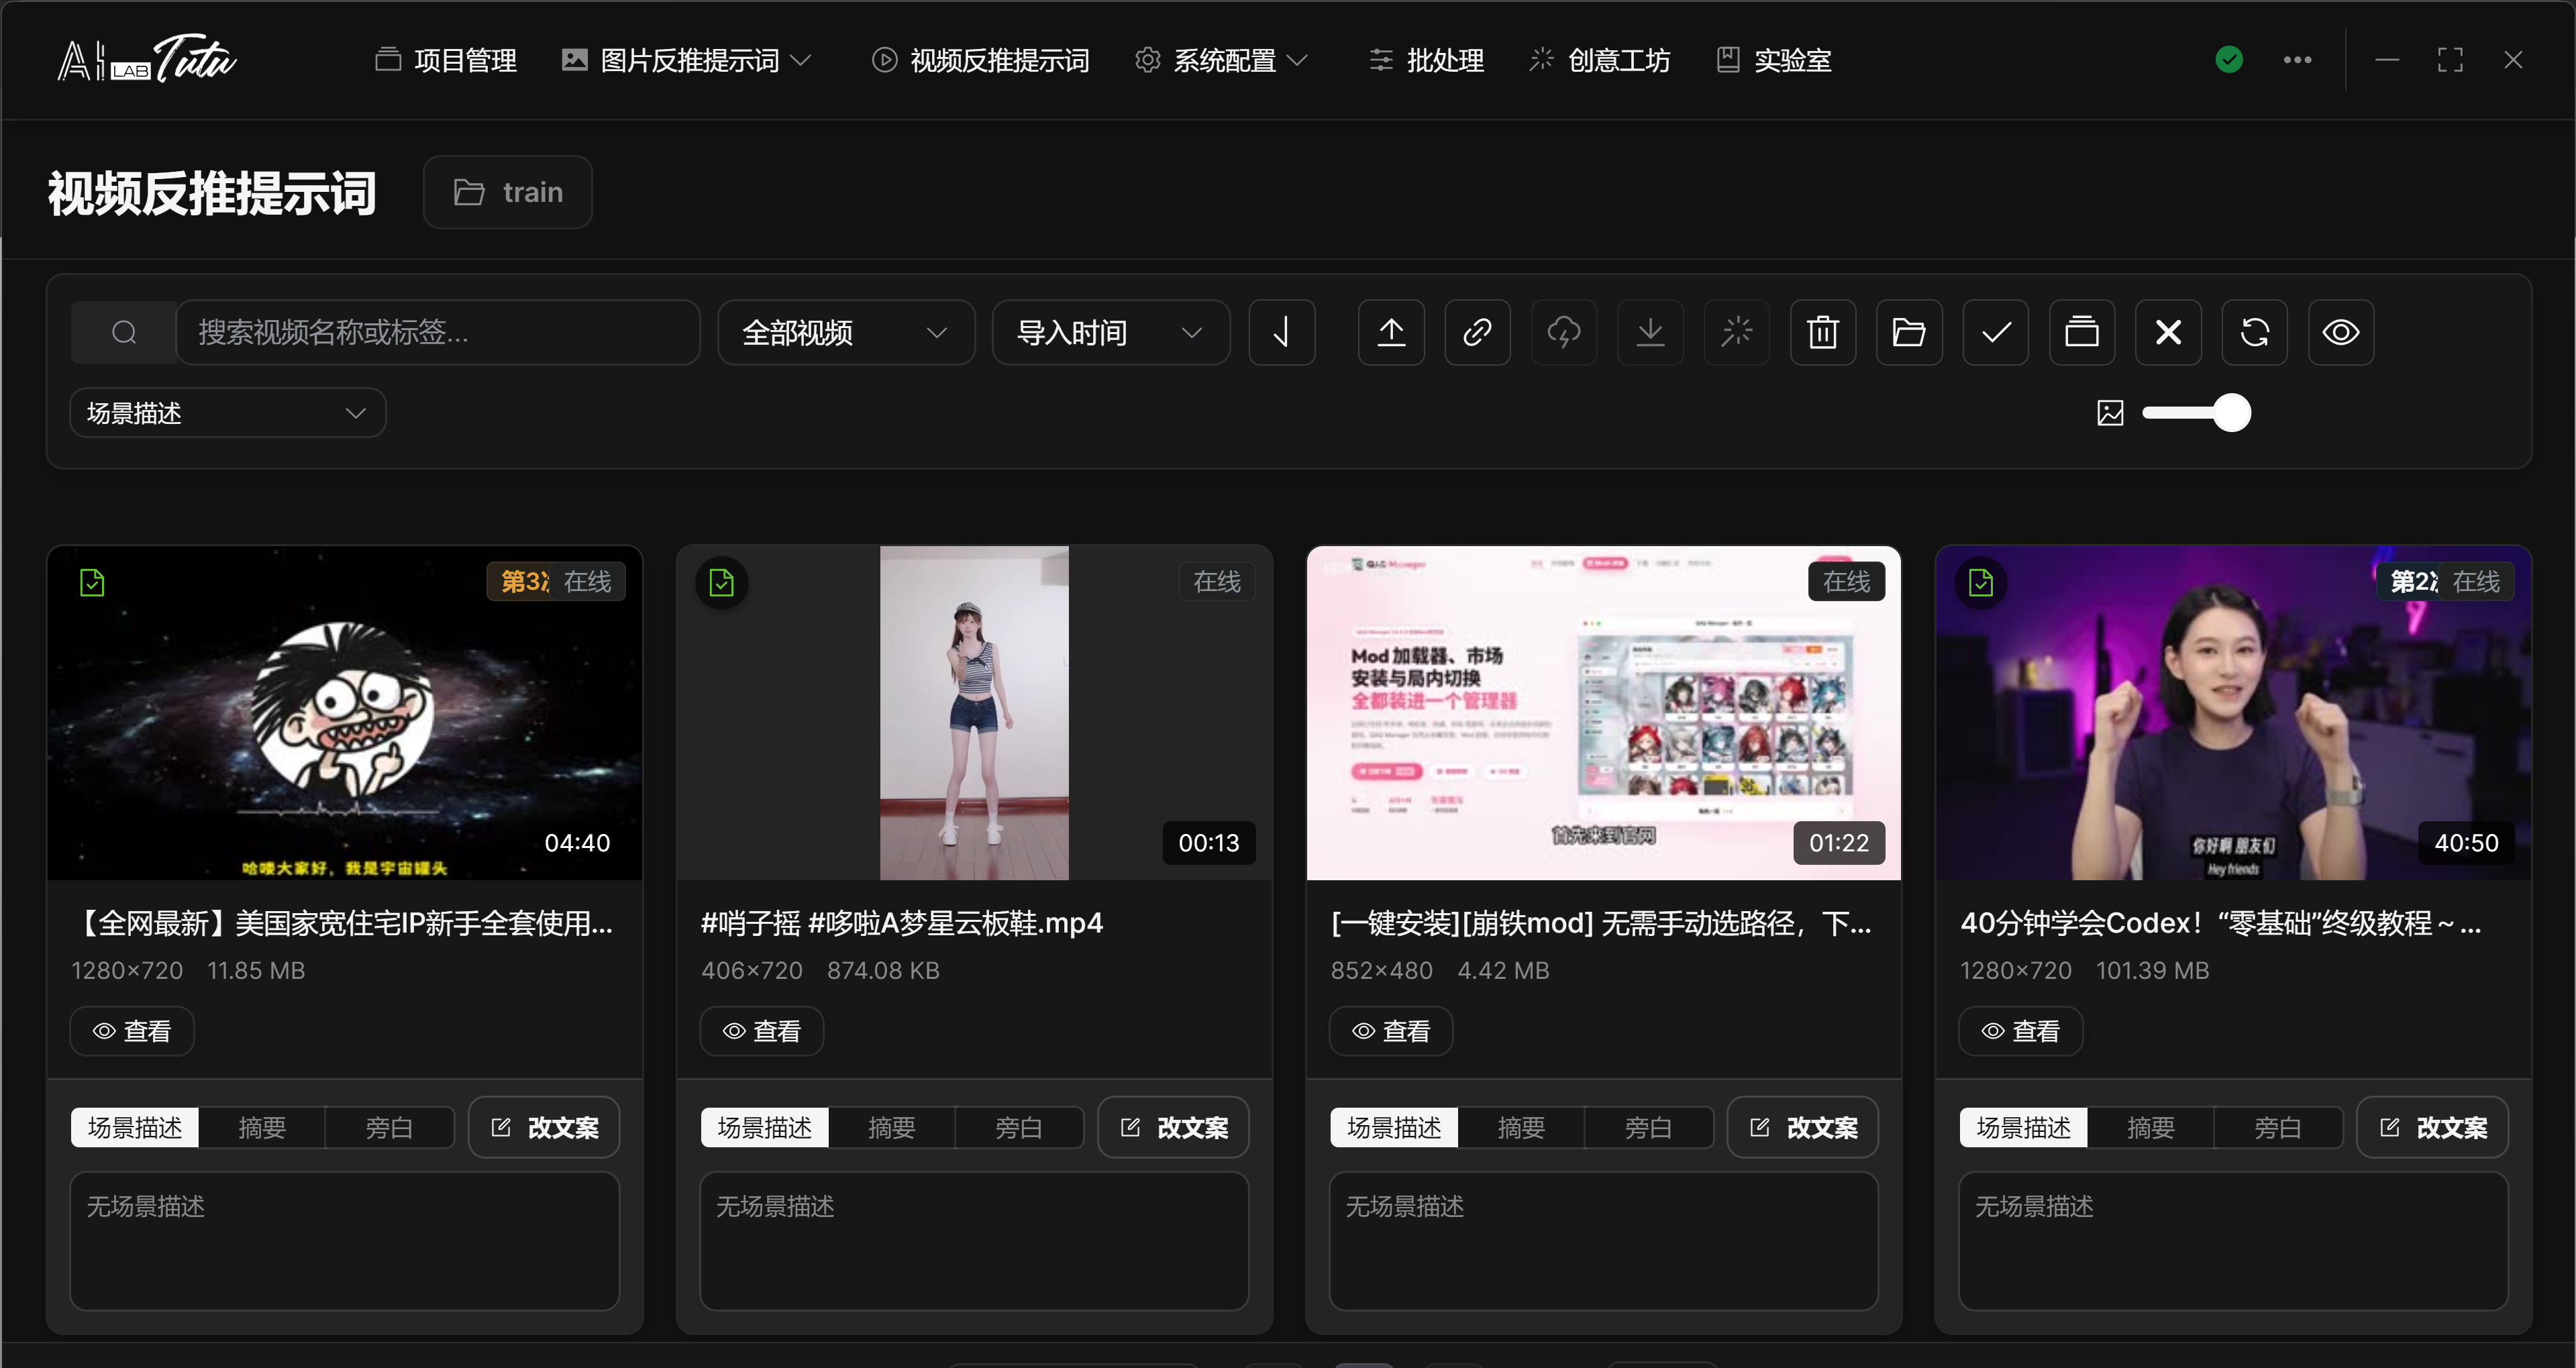
Video List and Toolbar
The video page supports local videos and online video records. The toolbar includes search, reverse-prompt status filtering, sorting, import local video, link online video, batch prompt reverse captioning, batch export, element editing, delete, open project folder, select current page, select all project videos, clear selection, refresh, preview toggle, and thumbnail-size adjustment.
Video cards show thumbnail, duration, file name, resolution, size, and status badges for scene description, summary, spoken script, timeline data, and related generated content.
For local videos, click View for read-only viewing, or click Edit to enter the video detail page. Double-clicking a local video card also opens the detail page.
Online videos are mainly read-only records. They are suitable for viewing generated scene descriptions, summaries, and spoken scripts.
Video Prompt Reverse Captioning list. Video cards show local or online source and generated-content status.
Video List Selection and Preview Area
The video list uses selection behavior similar to the image grid. Click a video card to select only that video. Hold Ctrl or Command and click to add or remove one video from the selection. Hold Shift and click to select a continuous range from the previously clicked video to the current video.
Drag over empty space to box-select video cards or table rows. If Ctrl is not held during box selection, the previous selection is cleared first. Select Current Page selects only videos shown on the current page. Select All Project selects currently loaded videos. If the project total is greater than the loaded count, the page shows a quantity prompt.
The preview toggle on the right side of the toolbar displays AI content previews below the cards. Preview type can be switched between scene description, summary, and spoken script. You can also switch preview type on a single card. Double-click the preview area or click the edit button to open the content-editing dialog.
Use the delete button carefully. If no video is selected, the delete flow enters confirmation for deleting all videos. If videos are selected, only selected videos are deleted. Always check the quantity in the confirmation dialog before deleting.
Video Card Status Badges and Entry Points
The upper-left corner of a video card shows AI content badges. The camera badge means scene descriptions exist. The document badge means a summary exists. The microphone badge means a spoken script exists. The timeline icon means timeline data exists. The duration marker on the right shows video length. Online videos also show an online-source label.
Local videos support View and Edit. View opens a read-only viewing window. Edit opens the video detail page. Double-clicking a local video card also opens the detail page directly. Online videos are mainly read-only and do not enter the local editing detail page.
A recent-access marker may appear at the top of a card to show that the video was opened recently. The thumbnail-size slider changes only the display size of grid cards. It does not change the video file itself.
Import Local Videos
Click the import button in the toolbar to select local videos, or drag video files into the video page.
Common video formats are supported, including mp4, webm, mov, avi, mkv, mpeg, 3gp, flv, and wmv.
During import, a full-screen progress dialog is displayed to avoid state confusion caused by switching pages. After import completes, the app shows the number of successful and failed files.
Local Import Progress and Drag-and-Drop Import
Local video import can use the toolbar upload button or direct drag-and-drop into the video page. The page displays a drag overlay. When you release the files, import starts.
During import, a full-screen progress window is shown. Each file has a waiting, uploading, success, or failed state. Do not switch pages or close the app before import finishes. Close the progress window only after all files are complete.
After successful import, the list refreshes and shows thumbnails, duration, resolution, and file size. If import fails, first check file format, whether the file is locked by another program, path permissions, and disk space.
Link Online Videos
Use Link Online Video as the recommended entry for online videos. Paste an online video link or shared text, and the system automatically recognizes the link inside it.
The separate YouTube analysis button mentioned in older documents is no longer the main entry. The current unified path is the Link Online Video function in the video page.
After an online video is added to the project, you can view video information and generated content in the read-only viewing window.
Link Online Video dialog. Paste a shared link and the system recognizes the online video source.
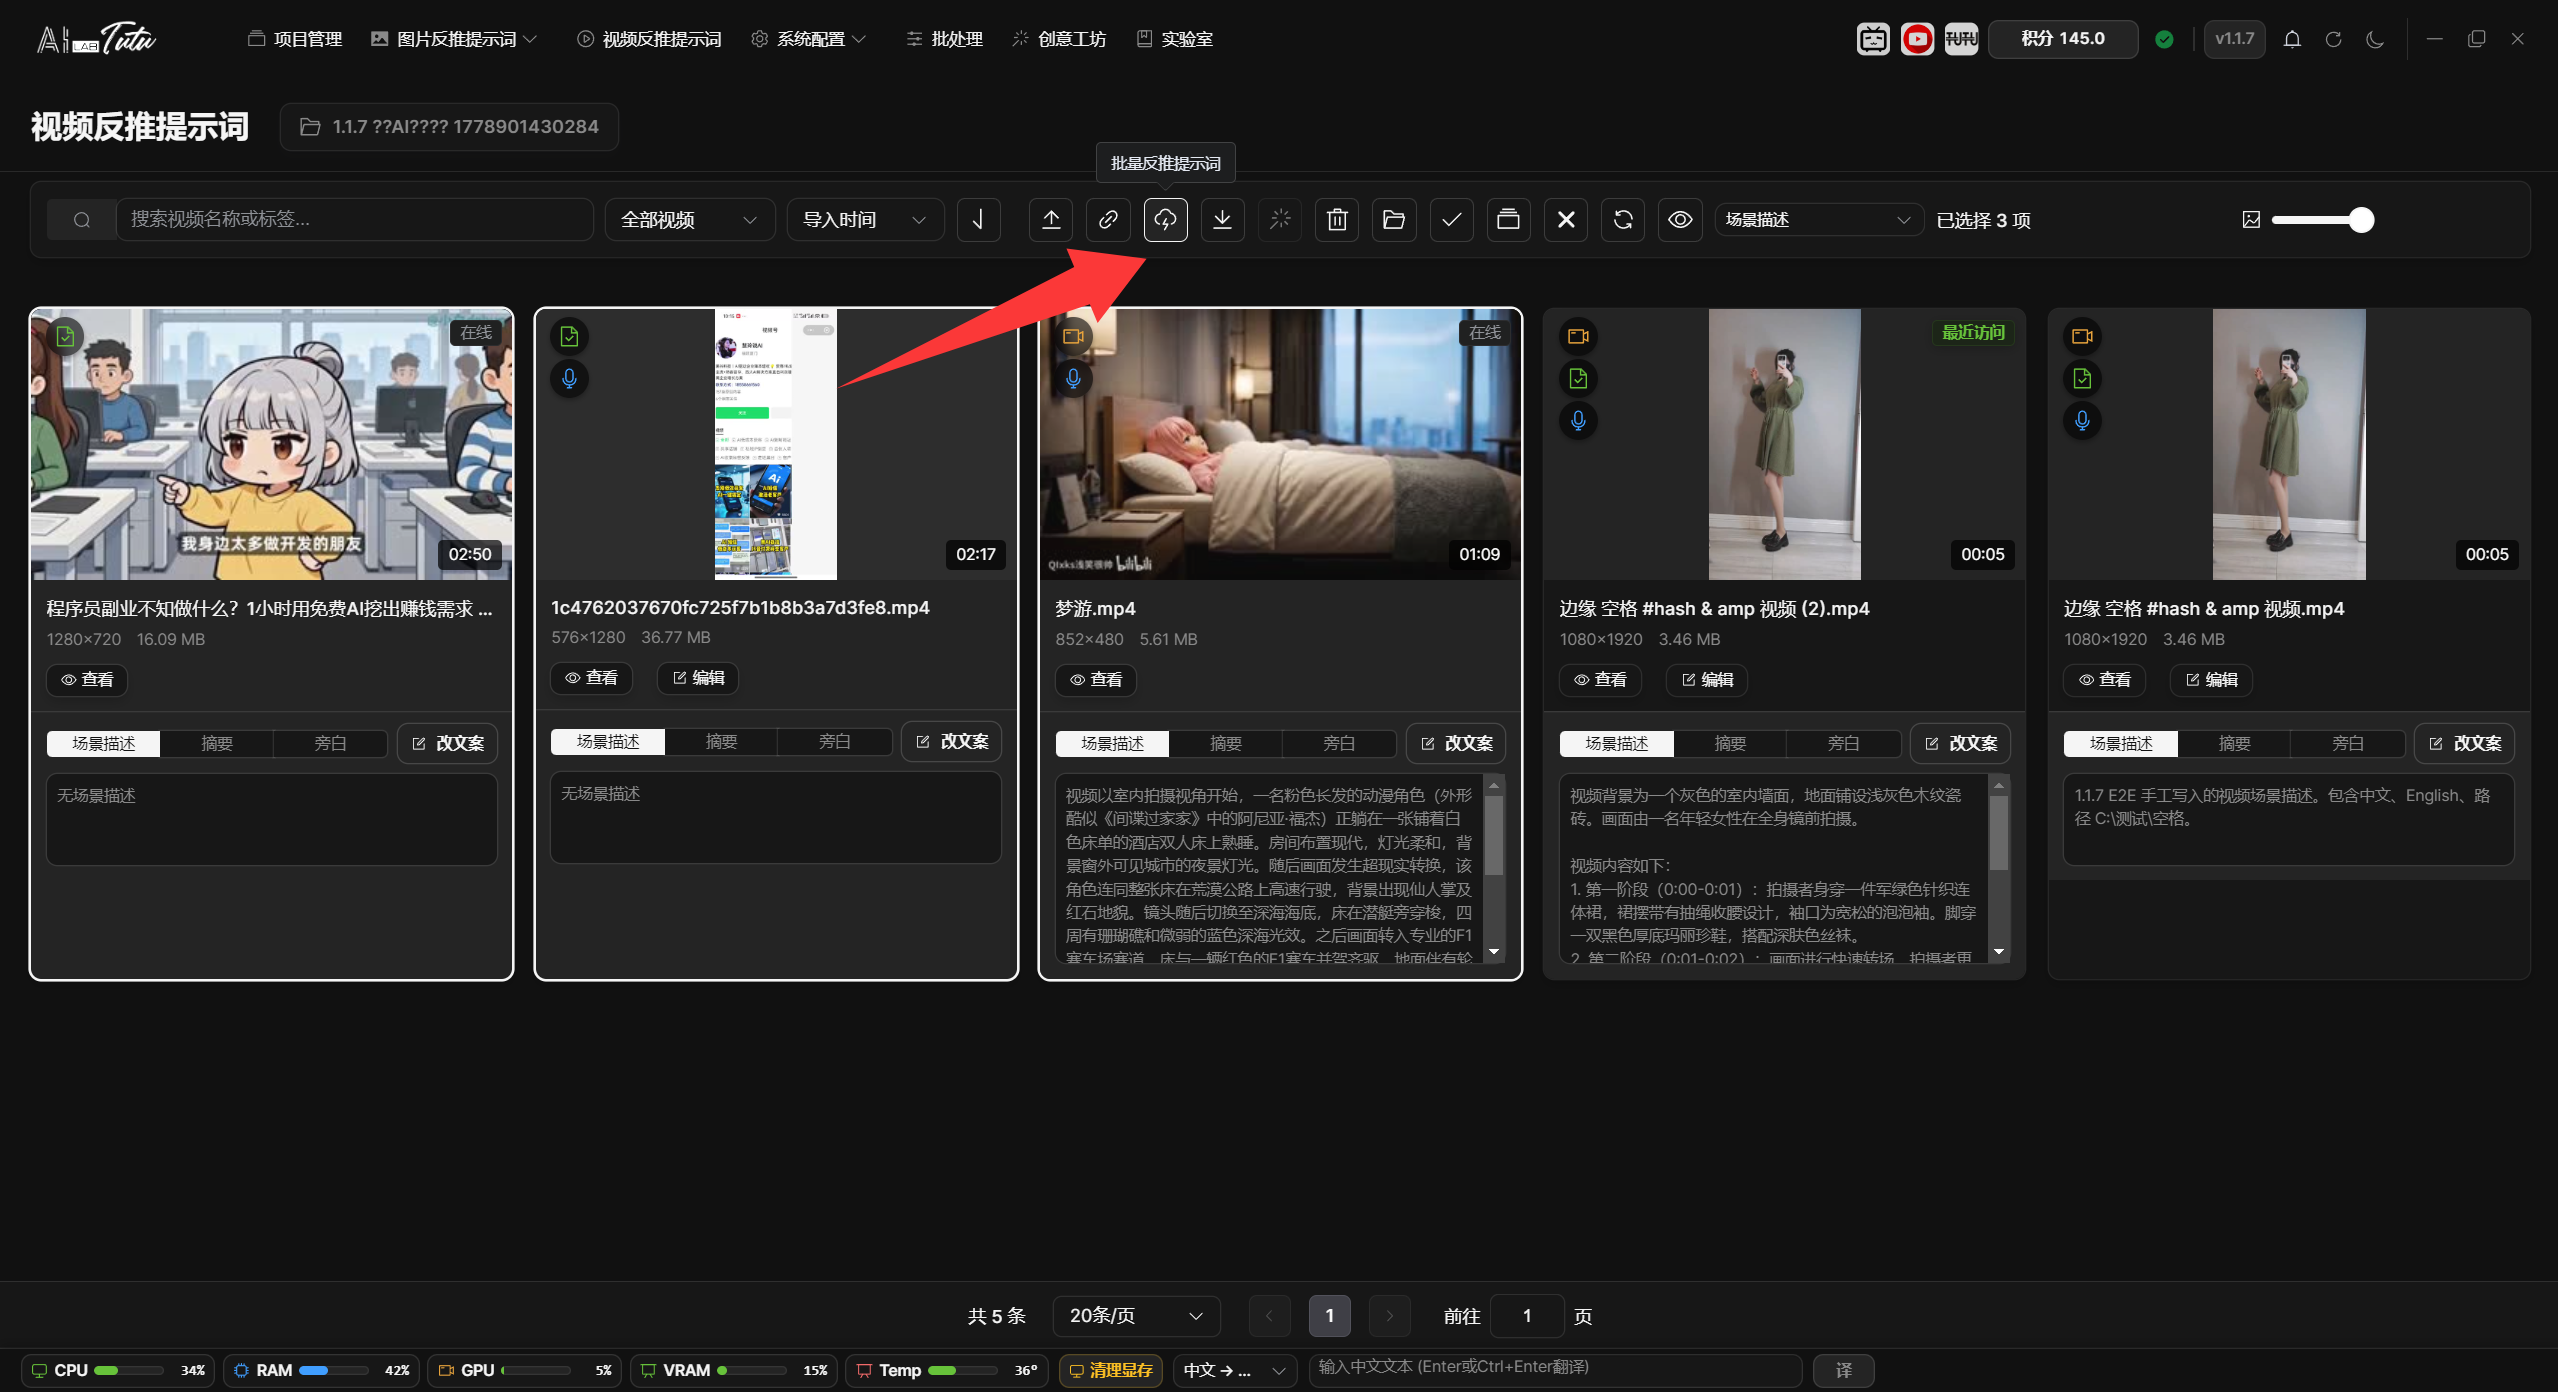
Batch Prompt Reverse Captioning
Select one or more videos, then click Batch Prompt Reverse Captioning in the toolbar.
You can generate scene descriptions, summaries, and spoken scripts as needed. In default AI gateway mode, when multiple content types are generated for the same video at the same time, they are merged into one video-understanding request to avoid repeated upload, repeated analysis, and repeated credit charges.
After the batch task finishes, the detail and preview areas automatically focus on the corresponding result, which reduces the chance of mistaking a successful task for a failed one.
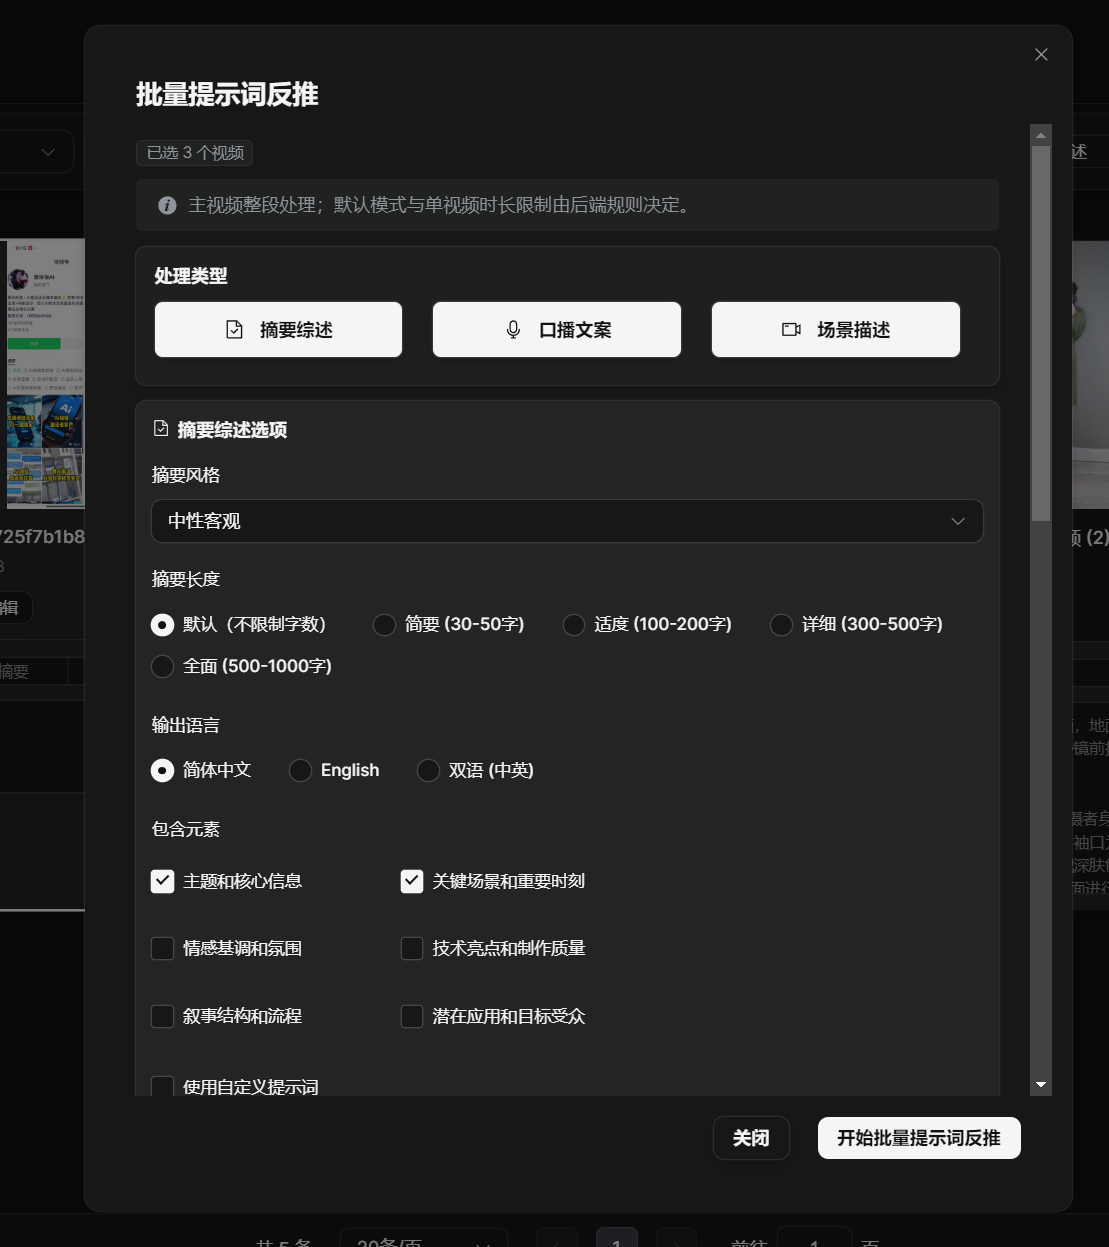
Batch Video Prompt Reverse Captioning settings. Generate scene descriptions, summaries, and spoken scripts as needed.
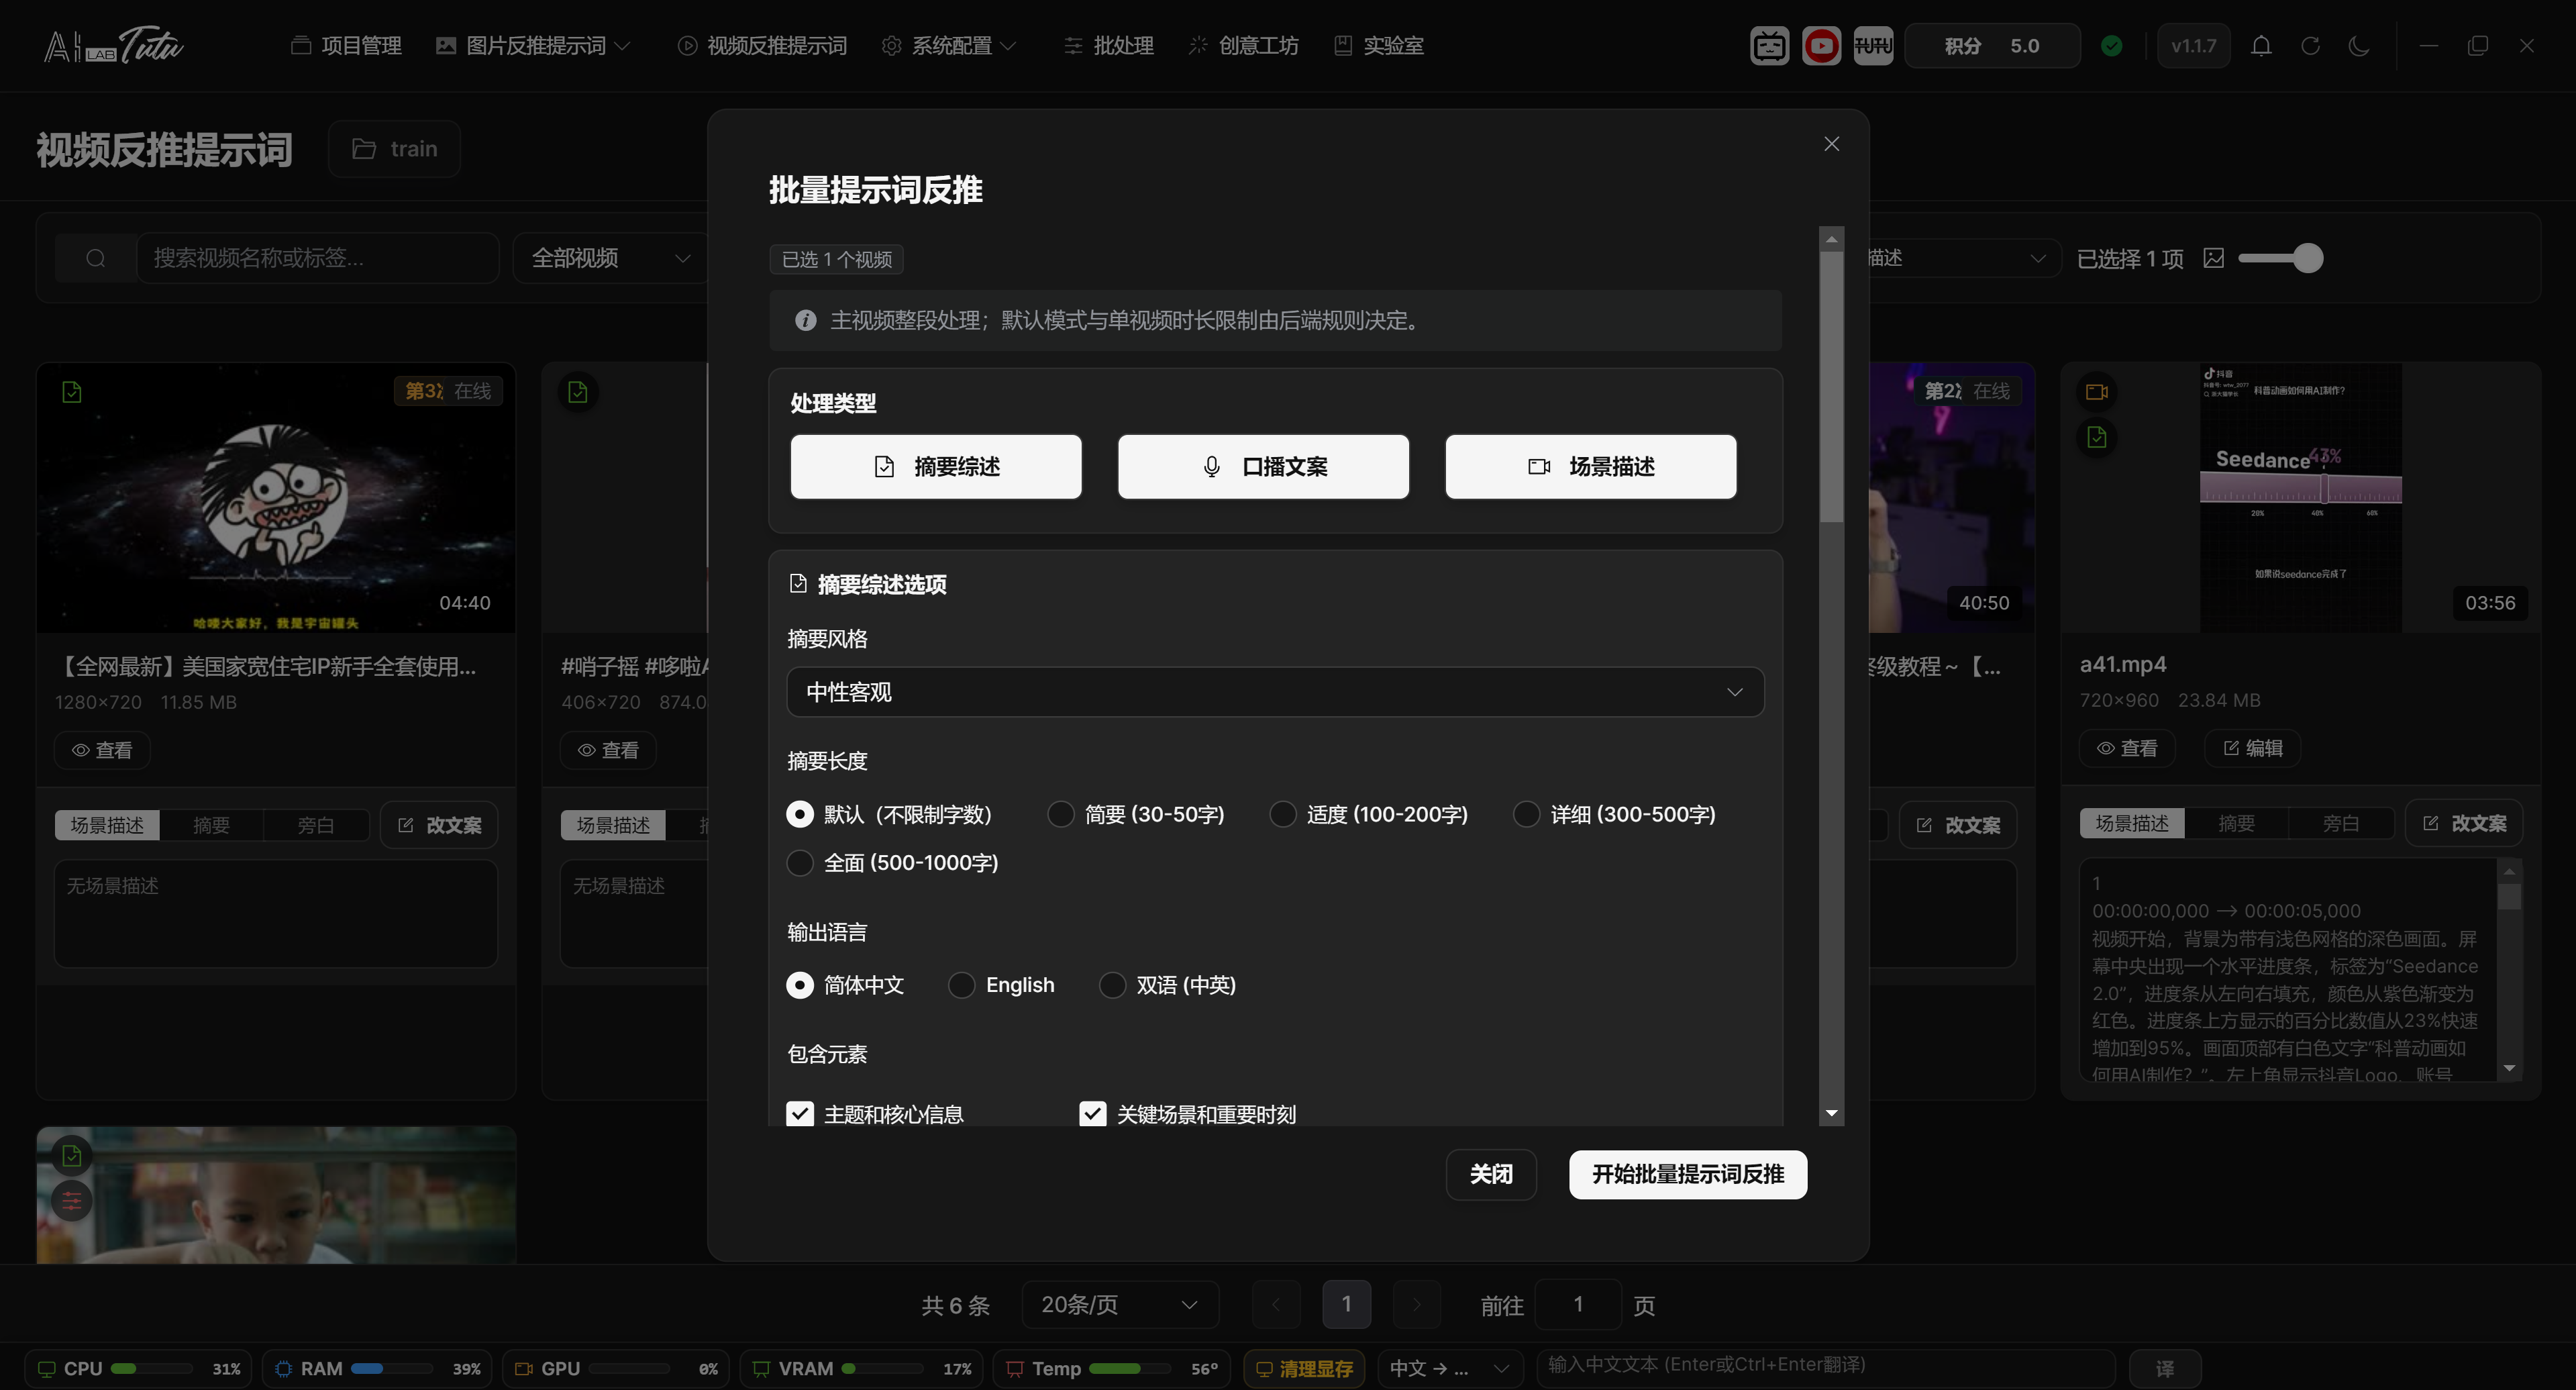
Batch Reverse Range and Configuration
Batch Prompt Reverse Captioning processes only the currently selected videos. The top of the dialog shows the selected video count. If no video is selected, the toolbar button is unavailable.
Scene description, summary, and spoken script are selected by default. You can turn off any content type you do not need. In default AI mode, you do not need to choose a model. In advanced mode, choose an available video reverse-captioning model in the model selector first.
Batch reverse captioning uses the same configuration panels as the video detail page. Summary supports style, length, language, and included elements. Spoken script supports style, pace, language, output format, and interaction guidance. Scene description supports style, detail level, language, and plain or SRT output format. All three task types support custom prompts.
While a task is running, the dialog locks the close button and shows the current video, processing item, subtask progress, success and failure counts, elapsed time, and recent events. You can click Cancel Task. After the cancellation request is sent, wait for the backend to return status.
After completion, the result panel is displayed. If there are failures, the table lists the video, processing type, failure reason, and error code. If the failure is insufficient credits, follow the insufficient-credit flow and do not restart the same batch repeatedly.
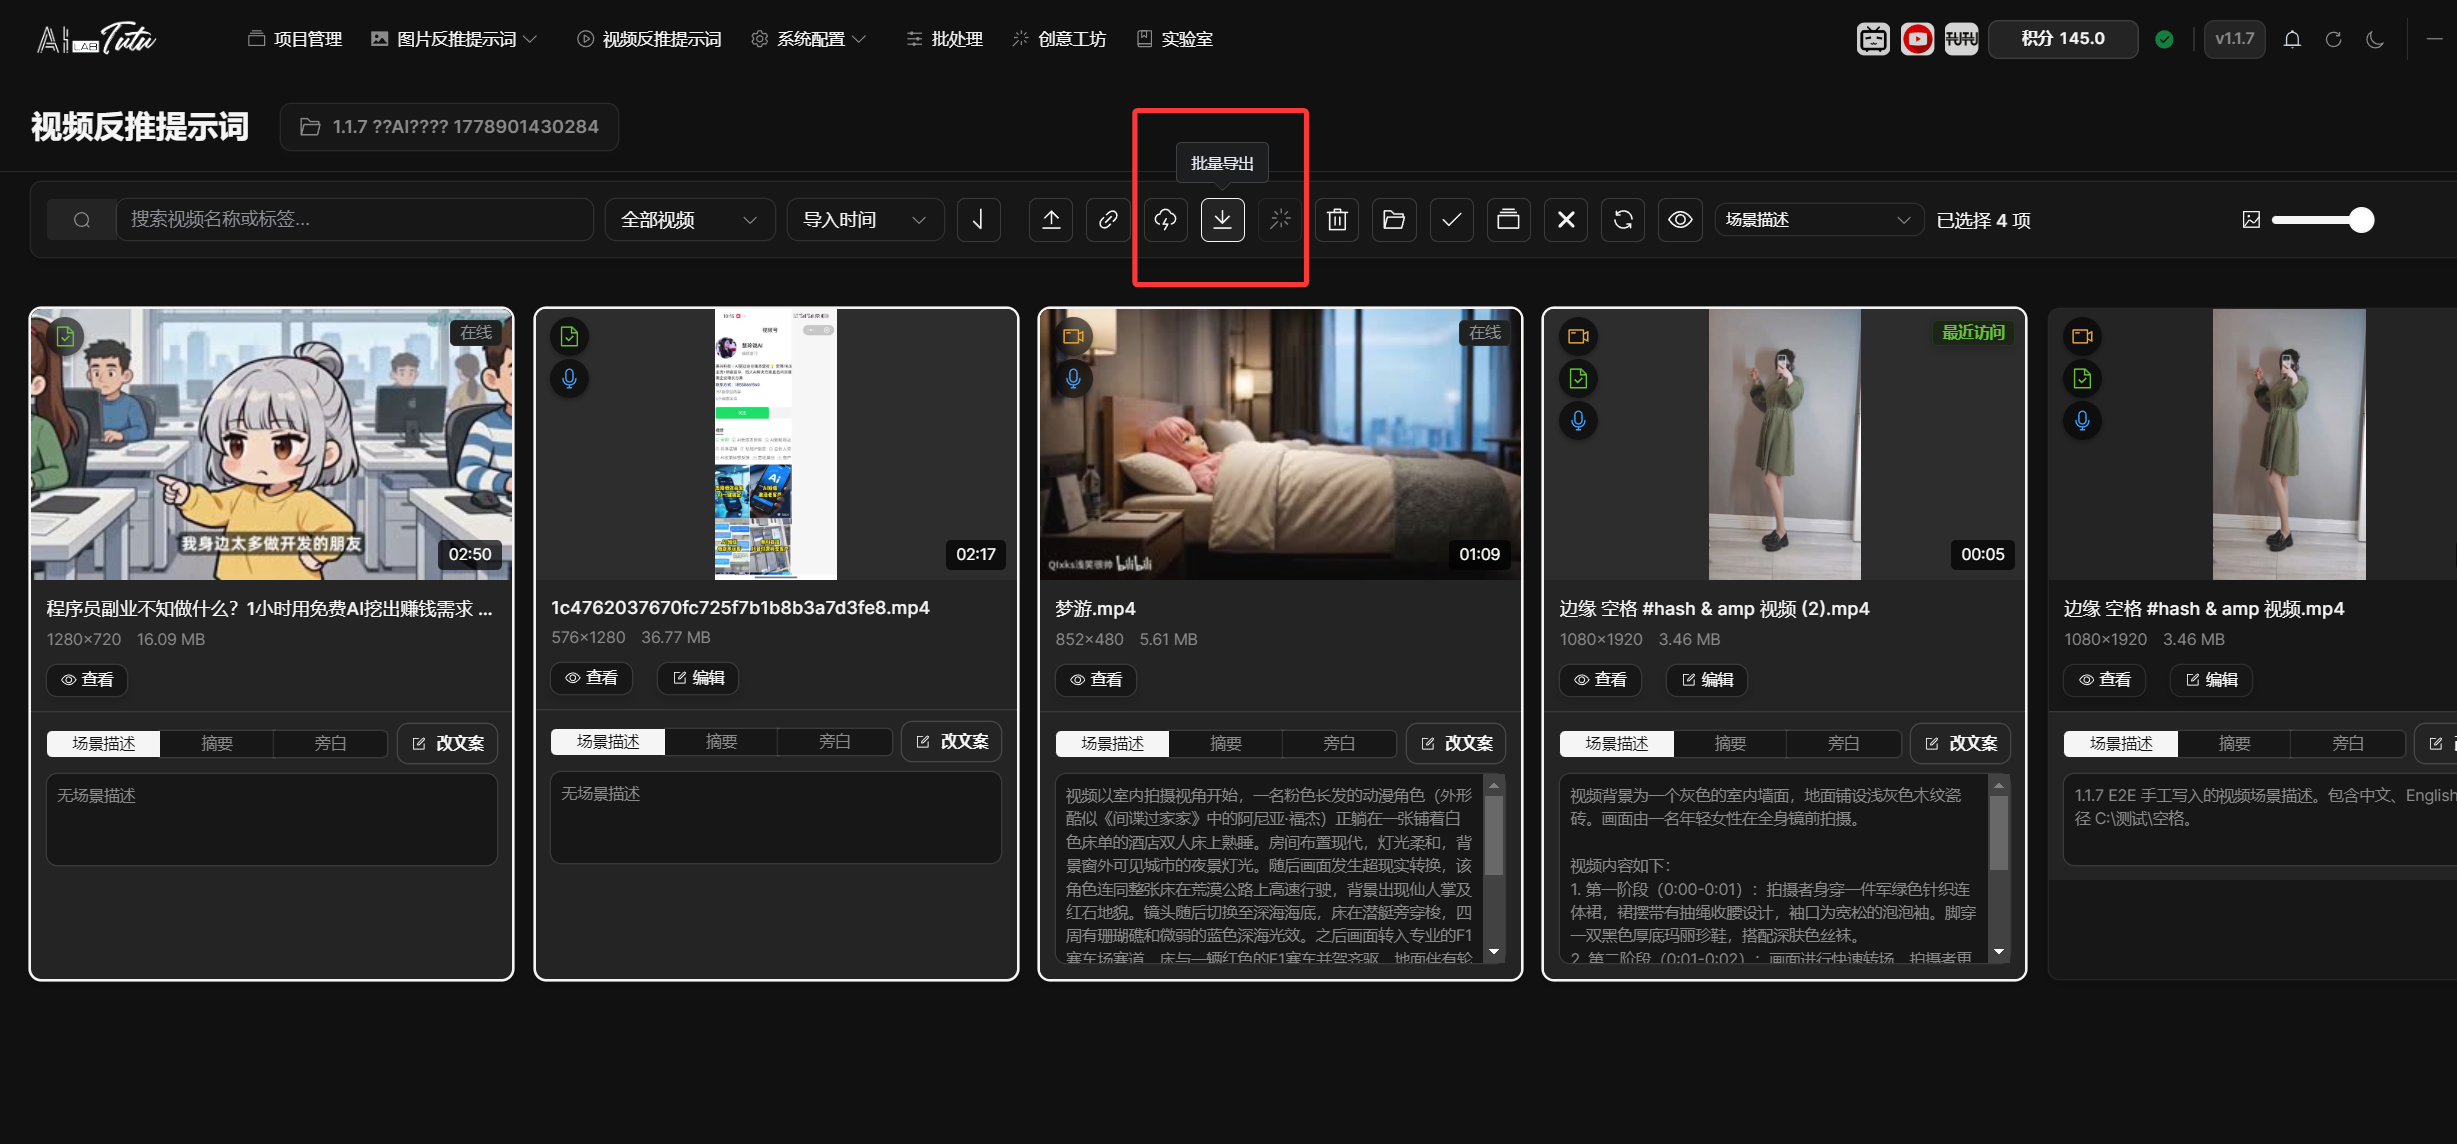
Batch Export
After selecting videos, click Batch Export to export overall content for multiple videos, such as scene descriptions, summaries, and spoken scripts.
If you need to export clips, keyframes, or a more complete material package, enter the video detail page and use Package Export.
During export, check output directory permissions, disk space, and file-name conflicts.
Video Batch Export dialog. Choose the export range and content to generate video materials.
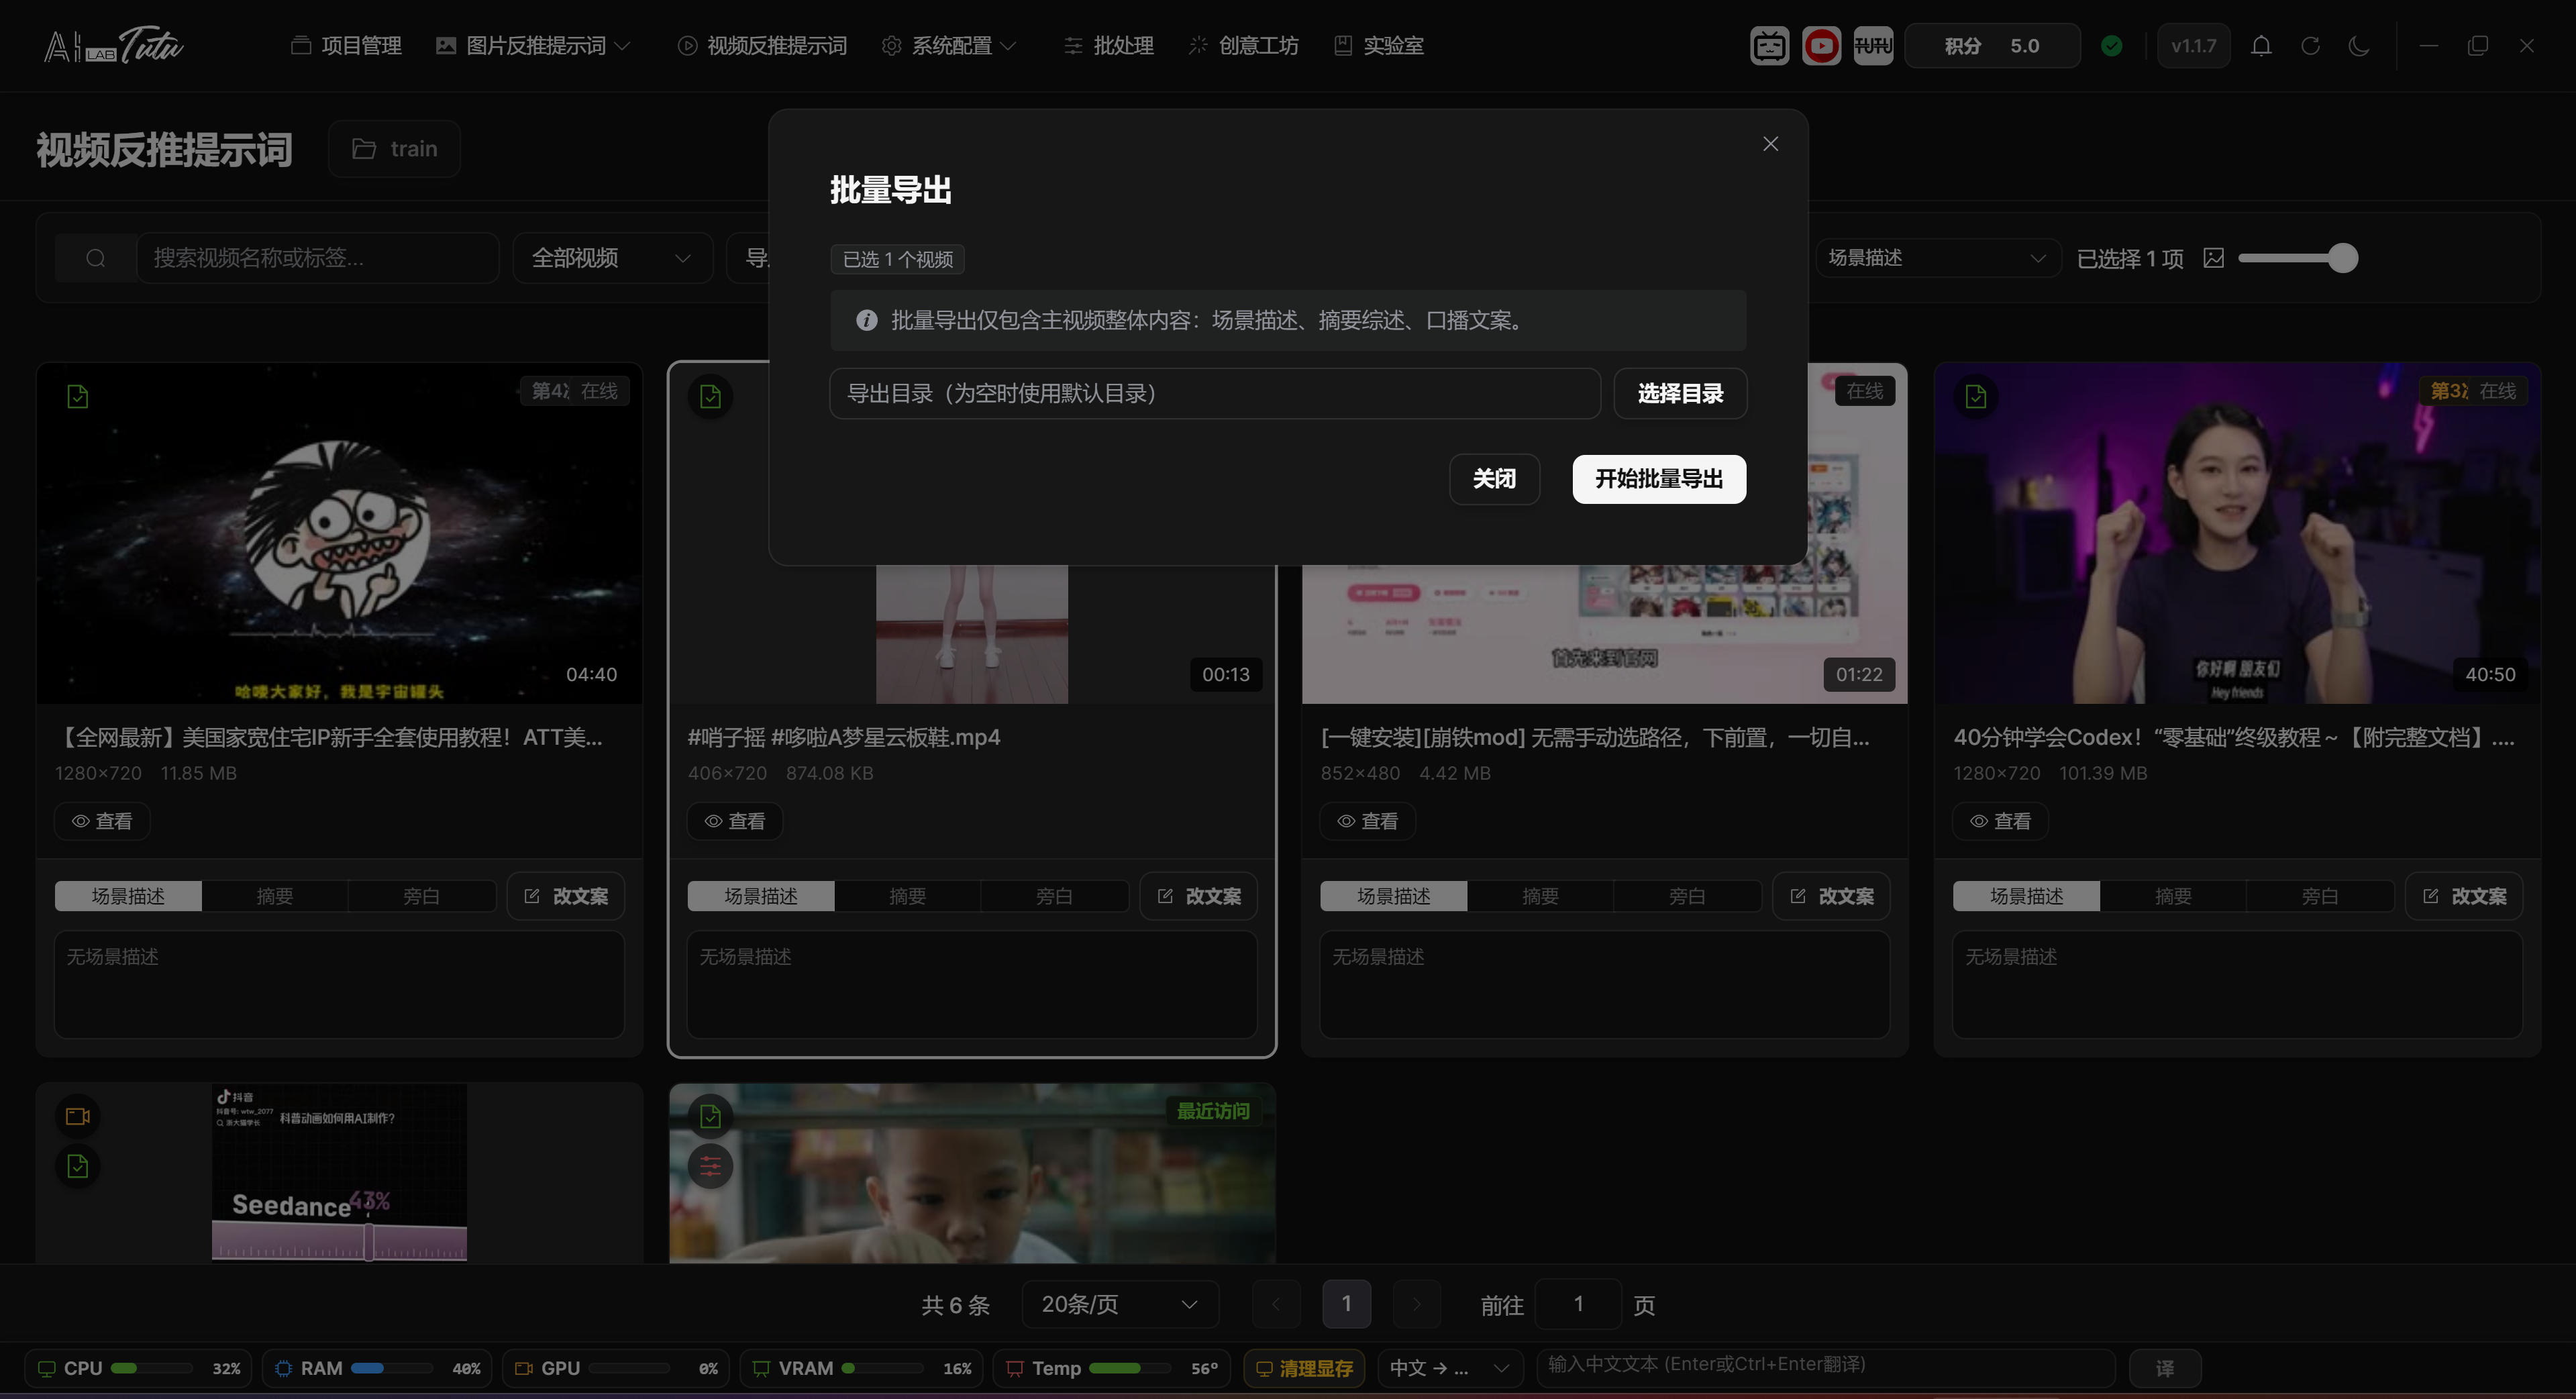
What Batch Export Actually Exports
Batch export from the video list exports overall content for multiple videos. The current export request includes overall scene description, overall summary, and overall spoken script. It does not include video clips, keyframes, or clip-level text.
If you need clips, keyframes, clip summaries, clip spoken scripts, or a complete material package, enter the detail page for a single video and use Export Package.
Batch export lets you choose an output directory. After the task starts, progress and WebSocket status show the current progress. After completion, the root directory of the batch export is displayed. Closing the dialog while the task is running opens a confirmation prompt first.
Element Editing Entry
The Element Editing button is used for one selected local video. Only one video can be selected when entering element editing.
Element editing supports click, box, and brush annotation modes. It also supports automatic tracking and manual segments. It is useful for watermarks, subtitles, logos, fixed regions, regular rectangular areas, and similar targets.
This feature depends on local models and GPU. On first use, if the models are not ready, the page shows download instructions, placement paths, and verification buttons for the VAE, Transformer, and SAM2 models.
Element Editing page. It is used for video-screen elements such as watermarks, subtitles, and fixed regions.

Entry Conditions and Five-Step Flow
In the video list, select exactly one local video before entering element removal. Online videos do not support this entry. After entering, the video player is on the left and the tool panel is on the right. The flow proceeds through five stages: 1 annotate element, 2 tracking, 3 preview tracking, 4 processing, and 5 save result.
During tracking and processing, the exit button is hidden to prevent accidental operation. Element removal clears the video's existing clips and keyframes. Saving the result also replaces the original video. Before processing, confirm that the original project material has been backed up or is no longer needed.
Model Status, GPU, and Download Guidance
The right side first shows model status. When models are not ready, the page provides folder entries, copy-path buttons, download links, and verification buttons for VAE, Transformer, and SAM2. The two MiniMax model files have the same name. If the browser renames the second file to diffusion_pytorch_model (1).safetensors, rename it back to diffusion_pytorch_model.safetensors after download.
The annotation tools are enabled only after models are ready. Before preview processing, the page shows GPU name and available VRAM. The quality card provides fast, balanced, high-quality, and custom configurations. When VRAM is tight, choose fast or balanced first.
Click, Box, and Brush Annotation
Click mode is suitable for elements with irregular shapes but clear targets. First add positive points on the element to remove, then add negative points on nearby areas that should not be removed. When you move to a new time point and continue annotation, old points are cleared automatically to avoid misaligned points across frames.
Box mode is suitable for watermarks, title subtitles, fixed corner labels, and other regular regions. Automatic box selection sends the rectangle to SAM2 for segmentation. After drawing the rectangle, you can drag it or adjust its edges. Manual box selection uses the rectangle directly as a mask and specifies a time range without calling AI tracking. The box must stay inside the video frame and cannot be drawn in black border areas.
Brush mode is suitable when you need to manually paint a more accurate mask. Automatic tracking uses the first-frame brush mask to track the entire video. Manual drawing saves the user-painted mask and time range directly. Brush size can be adjusted from 2 to 64 px.
Keyframes, Manual Segments, and Tracking Preview
In automatic tracking mode, after generating the mask you can start tracking directly. If the target moves quickly, is occluded, or changes shape noticeably, annotate again at different time points and click Add Keyframe at Current Frame. Multi-keyframe tracking can improve stability.
In manual mode, draw the mask and click Confirm and Generate Mask. Then play or drag to the end time and click End and Save Segment. After saving multiple segments, click Generate Preview and the page generates a preview video according to the segment ranges.
After tracking finishes, the left side switches to the preview video. Check the whole preview to confirm whether the mask follows the target and whether it damages the background. If the result is unsatisfactory, click Re-annotate. If it is satisfactory, proceed to processing.
Processing Quality, Cancellation, and Saving Results
After preview confirmation, choose processing quality. Fast saves time and VRAM. Balanced fits most videos. High quality is slower and uses more VRAM. Custom lets you adjust inference steps and iteration count. Higher steps or counts usually mean slower processing.
During processing, the page shows stage progress, short-video or long-video processing mode, and estimated remaining time. Both tracking and processing can be canceled. After a cancellation request is sent, wait for the task to stop at a safe checkpoint.
After processing completes, the left side shows the processed video. The result is applied only after you click Save and Replace. Applying the result replaces the original video, regenerates proxy files, and clears that video's existing clips, keyframes, and AI-generated content.
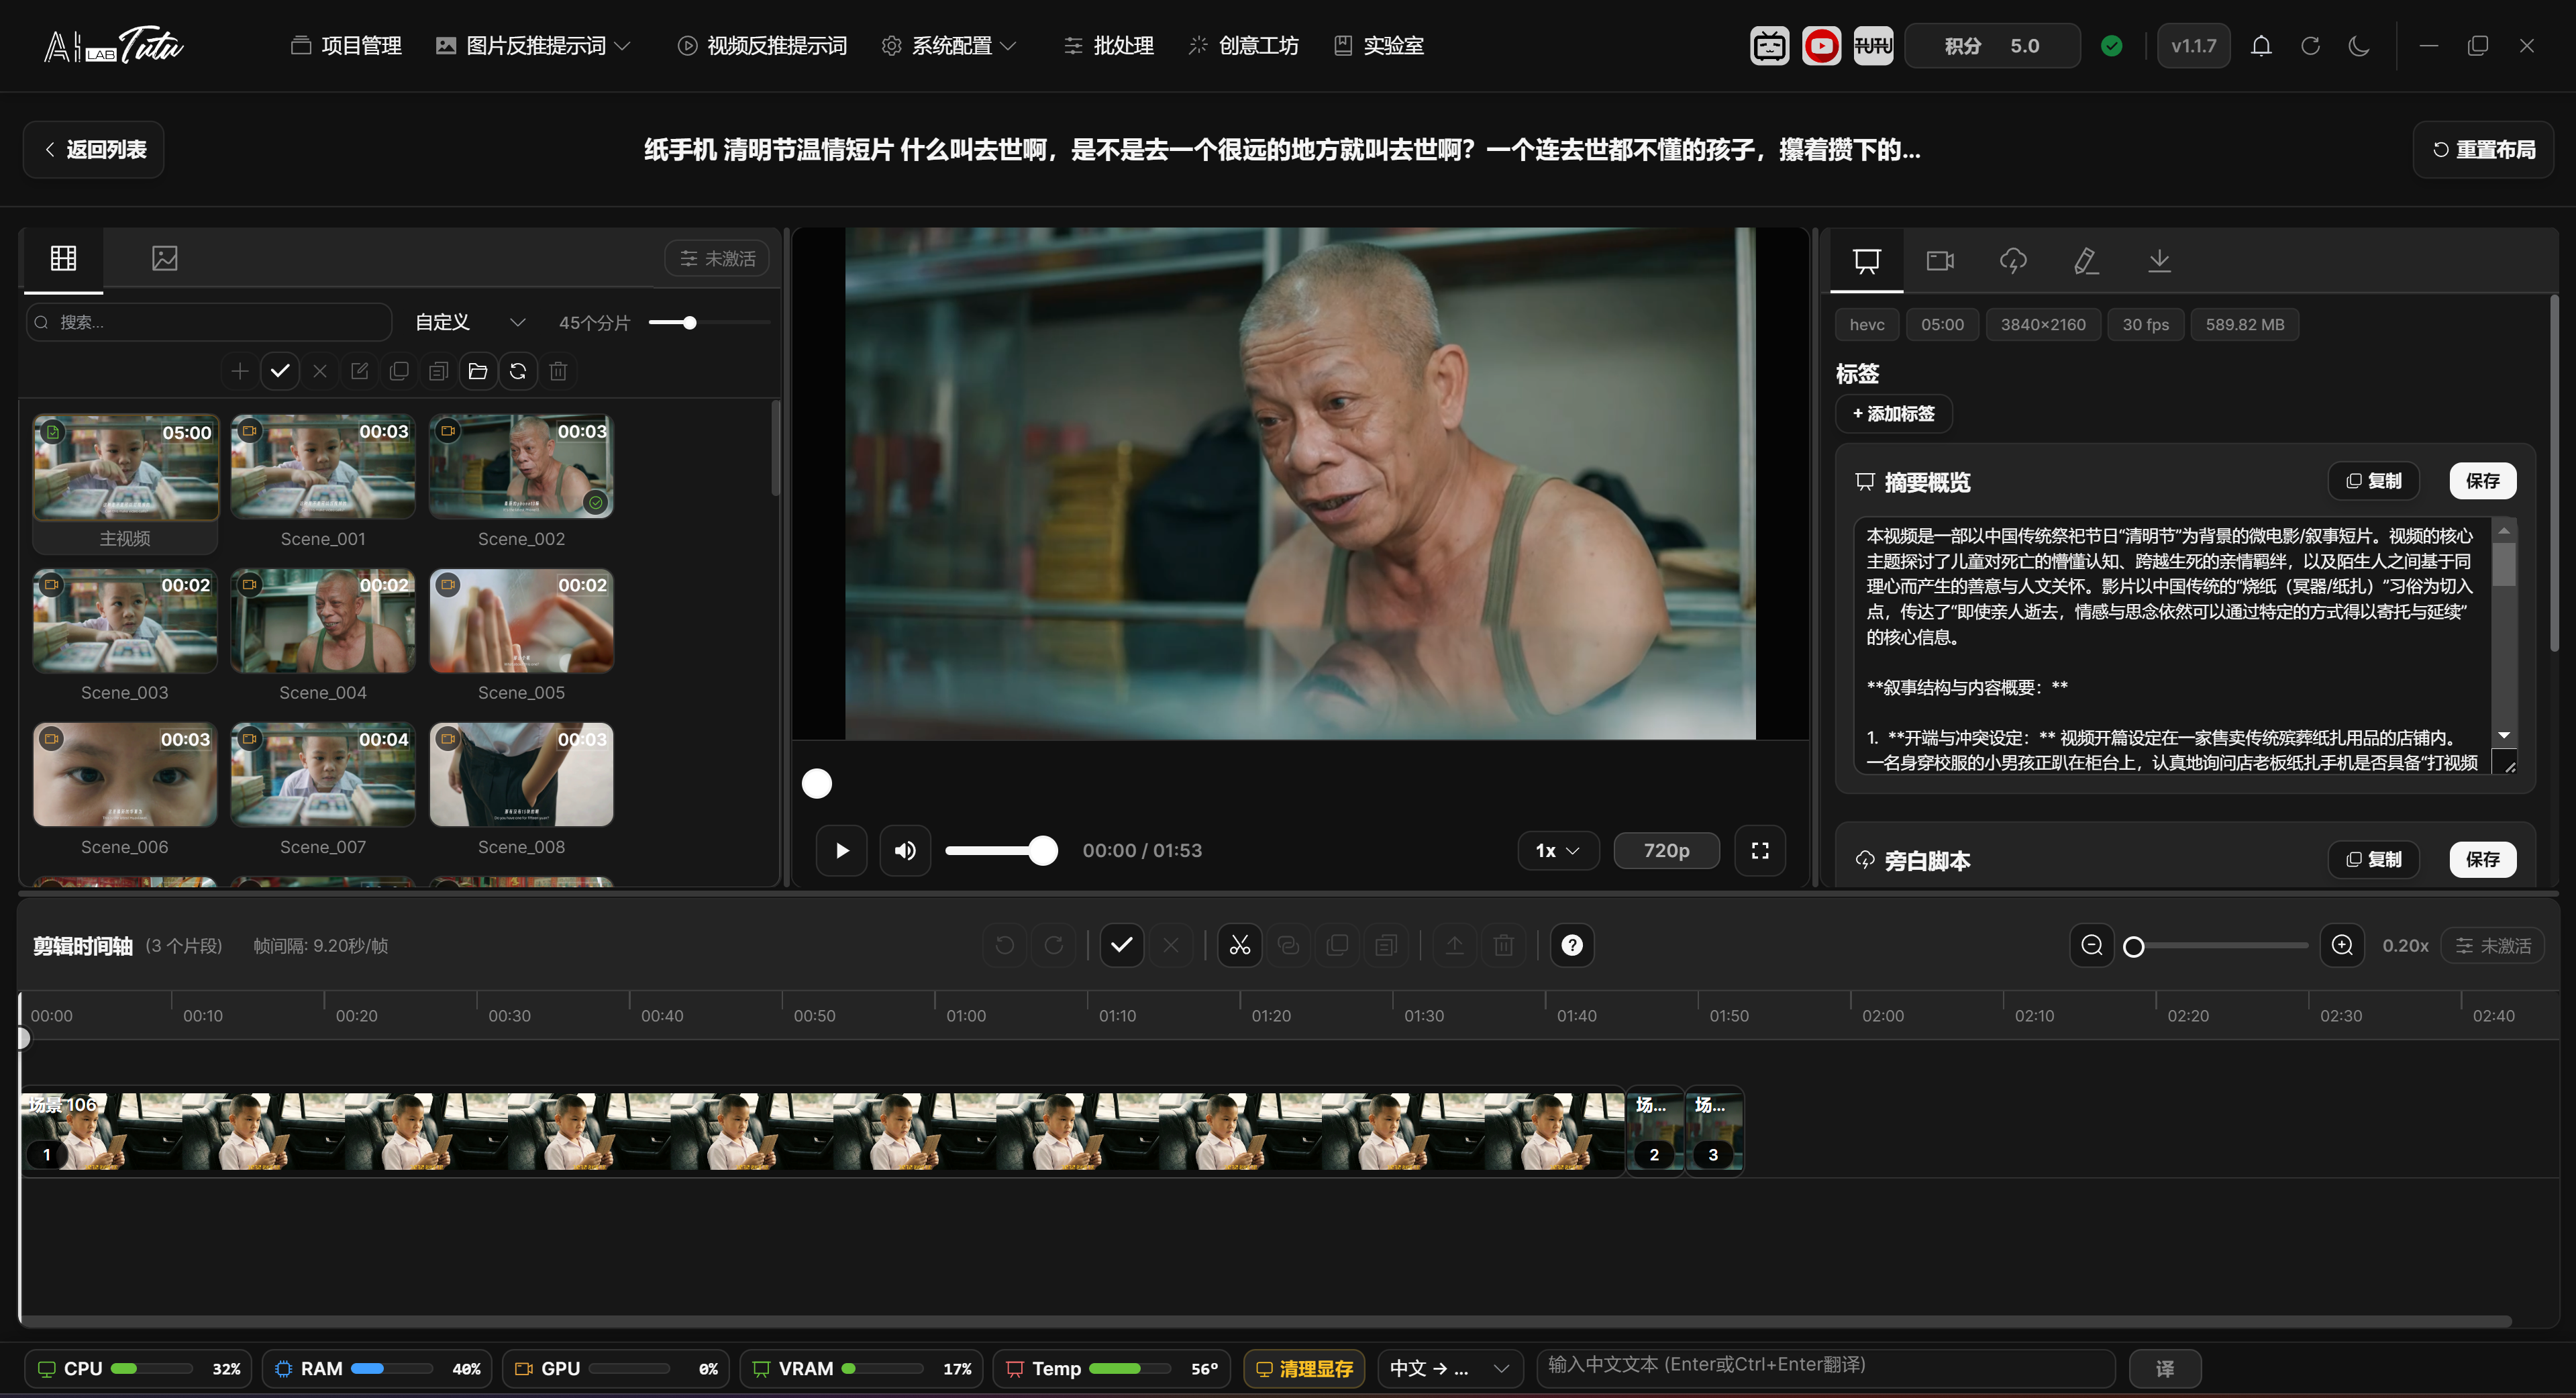
Video Detail Page
How to Enter
In the video list, select a local video and click Edit, or double-click the video card to enter the video detail page.
The video detail page is used for more detailed work on one local video, including scene detection, timeline organization, AI content generation, subtitle and spoken-script editing, and material package export.
Video Detail Page Layout and Splitters
The video detail page is a two-row, three-column editing workspace. In the upper area, from left to right, it contains the clip and keyframe panel, video player, and right-side function panel. The lower area is the editing timeline.
The left splitter adjusts the width of the clip panel and player. The center splitter adjusts the width of the player and right-side function panel. The horizontal splitter adjusts the height of the upper workspace and bottom timeline.
The layout has boundary limits. The left clip panel cannot be smaller than about 15%, the player cannot be smaller than about 25%, and the upper area height is limited to about 40% to 80%. Click Reset Layout at the top to restore the default layout: left 30%, center 40%, upper area 60%.
The right-side function panel can be understood as five entries: basic information, automatic clipping, AI processing, content editing, and package export. The icon labels are compact, and hovering shows their names.
Scene Detection and Timeline
Scene detection splits the video into scene clips according to shots or visual changes and generates keyframes.
You can view scenes, keyframes, and AI content status in the clip list, and you can add clips to the timeline for organization.
The timeline supports playback preview, clip order adjustment, trimming, splitting, merging, and related export operations.
Video detail page. Video, clip timeline, keyframes, and AI content are organized on one page.
Clip List Selection and File Operations
The Clip List in the left clip panel contains the full video entry and clips generated by detection or editing. At the top, you can search, sort, view counts, and adjust card size with the thumbnail slider.
Clip cards show AI content badges in the upper-left corner, duration in the upper-right corner, and a checkmark in the lower-right corner when the clip has already been added to the timeline. Newly generated clips are briefly highlighted and marked NEW.
Click a clip to select it and switch the playback target. In single-selection state, click the same clip again to cancel selection and return to the main video. Ctrl or Command-click supports multi-selection. Shift-click selects a continuous range. Drag over empty space to box-select.
Double-click a clip to add it directly to the bottom timeline. The plus button in the toolbar adds the currently selected clips to the timeline in batch. The full video can be selected for playback or AI processing, but it cannot be deleted, renamed, or copied as a normal clip file.
The clip toolbar also supports select all, cancel selection, rename, copy, paste, open clip folder, refresh, and delete. Rename supports a single rename, and batch rename by sequence number, prefix, or suffix.
Keyframe List Selection and File Operations
The keyframe list is used to view keyframes from video detection or refresh. At the top, you can search, sort by name or time, and adjust keyframe thumbnail size.
Click a keyframe to toggle selection. Shift-click selects a continuous range. Drag over empty space to box-select. Double-click a keyframe image to jump the player to that keyframe time. Click the time label to rename the keyframe file.
The keyframe toolbar supports select all, cancel selection, single or batch rename, copy files, paste copied keyframes, open keyframe folder, refresh, and delete. Deleting keyframes runs according to the currently selected keyframe paths.
Basic Editing Timeline Operations
The bottom timeline reorganizes clips into an editing sequence. Add clips by double-clicking the clip list or clicking the plus button. After being added, clips are arranged in order on the timeline and display an Added marker in the clip list.
The timeline supports click selection, Ctrl to add selection, Shift for continuous selection, box selection over empty space, drag sorting, and auto-scroll near the edge. The toolbar can select all, cancel selection, copy, paste, and delete selected timeline clips.
The playhead can be dragged on the ruler or track, or moved by clicking the track. Timeline zoom ranges from about 0.02x to 4x. Use the zoom slider on the right, zoom buttons, or Ctrl + mouse wheel.
Split runs when the playhead is inside a clip and cuts that clip into left and right parts. Merge requires selected clips to be continuous on the timeline. Merged clips preserve subclip information. When they are later exported back to the clip list, the app regenerates video according to the subclips.
Export to Clip List creates the selected timeline clips back into the left clip list. Small numbers of clips are processed directly. More clips, longer total duration, or merged clips enter a background task with progress. Duplicate clip names automatically get appended numbers to avoid overwriting.
Built-in timeline shortcuts:
- Ctrl+Z and Ctrl+Y: undo and redo.
- Ctrl+A: select all.
- Esc: cancel selection.
- Ctrl+C, Ctrl+X, Ctrl+V: copy, cut, paste.
- Delete: delete.
- Ctrl+S: split.
- Ctrl+M: merge.
- Ctrl+E: export.
- Space: play or pause.
- Left and right arrow keys: move the playhead.
AI Content Generation
The video detail page can generate scene descriptions, summaries, and spoken scripts.
In default AI mode, users do not need to manually choose the underlying model. In advanced mode, you can choose an external model or local model through the video reverse-captioning model selector.
When multiple content types are generated for the same video at the same time, the app tries to reuse one video-understanding result and charges credits once according to the real amount returned by the server.
If returned content is missing, the API fails, or credits are insufficient, the client treats the task as failed and should not write a successful credit-charge record.
AI Processing Range and Output Settings
The AI Processing entry on the right processes the object currently selected in the left clip panel. If the full video is selected, it processes the main video. If one or more clips are selected, it processes those clips. If no object is selected or no processing type is checked, the start button is unavailable.
Available processing types include summary, spoken script, and scene description. Summary can configure style, length, language, and included elements. Spoken script can configure style, pace, language, plain or SRT format, and interaction guidance. Scene description can configure style, detail level, language, and plain or SRT format.
In default AI mode, the page shows Default Mode and does not require manual model selection. In advanced mode, choose an external or local model in the video reverse-captioning model selector.
During a task, the page shows current stage, progress percentage, success and failure counts, current processing object, task type, model, and elapsed time. Streaming content display and cancellation are supported.
After completion, if only the full video was processed, the page returns to the Basic Information area. If clips were processed, the page switches to the Content Editing area so you can immediately check and modify clip results.
Prompt Editor
Video scene description, summary, and spoken-script prompt configuration have independent editor entries.
It is recommended to run the workflow with default prompts first, then adjust prompts according to your material type.
Main Video and Clip Content Editing
In Basic Information, you can edit the main video's summary, spoken script, and scene description. Each block has copy and save buttons. The save button becomes available only after the content changes.
Content Editing is used for one clip. The edit form appears only when exactly one normal clip is selected in the left clip list. If multiple clips are selected, no clip is selected, or only the full video is selected, the page shows a selection prompt.
Clip content editing is also divided into summary, spoken script, and scene description. Each block can be copied or saved. Saving updates only the current clip and does not automatically sync to other clips or to the main video.
If you need to rewrite content in batch, use AI Processing or batch processing first, then review important clips one by one. Do not expect the Content Editing area to batch-save in multi-selection state.
Package Export
Package Export in the video detail page can organize the original video, clips, keyframes, subtitles, and AI-generated text.
During export, a stable progress summary is shown, including processing mode, overall count, clip count, and output directory.
Do not close the app during export. Do not move the source video or project directory.
Package Export Content and Progress
Package Export is divided into whole-video content and clip content. Whole-video content can include the original video, summary, spoken script, and scene description. Clip content can include clip videos, keyframes, clip summaries, clip spoken scripts, and clip scene descriptions.
Spoken scripts and scene descriptions can be exported as txt or SRT. SRT is more suitable for subtitles and timeline scenarios. txt is better for regular text organization.
Before export, choose an output directory and confirm that the current clip list, keyframes, and AI text are ready. During export, the page shows total progress, export mode, overall count, clip count, current clip, current subclip, and output directory.
Do not close the app, move the source video, or move the project directory during export. When merged clips or many clips are included, the progress window may show subclip progress. This is normal.
Batch Processing
Page Structure
Batch Processing is located in the top navigation bar. The page is divided into three areas: task configuration, task monitoring, and task details.
The left side selects the project and adds processing steps. The middle area shows the task list and progress. The right side shows the current task details, logs, previews, and results.
Batch Processing main interface. Configure steps on the left, view tasks in the middle, and inspect task details and previews on the right.
Task Configuration, Monitoring, and Details
The left side is Task Configuration. Select a project first, then add processing steps through Add Step. The step list supports drag sorting. The toggle can temporarily disable a step. The delete button removes a step. After you click a step, its parameters appear below.
The middle area is Task Monitoring. After a task starts, it appears in the list and shows ID, status, progress, start time, and cancel entry. The right side is Task Details, with Detail and Preview tabs for progress logs, failed images, pre-run preview, and similar-image processing results.
When Resize or Format, Rename Materials, or Detect Similar Images is selected, the right side automatically switches to the Preview tab. Before starting batch processing, a project must be selected and at least one enabled step must remain.
Available Steps
The current interface provides three main steps by default:
- Resize or Format
- Rename Materials
- Detect Similar Images
Dataset export is no longer shown as a normal default batch-processing step for regular users. Export image datasets from the corresponding image mode. Export video content from the video page or video detail page.
Step Order, Enabled State, and Execution Range
Steps run from top to bottom according to the left-side list. Drag the handle on the left to change order. If you turn off a step, that step is skipped but its configuration remains and can be turned on again later.
When entering from the top Batch Processing page, after selecting a project the default range is the whole project. Some tasks launched from image pages or export flows include the selected image range. The Preview tab displays the first results according to the actual range passed in.
If a task includes deletion through similar-image processing, check the preview on the right before starting. If the preview is loading, has an error, or has not been generated yet, a delete task will not start directly.
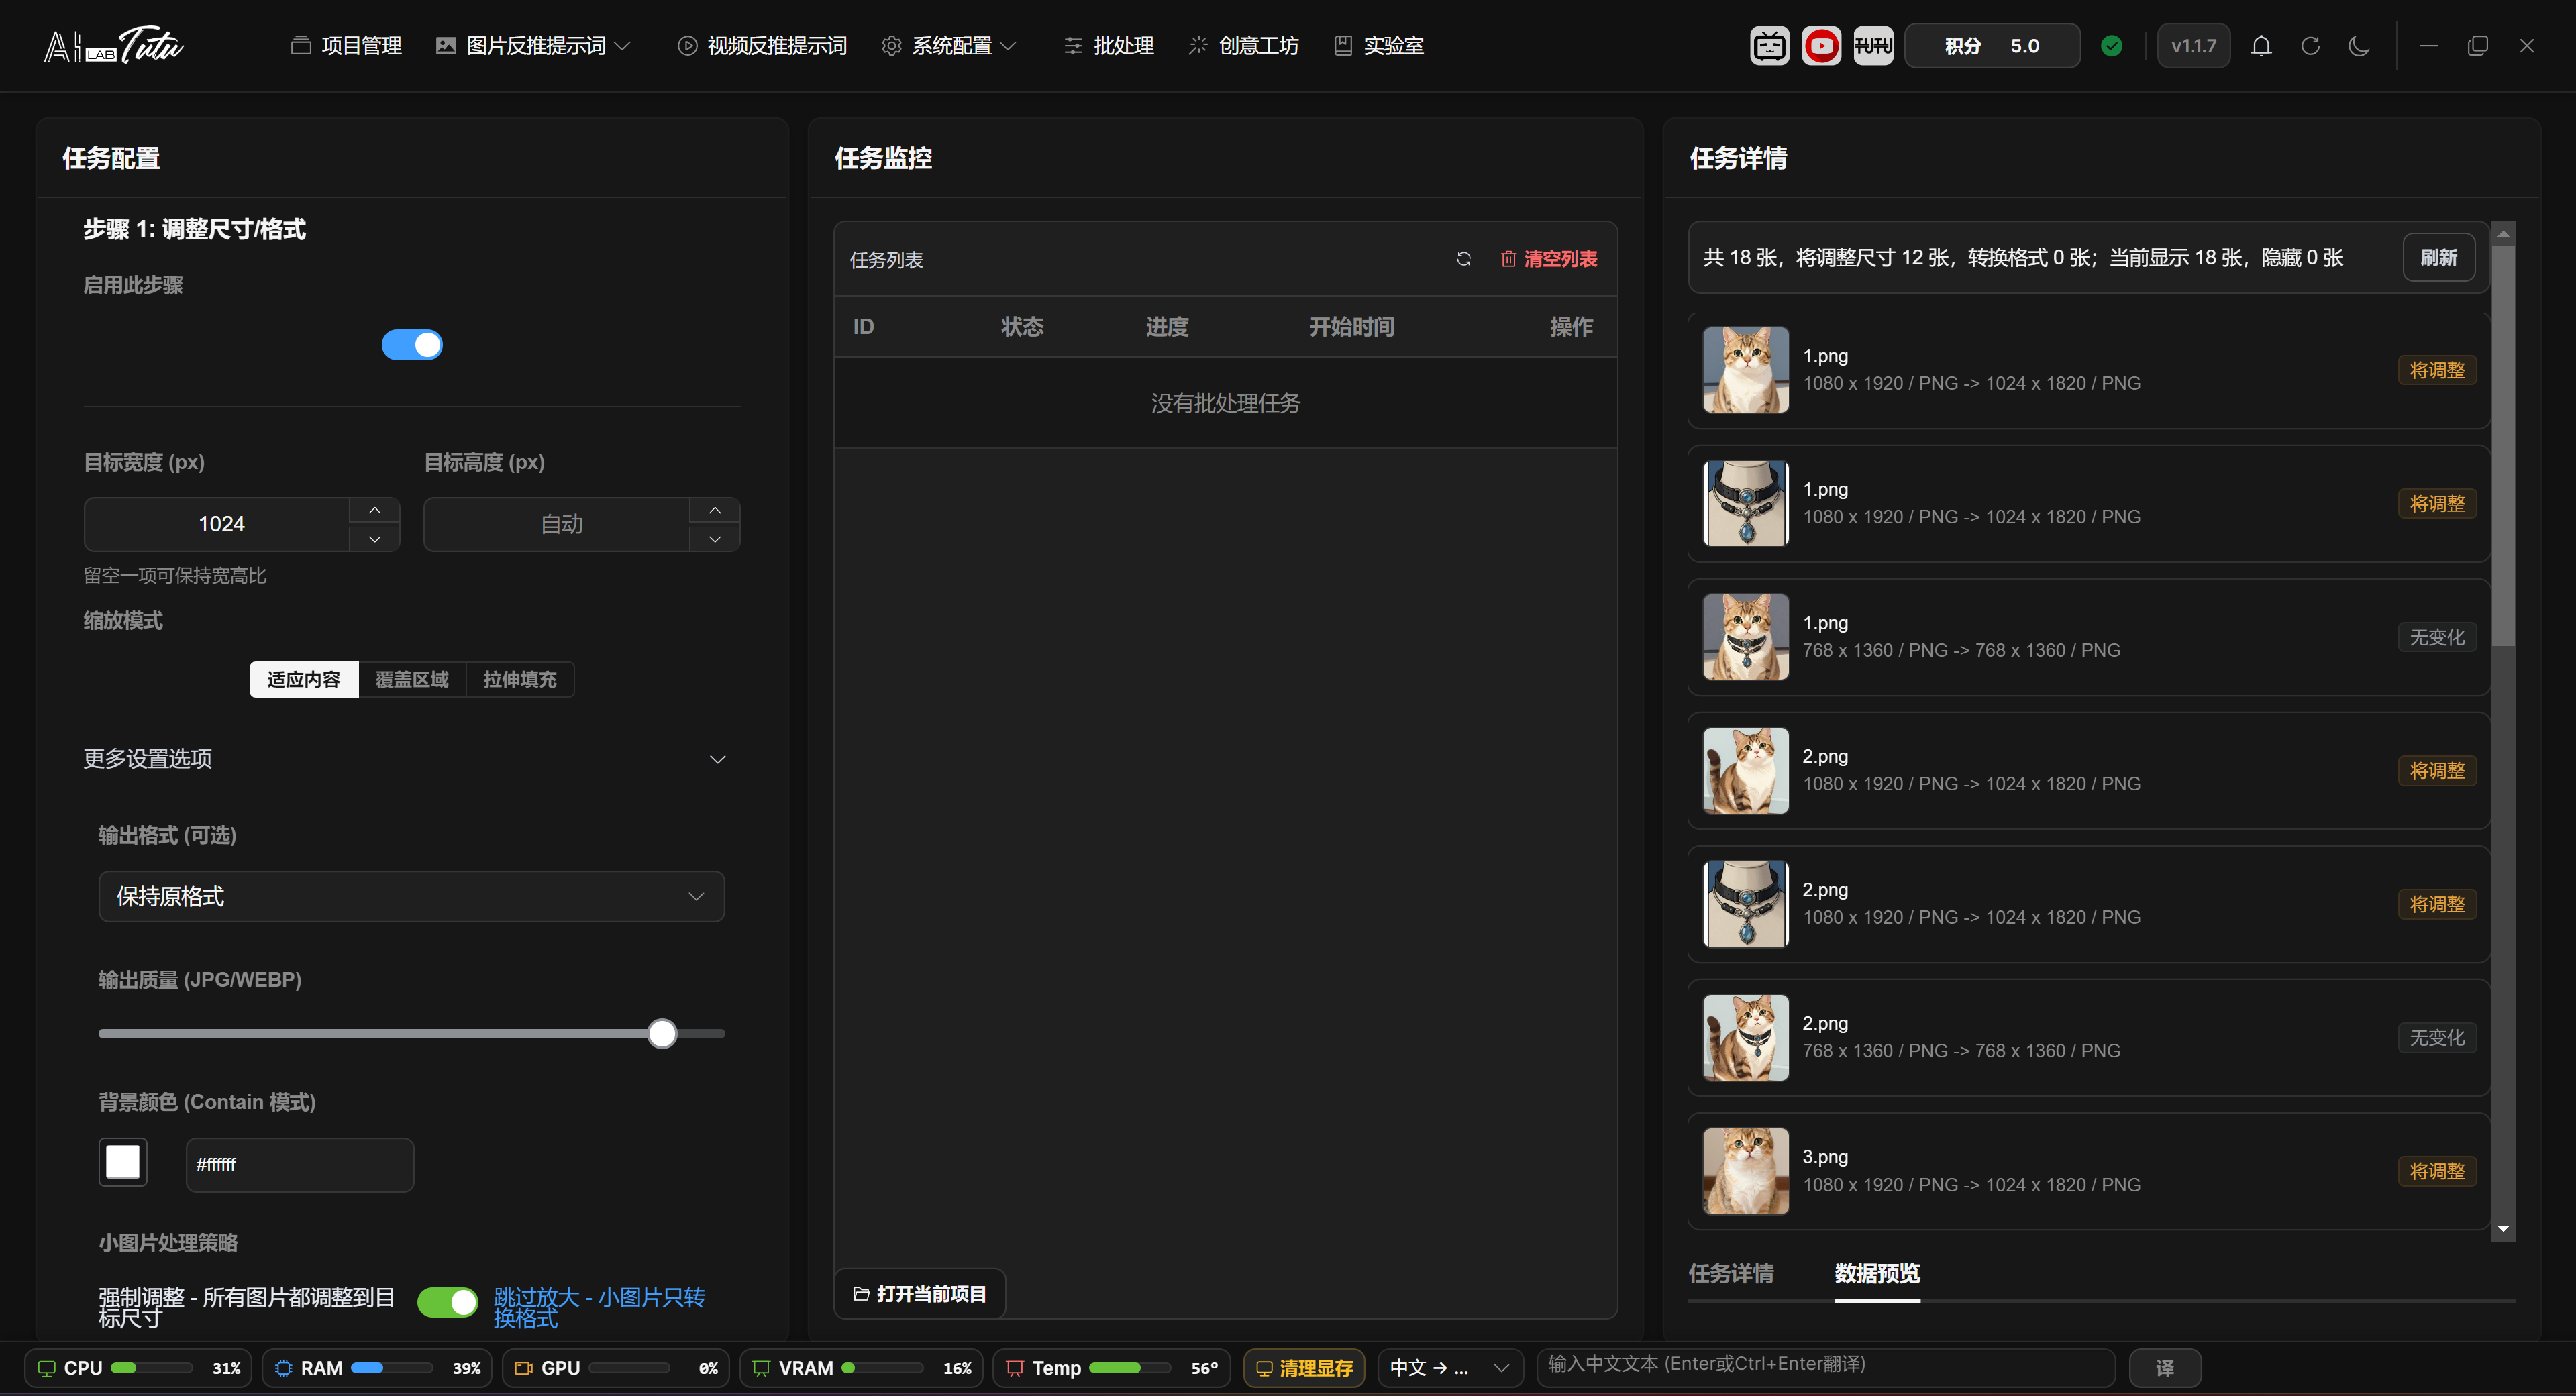
Resize or Format
This step batch-adjusts image size, format, and quality.
Skip Upscaling is enabled by default. Small images only change format, which prevents quality loss from enlarging small images.
Before processing, you can view the estimated changes and confirm how many images will be resized or converted.
Resize or Format step. Set target width, output format, quality, and small-image handling strategy.
Resize or Format Parameters and Preview
Target width and target height can use only one value. The system calculates the other side proportionally. If both are empty, the step does not resize and only performs format conversion when an output format is selected.
Scaling modes include keep aspect fit, crop fill, and stretch. In more settings, you can choose JPG, PNG, or WEBP. JPG and WEBP support output quality adjustment. Background color is used only when fit mode needs padding.
Skip Upscaling is enabled by default. Images smaller than the target size keep their original dimensions and only convert format. The preview on the right shows old size and format to new size and format, with labels such as will resize, will convert, or no change. It displays up to the first 40 items.
Rename Materials
Rename Materials renames project images according to one unified rule.
You can set a common file name and starting number, then view the first file's naming effect in the preview area. If duplicate names occur, the system automatically appends suffixes to resolve conflicts.
Renaming affects file management and later export, so it is recommended to run it only after the project structure is confirmed.
Rename Rules and Preview
The current rename step uses a simplified rule: enter a unified file name and set the starting number. The generated format is number_filename, while the original file extension is preserved.
The number increments according to processing-list order. For example, if the starting number is 88 and the file name is tutu, results look like 88_tutu.jpg, 89_tutu.jpg, and so on.
The left step configuration shows a preview based on the first image. The Preview tab on the right shows batch results from old file names to new file names. When duplicate-name conflicts occur, the system appends suffixes such as _1 or _2.
Detect Similar Images
Detect Similar Images is used to find duplicate or similar materials.
You can choose to mark images as duplicate, or delete them after confirmation. Delete operations are high risk, so review the preview and range before running.
If no similar images are detected, the preview area displays an empty result normally. After deletion or marking completes, the right-side preview shows the processing result so you can confirm the actual affected range.
Detect Similar Images. Use it to find duplicate or similar materials and process them after confirmation.
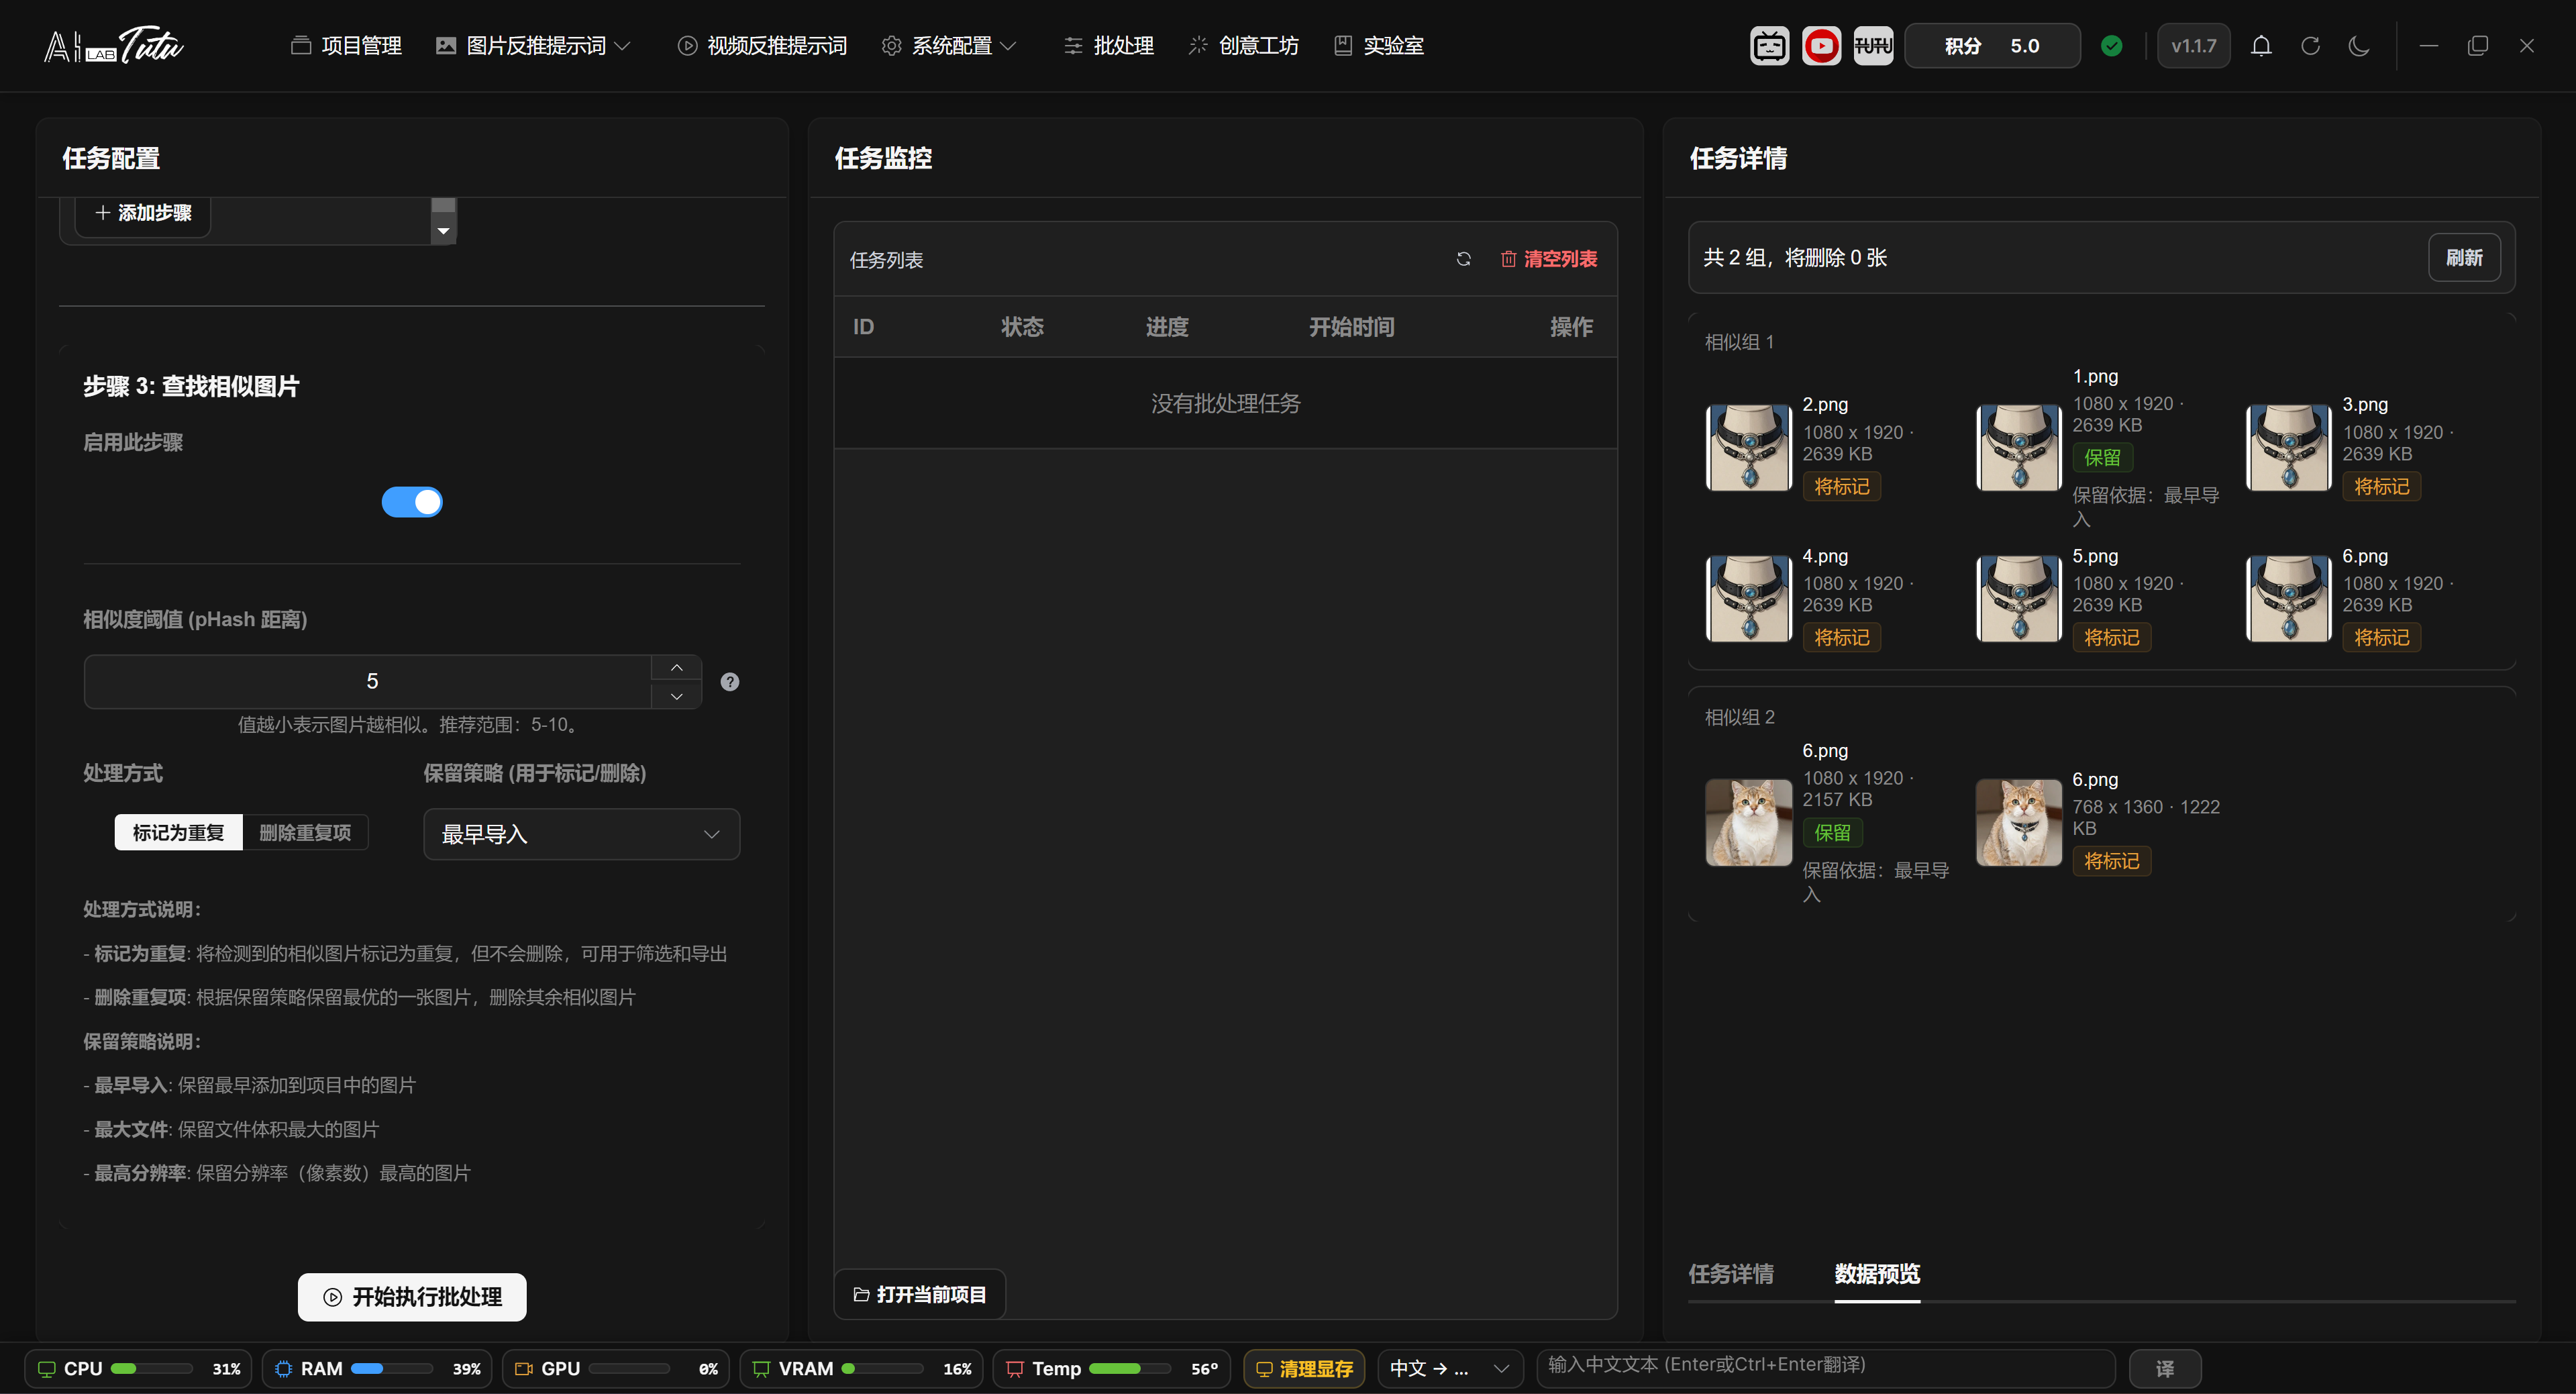
Similarity Threshold, Keep Strategy, and Preview
Similar-image detection uses pHash distance. The threshold range is 0 to 64. Smaller values are stricter. A common range is 5 to 10. If unsure, preview with the default value first.
Processing modes are Mark as Duplicate and Delete Duplicates. Keep strategy can be earliest imported, largest file, or highest resolution. The system keeps one image in each similar-image group and marks or deletes the others according to the processing mode.
The right-side preview groups thumbnails and shows dimensions, file size, will keep, will mark, will delete, and keep reason. If some project images still lack pHash data when preview is generated, the page shows preparation progress.
When Delete Duplicates is selected, refresh and confirm the preview first. If the preview shows no deletable images, the app prompts for confirmation again when starting.
Task Monitoring and Cancellation
The task list shows task ID, status, progress, start time, and available cancel action.
For long tasks, refresh the task list to view the latest status. Tasks that can be canceled show a cancel button.
After a task completes, related project cache and page data refresh, making it easier to return to image pages and inspect results.
Task Status, Logs, and Failed Images
The task list prioritizes running and waiting tasks. Finished tasks are sorted by recent time. Common statuses include queued, waiting, running, completed, partially failed, failed, and canceled.
After selecting a task, the right-side details show task ID, status, progress, processed count, current step, message, start and end time, error information, and logs. The log area scrolls through recent records and is useful for diagnosing long tasks that hang or fail.
If some images fail, the details area shows failed image count and a View Details entry. You can inspect failed images, failed steps, and error messages. Failures do not automatically delete project materials. After processing finishes, return to the image page and spot-check results.
Refresh, Cancel, and Clear Tasks
The refresh button above the task list actively pulls all task statuses. The backend also updates progress through polling and WebSocket. Tasks that are queued, waiting, or running can be canceled. After a cancellation request is sent, the task stops at a safe checkpoint.
Clear List only clears historical task records that are completed, failed, canceled, or partially failed. It does not interrupt running tasks. Open Current Project at the bottom opens the current project folder directly, making it easier to inspect processed files.
Creative Workshop
Page Purpose
Creative Workshop is the AI image generation and editing page. It is located in the top navigation bar.
It supports text-to-image without reference images, and image-to-image or multi-image reference editing after reference images are uploaded.
Basic Workflow
- Upload 1 to 5 reference images if needed. If no reference image is uploaded, the workflow runs as text-to-image.
- Choose a preset style, or directly enter your own editing or generation instruction.
- Choose the number of images to generate. In default mode, you can also choose resolution and aspect ratio, and view the corresponding credit cost prompt.
- Click Start Generation and wait for progress to complete.
- View images in the result area on the right. You can download one image, download a ZIP, or open history to reuse prompts.
Creative Workshop main interface. Upload reference images, choose a style, enter instructions, and generate images.
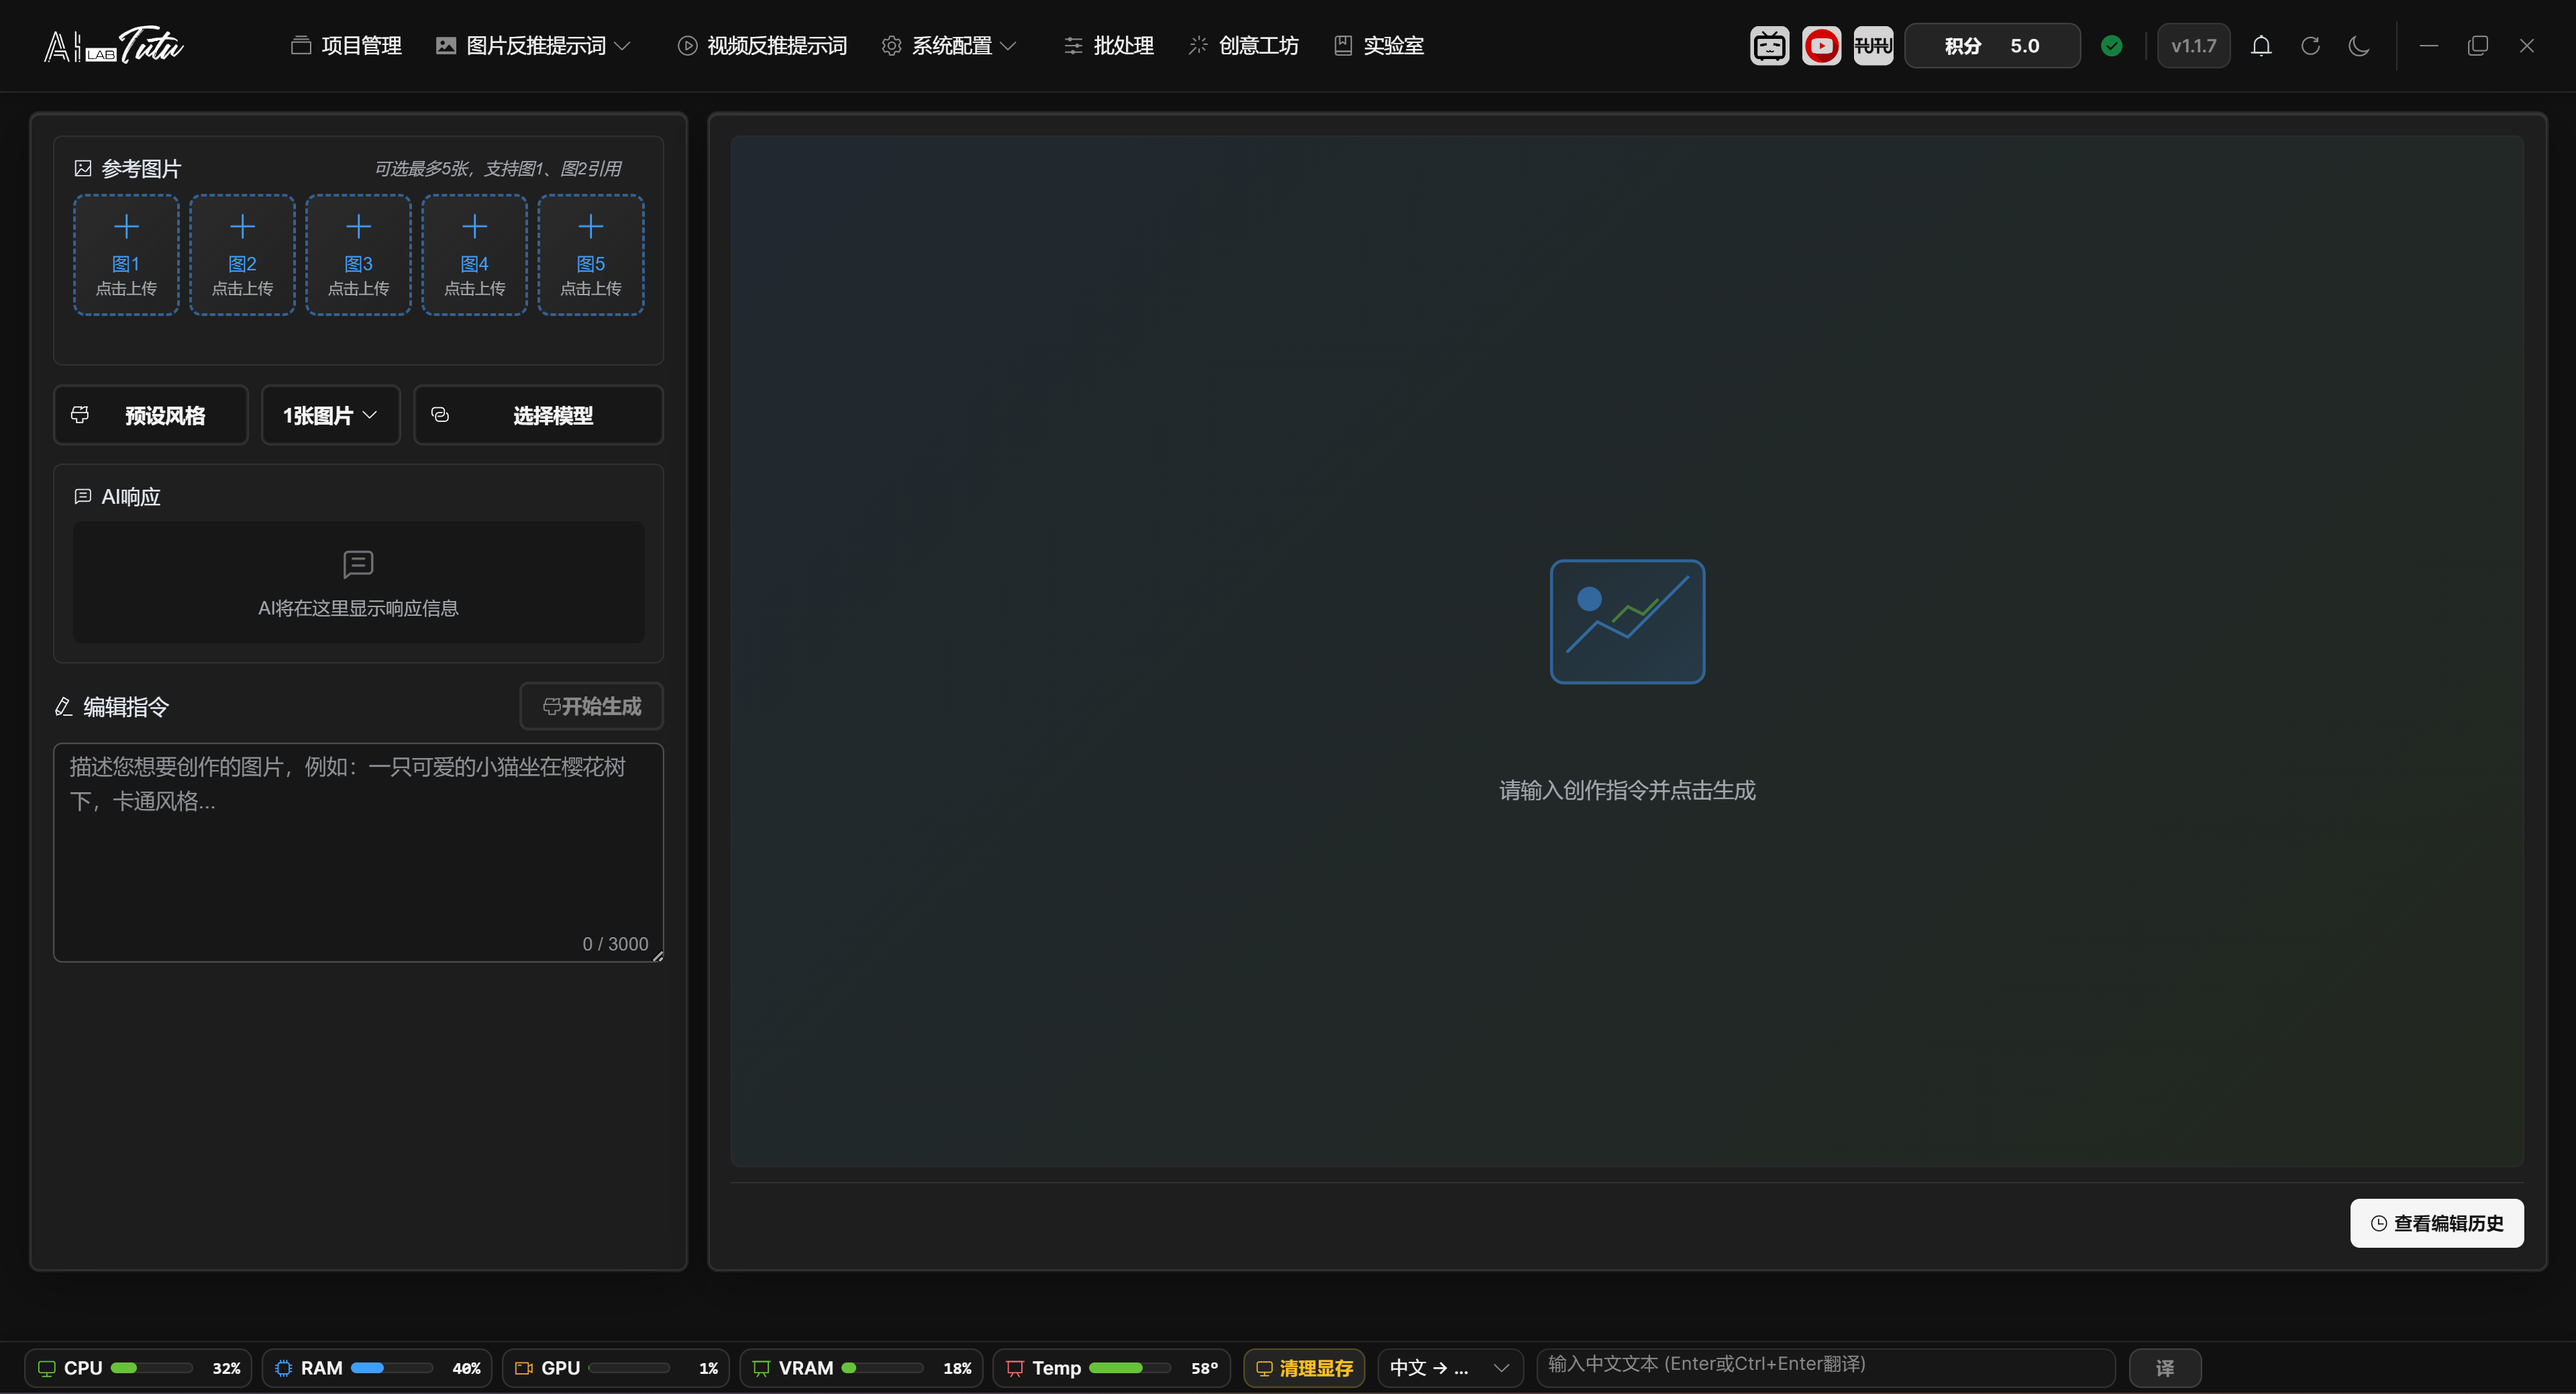
Reference Images, Prompts, and Generation Parameters
The left side supports up to 5 reference images. Uploaded files must be images, and each image must be no larger than 10 MB. After uploading or clearing any reference image, old results on the right are automatically cleared so that new parameters are not mixed with old results.
If no reference image is uploaded, generation runs as text-to-image. After uploading reference images, it runs as image editing or multi-image reference generation. Prompts can be up to 3000 characters. You can write them manually, or choose Chinese or English prompts from preset styles and then edit them.
In default mode, you can choose image count, resolution, and aspect ratio. Resolutions 1K, 2K, and 4K show an estimated credit cost of about 2, 4, and 6 credits per image respectively. 4K can generate at most 2 images per request. Other resolutions can generate at most 4 images per request.
Available default aspect ratios include 1:1, 16:9, 9:16, 4:3, and 3:4. Before reference images are sent, they are automatically compressed and resized according to the target resolution. The original uploaded files are not modified.
Default Mode and Advanced Mode
Default mode uses account credits and does not require external model configuration.
Advanced mode lets you choose an external model provider and model. It is intended for users who already have API keys or custom workflows.
When generating multiple images in one request, if only some images succeed, the successful images remain and the app reports success and failure counts.
Generation Progress, Partial Success, and Download
After clicking Start Generation, a full-screen progress layer appears. It moves through stages such as preparing reference images or prompt, submitting request, AI generation, and saving result. The current generation flow does not provide an in-progress cancel button.
After generation completes, the right-side result area displays the returned images. Click an image to preview it larger. Hover over a single image to download it, or click Download ZIP to package and download all results from this run.
If a request asks for multiple images but only some succeed, the successful images stay in the result area. Notifications and the AI response area show requested count, success count, failure count, and readable failure reasons.
The Send to Gallery entry in the result area is still a future capability. The stable result actions currently available are preview, single-image download, and ZIP download.
Preset Styles and History
The preset style window supports search, preview, Chinese prompt selection, English prompt selection, and adding custom presets. Default presets can be selected and previewed, but cannot be directly edited or deleted.
Edit history can recover previous prompts and thumbnails. It is useful when iterating repeatedly on the same theme.
Creative Workshop edit history. View historical thumbnails, copy or reuse prompts, and delete records.
Reusing and Deleting History
History records are displayed in reverse chronological order. Each record contains a thumbnail, prompt, default-mode or external-model identifier, and generation time.
Click a history card to bring that record's prompt back into the input box on the left. Copy Prompt copies only the text. Delete removes one record. Clear History in the upper-right corner deletes all records.
Reusing a history prompt does not automatically restore the reference images, resolution, aspect ratio, image count, or external-model selection from that run. After reusing a prompt, recheck these parameters for the current task.
AI Lab
Page Purpose
The top navigation displays this page as Lab, while the route title is AI Lab. This page is used to browse AI and AIGC authors, experts, and learning-resource entries.
It is not required for image captioning or video reverse prompt workflows. Treat it as a learning and extension resource library.
Browse Resources
The current page mainly displays author cards sorted by recommendation weight. Cards include avatar, background image, author name, introduction, domain tags, recommendation highlights, and external platform entries.
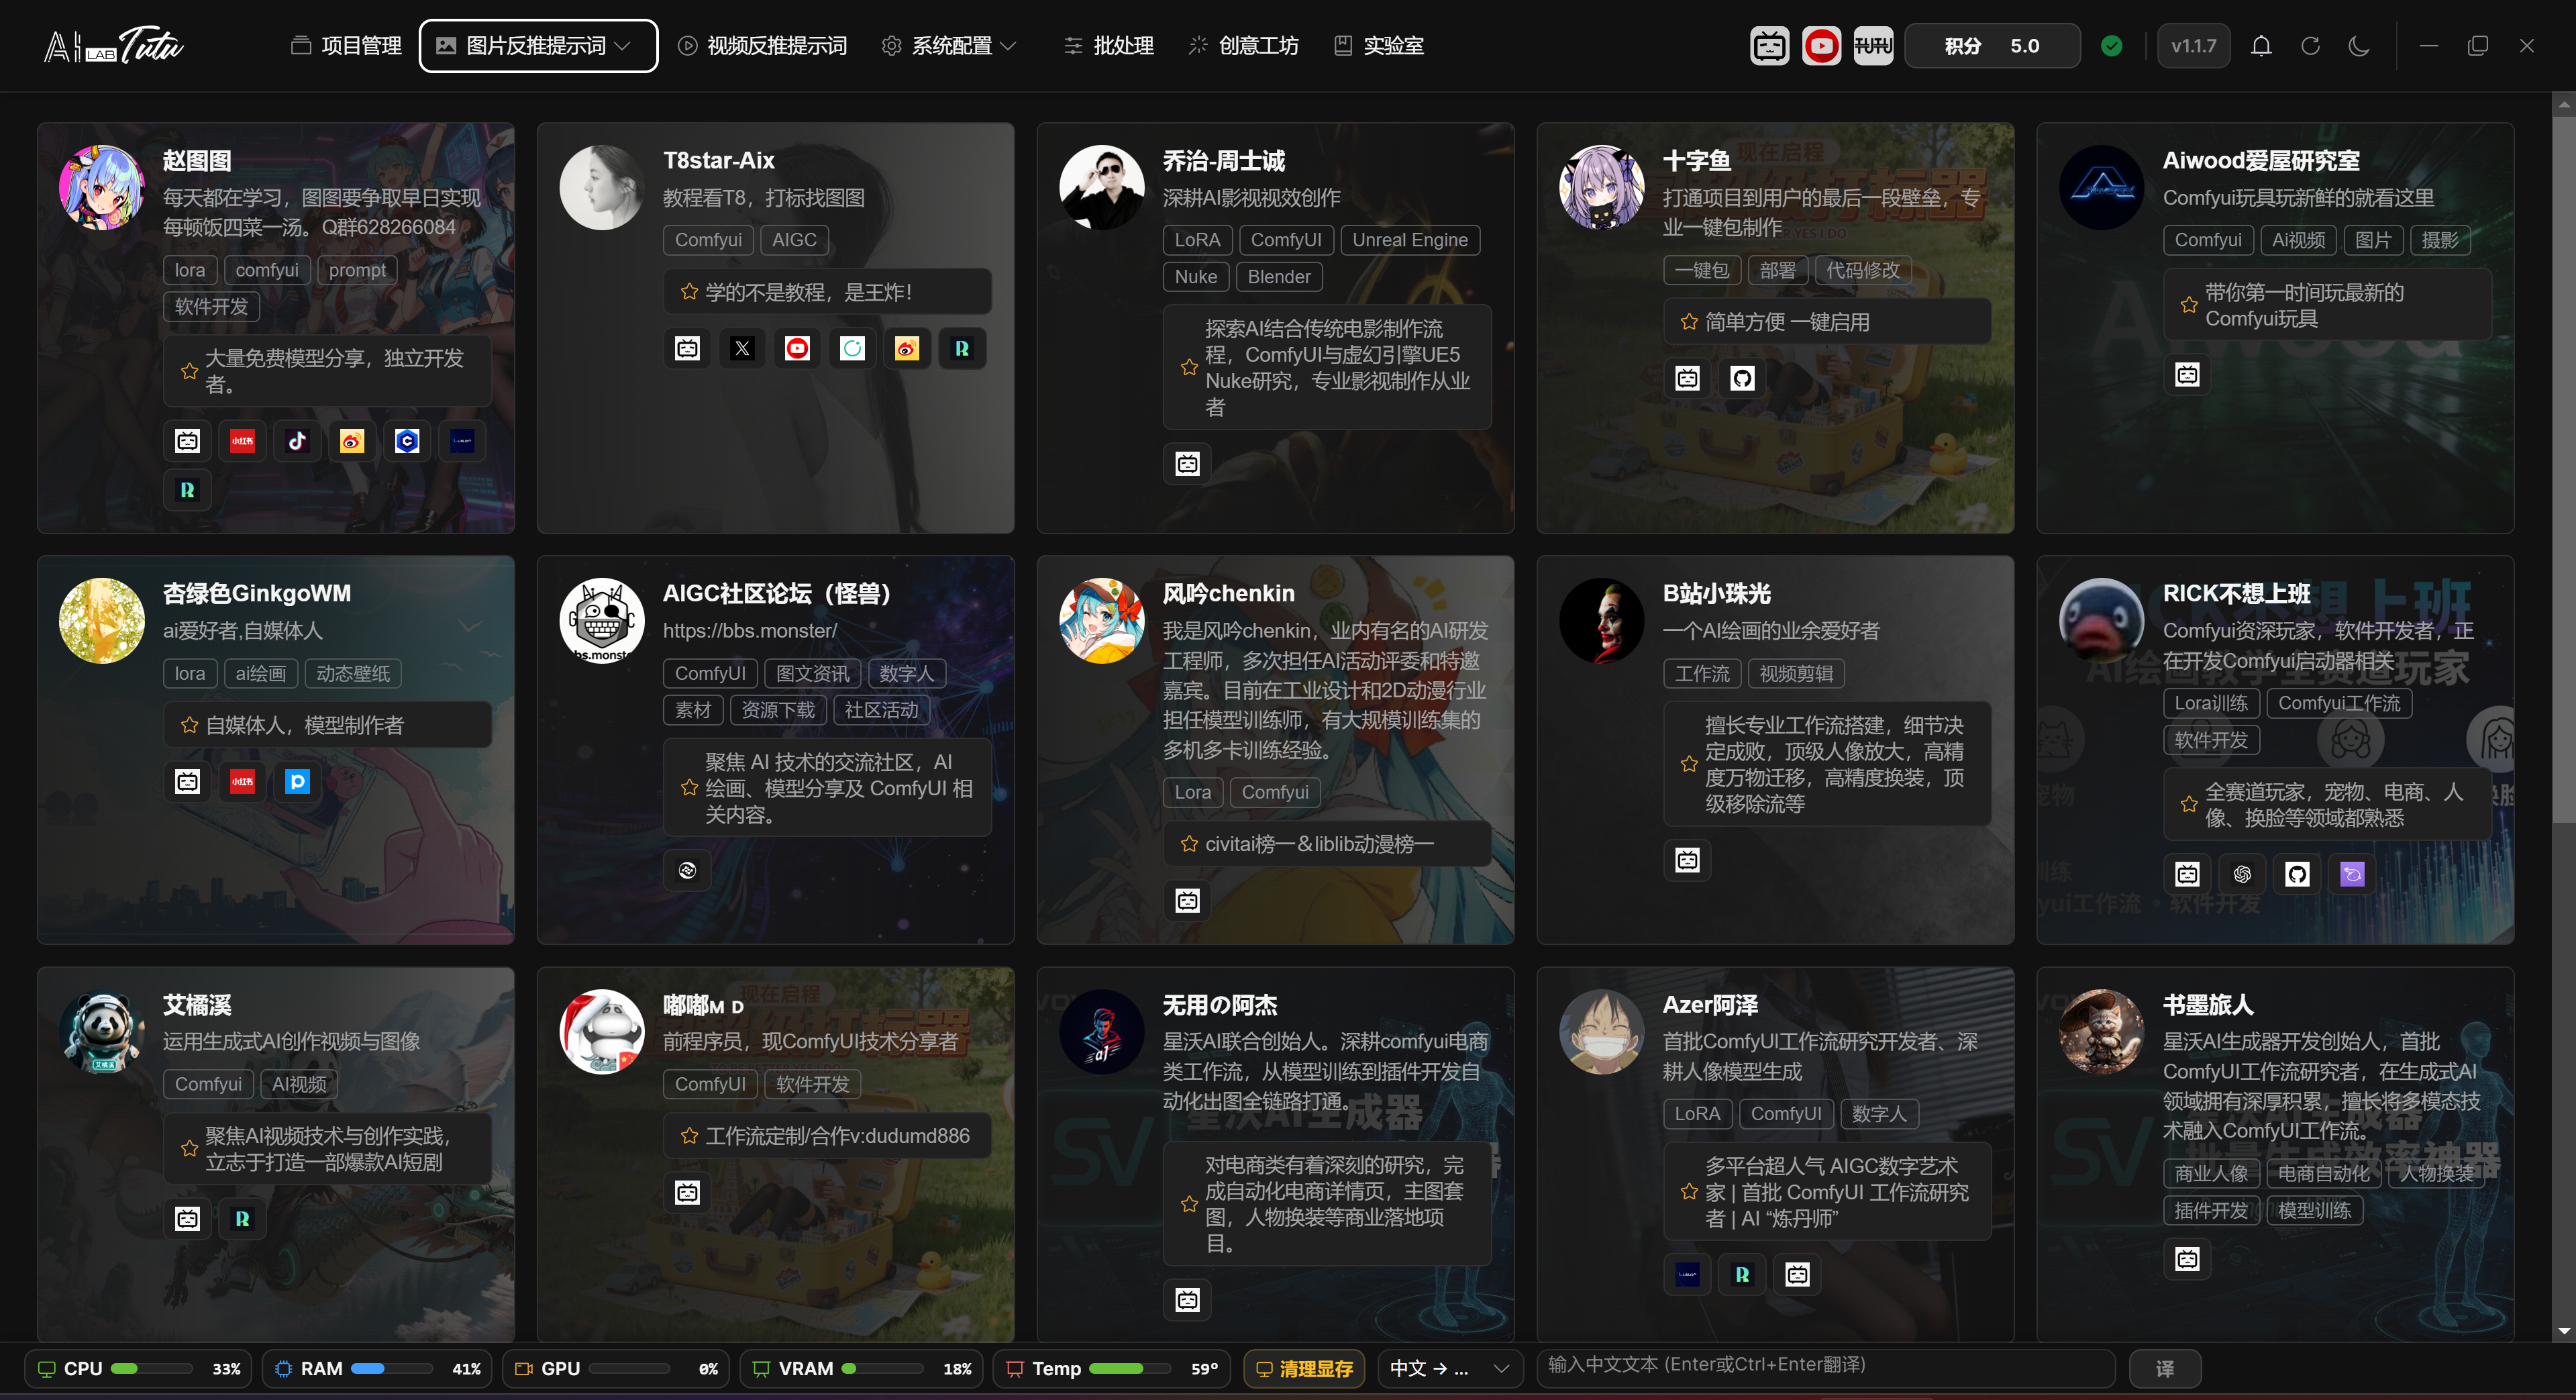
AI Lab author card list. Use the platform icons on each card to open the corresponding external resources.
Author Cards and External Links
Regular users see an author-card grid. Search, domain filtering, tutorial lists, and works lists are currently hidden, so the main operation is to browse card content and choose a platform entry.
Click Bilibili, YouTube, GitHub, website, or other platform icons on a card to open the corresponding external link. The app tries to record click statistics for future popularity sorting and content optimization. If statistics reporting fails, it does not prevent the link from opening.
If you see management-related entries, they are for content maintenance. Regular users only need to browse author cards and open the external resources they need.
Usage Suggestions
When you encounter an unfamiliar function, you can first look for related authors or external learning entries in AI Lab, then return to the feature page to operate.
Resources will continue to be supplemented in future versions. If the page displays abnormally, refresh it or try again later. These errors usually affect only the display of Lab resources and do not affect project management, captioning, or video processing.
Model Settings
Page Location
Open the System Configuration drop-down menu in the top navigation bar and choose Model Settings.
Model Settings first separates Default Mode and Advanced Mode. For first-time use, keep Default Mode, confirm that account credits and default AI work correctly, and switch to Advanced Mode only when needed.
Default Mode
Default Mode uses preset default AI configuration. Users only need to log in and buy credits to use image reverse prompts, natural-language descriptions, reference reverse captioning, video understanding, Creative Workshop, and related features.
Default Mode Scope and Account Entry
Default Mode uses the unified account and credit system. You do not need to enter an API key or configure local model paths. Image reverse prompts, natural-language descriptions, reference reverse captioning, video understanding, and Creative Workshop use the app's preset default AI capability.
The Default Mode page displays an account entry, making it convenient to view balance, top up credits, and confirm subscription or device benefits.
Failure Handling Strategy
The default strategy is conservative: when a task fails, processing stops first to avoid continuing a batch task and consuming more credits. When processing many materials, you can choose Continue Processing so that the app skips failed items and continues with later images, videos, or generation tasks.
Failure handling is divided into three categories: image and reference reverse captioning, video reverse prompts, and Creative Workshop. Each category can use Stop on Failure or Continue Processing. If one image, video, or generation subtask still fails after one retry, the app follows this strategy to decide whether to continue.
Default Mode model configuration. Regular users can keep Default Mode to use credits and default AI.

Advanced Mode
Before switching to Advanced Mode, the app displays a confirmation prompt. Advanced Mode is for users who need their own API keys, local models, custom providers, or special model routing.
Advanced Mode mainly has two tabs: Built-in Model Configuration and External Model Configuration. The separate Video Model Configuration page mentioned in older documents is no longer an independent navigation entry. Video reverse-captioning capability is now managed through unified model and provider configuration.
Built-in Model Configuration
Built-in Model Configuration manages local or built-in models, such as Ollama-related models.
You can view model lists, manage paths and status, test connections, enable or disable models, and perform related operations.
Local models depend on hardware performance, especially VRAM and disk space. If a model cannot load, first check the model path, Ollama status, VRAM, and log prompts.
Recommended Models, Downloads, and Local Video Models
The top area of Built-in Model Configuration is Recommended Models. Cards show parameter scale, model size, VRAM and memory requirements, and use green, yellow, or red status hints to indicate how well the current hardware fits. Models that are not downloaded can be downloaded directly. Models that are already downloaded or manually prepared can have their paths configured.
Local video-understanding models are also managed here. Each model shows input modality, whether it natively supports video, model path, device, configuration status, test status, and enabled state. After setting the path, click Test first. Use the model for video reverse prompts only after the test passes.
Downloading models shows speed, downloaded size, remaining size, estimated remaining time, and elapsed time. Downloads can be paused or continued. The model is not truly deployed until the page's validation, configuration, and cleanup stages all complete.
Model List, Connection Status, and Quantization
The local model list combines tested video models, Ollama models, external-path models, and quantized models. The action area on the right can delete, reconfigure, or remove paths. Removing a local video model path does not delete the original model files.
The bottom connection status is used to test whether the model service is available. In the model quantization area, choose an existing model and quantization type, then start quantization. Progress is displayed after startup. Completed quantized models enter the quantized-model list, where type, size, and creation time can be viewed.
Built-in Model Configuration. Manage local or built-in model status, paths, and downloads.
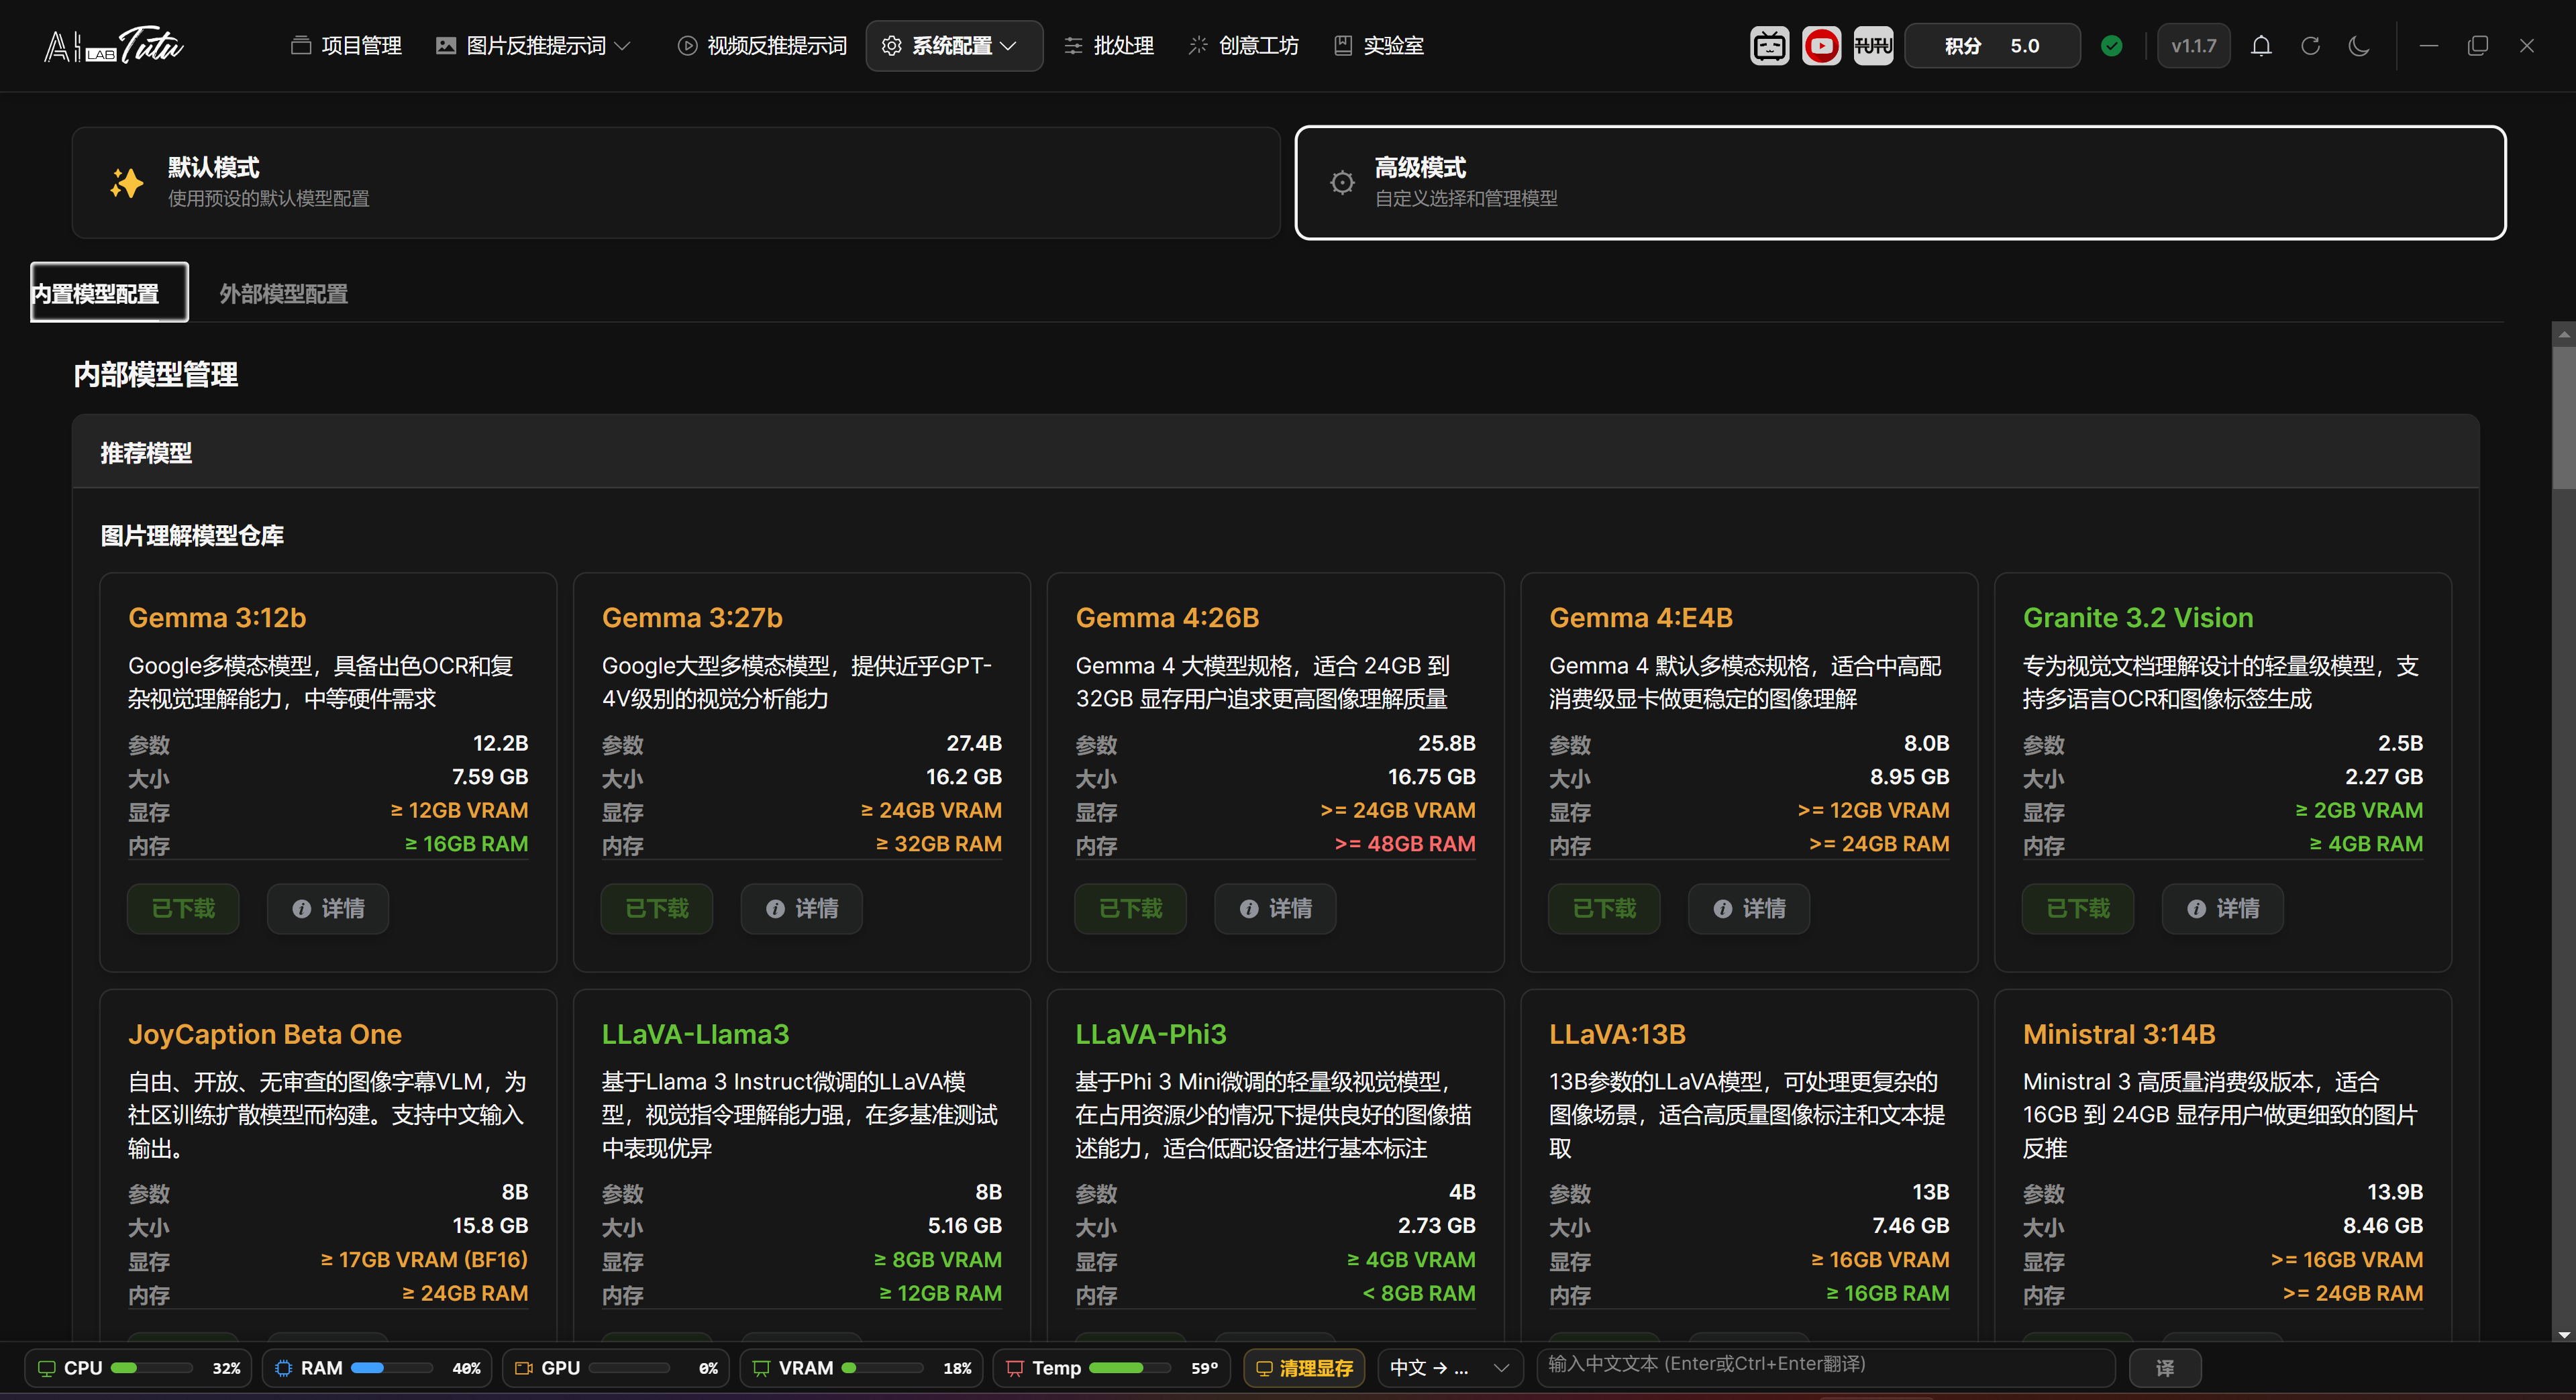
External Model Configuration
External Model Configuration manages third-party providers, custom providers, API keys, model libraries, and connection tests.
Provider icons and sorting have been reorganized so provider sources are easier to recognize. Custom providers are also placed before system providers, making newly added interfaces easier to find.
Models can be selected and enabled by purpose. If a model should be used for video reverse prompts, turn on the Video Reverse Prompt switch on the model card and confirm that the model itself supports video or multimodal understanding.
When an external model reports an error, the page tries to show shorter and clearer reasons, such as invalid key, insufficient quota, unavailable model, too frequent requests, or temporary service unavailability.
Provider List and API Configuration
The left side of External Model Configuration is the provider list. You can search platforms, add a custom provider, delete a custom provider, or refresh all models. Built-in system providers cannot be deleted casually. The switch area shows ON or OFF state and model count.
After selecting a provider, the middle area is used to enter the API key and API address. Click Test to verify connection. Before enabling a provider, at least one model must be selected, and both API address and key must be complete. Official website, key acquisition, and API documentation entries are also centralized here.
Model Library, Selected Models, and Video Reverse Switch
The model library on the right supports searching by name and browsing by group. Click a model card to select or unselect it. Selected models appear in the selected-model panel in the middle, where they can be removed individually, cleared all at once, or saved.
Selected models are counted across providers, with a total limit of 50. When switching providers, the page synchronizes the model selections already saved for that provider. When disabling a provider, selected models under that provider are removed from the global selected set.
Capability icons on model cards identify visual understanding, image generation, and image editing capabilities. The Video Reverse Prompt switch only controls whether that model appears in the selectable range for video reverse prompts. Before enabling it, still confirm that both the provider API and model support the corresponding input.
External Model Configuration. Advanced users can manage providers, API keys, and the model library.
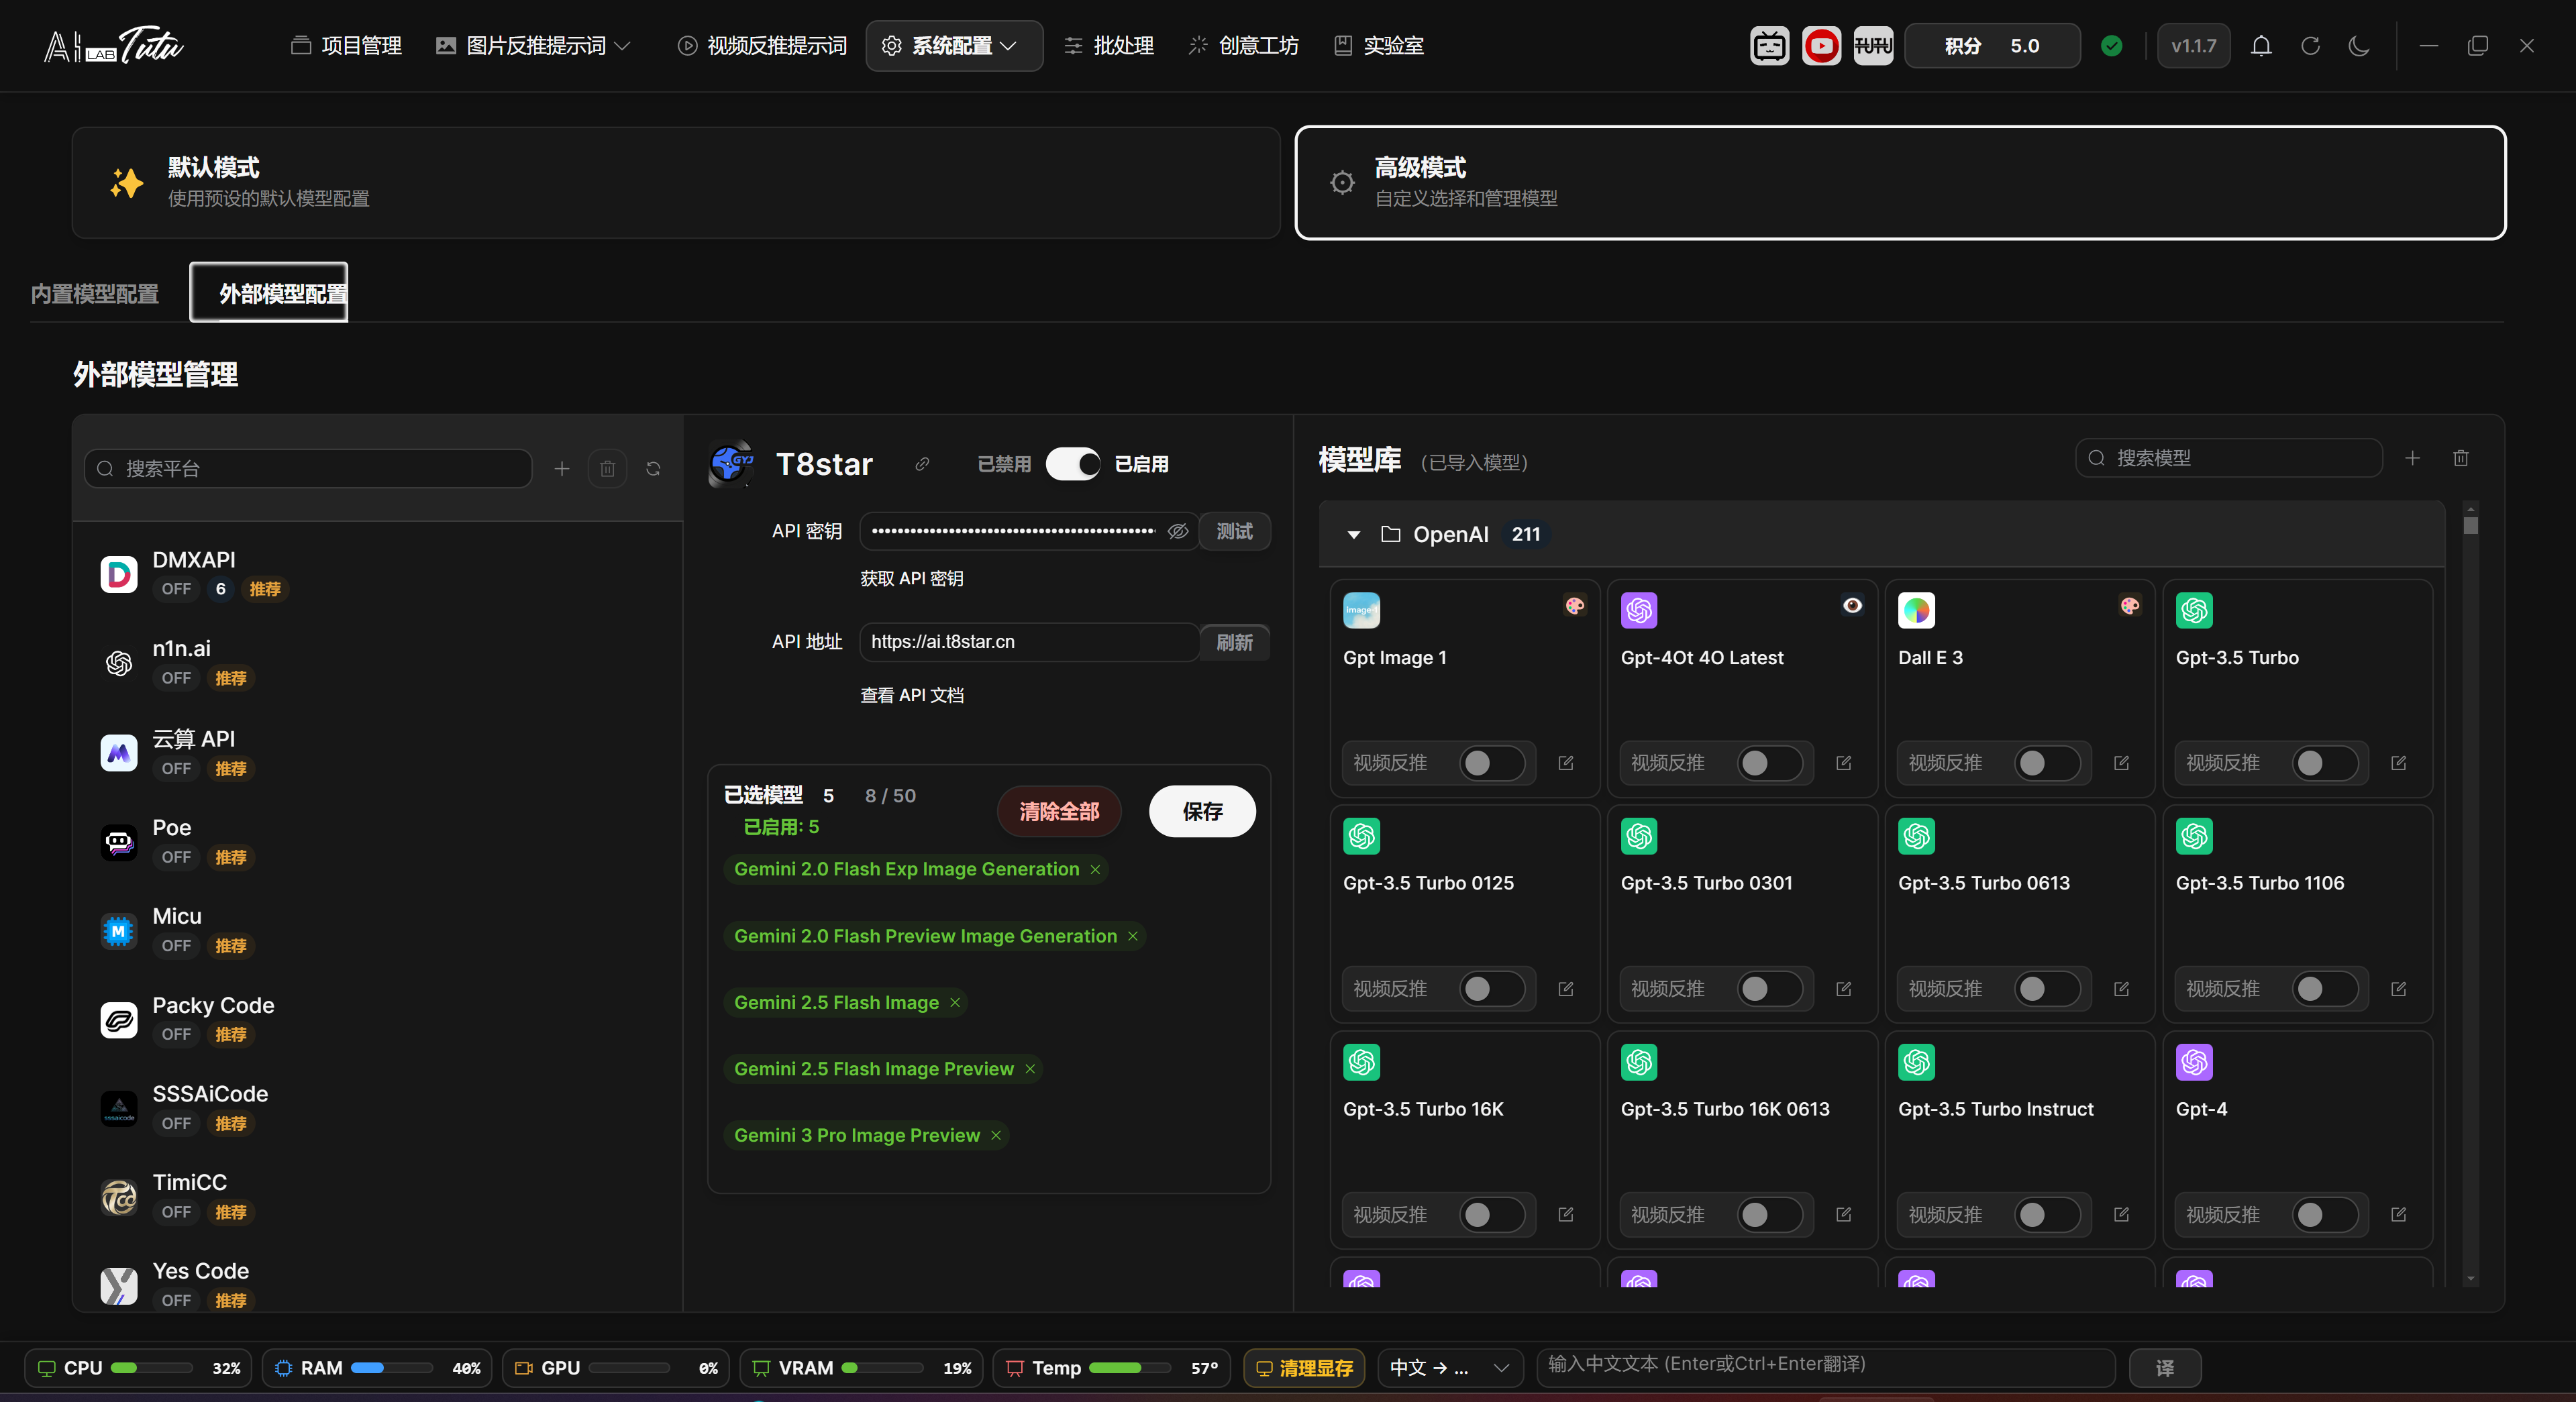
Other Settings
Page Location
Open the System Configuration drop-down menu in the top navigation bar and choose Other Settings.
Other Settings mainly handles language, model storage, data storage, cleanup, and disk health checks. Theme switching is handled in the top bar. The bottom translation assistant uses the unified translation service and usually does not need separate third-party key configuration here.
Language and Theme
Language supports Follow System, Chinese, and English. On first launch, the app chooses automatically according to system language. Later, you can manually lock the language.
Theme supports Follow System, Light, and Dark. The top theme button can switch among these states.
The login page, settings pages, model selection, preset styles, and dialogs have been adapted to dark mode. If display looks abnormal, switch the theme once or restart the app.
Language Switching
The language card provides Chinese, English, and Follow System options. After switching, the setting is written locally and the current interface language refreshes immediately. If Follow System is selected, the app resolves the system language into Chinese or English.
Theme Switch Location
Other Settings no longer contains a separate theme selection card. Light, Dark, and Follow System switching is mainly handled by the theme button in the top bar. The setting is saved locally and remains effective after restart.
Other Settings. Language, theme behavior, model storage, and data paths are configured here.
Translation Service
The translation service is used by the bottom translation assistant, tag translation, sentence translation, and other Chinese-English translation scenarios.
The current translation channel has been unified as the built-in translation service. Users usually do not need to enter Baidu, Tencent, or other third-party keys. If older instructions mention manual translation API configuration, follow the current interface instead.
Bottom Translation Assistant
The translation assistant in the bottom status bar is available by default and supports Chinese-to-English and English-to-Chinese translation. Enter text and click Translate, or press Enter, Ctrl+Enter, or Command+Enter in the input box to trigger translation. The result area supports copy and clear.
Tag and Sentence Translation
Internal functions such as tag translation and sentence translation use the same unified translation service. If translation fails, the page indicates error types such as rate limit, authentication failure, or temporary service unavailability. Regular users usually only need to retry later.
Model Storage Management
Model Storage Management shows the built-in model directory, external model directory, video editing model directory, installation directory, and model disk usage.
For Ollama model migration, follow the operation guide shown on the page: confirm the model directory and disk space, stop Ollama, copy model files, choose the new location in Ollama settings, restart Ollama, and return to the app to detect again.
Before migration, confirm that the target disk has enough space and avoid moving model files while they are in use.
Storage Paths and Capacity Information
Model Storage Management reads disk usage and displays the external model root directory and each model path, video editing model directory, installation directory, total model usage, and total disk space. The open button beside a directory opens the corresponding folder directly so you can check whether files exist.
Ollama Moving Instructions
The How to Move Ollama entry opens the full operation guide. Before migration, do not move model files that are currently in use. After migration, choose the new directory in Ollama's own settings, fully exit Ollama, and start it again.
Model Storage Management. View external model directory, video editing model directory, installation directory, total model usage, and disk space. Specific model download, pause, and test operations are handled in Built-in Model Configuration.
Data Storage Management
Data Storage Management shows the data root directory and usage for different data categories, including videos, video source files, thumbnails, keyframes, AI editor files, database, and logs.
You can open data folders to inspect actual files, or use smart cleanup to remove temporary files or old logs.
Before cleanup, confirm that the corresponding files are no longer needed. Project data, source materials, and databases should not be manually deleted casually.
Data Categories and Open Folder
Data Storage Management displays usage grouped by videos, images, temporary data, and system data. Common types include original videos, proxy videos, thumbnails, keyframes, clips, AI editor files, exports, logs, and temporary files. Most rows can open the corresponding folder.
Cleanup Rules and Safety Mechanism
When clicking cleanup, the app first provides default retention days and also allows custom days. Original videos, project data, imported projects, and AI editor files are important data and have stronger reminders before cleanup. Cleanup moves files to the system recycle bin instead of deleting them permanently.
System files and smart-pairing models are runtime dependencies. The page disables open or cleanup operations for them, and manual deletion is not recommended.
Data Storage Management. View disk usage for videos, thumbnails, keyframes, database, logs, and related data.
Disk Health Check
Disk Health Check displays remaining space, health status, issue prompts, and optimization suggestions.
If import, generation, model download, or export fails, check disk space and read/write permissions first.
Health State and Suggestions
The health check shows healthy, warning, or critical status, and lists remaining disk space, usage ratio, issue prompts, and optimization suggestions. When import, generation, model download, or export fails, first check the space and permission prompts here.
Top Bar, Status Bar, and Account Entry
Top Bar Entries
The right side of the top bar shows credits, device or authorization status, current version, check updates, refresh data, theme switching, and more actions.
The credit display is synchronized with the account page. After credits or transaction history are refreshed on the account page, the top credit display updates as well.
Check Updates now immediately shows checking or failure feedback. It no longer stays silent like older versions.
Top navigation bar. Project Management, Image Prompt Reverse Captioning, Video Prompt Reverse Captioning, System Configuration, Batch Processing, Creative Workshop, and Lab are entered from the top navigation.

Top bar update-check feedback. After clicking Check Updates, the app directly displays the current version state.
Bottom Status Bar and Translation Assistant
The bottom status bar is displayed globally outside the login page. It is located at the bottom of the app. It does not replace the current page toolbar. It is used to observe resource usage, clear VRAM, and perform quick translation at any time.
Resource Monitoring and VRAM Cleanup
Resource monitoring displays CPU, RAM, GPU, VRAM, and Temp from left to right. Progress bars and percentages help judge current machine load. If no GPU is detected, or if the graphics card does not return temperature data, the corresponding item is not shown.
The status bar refreshes about every 2 seconds by default. Hover over a monitoring item to view more details such as system, graphics card name, and VRAM usage. When running video enhancement, element removal, local models, or large batch tasks, watch GPU, VRAM, and Temp first.
Click Clear VRAM to call the GPU memory cleanup interface. It is useful after local-model, video enhancement, element removal, or similar tasks finish. Use it after the task ends. Do not force cleanup during a running task just to lower visible usage. While cleanup runs, the button shows a loading state, and completion or failure shows a prompt.
Quick Translation and Narrow-Window Display
The translation assistant is on the right side of the bottom bar. It provides Chinese to English and English to Chinese by default. Enter text and click Translate, or press Enter, Ctrl+Enter, or Command+Enter to trigger translation.
The translation result appears directly to the right of the input box. Click the copy button to copy the result, or the clear button to clear it. When switching translation direction, the input and result are cleared automatically to avoid mistaking the previous result for the current one.
If the window is narrow, the input placeholder is shortened. When the window is even narrower, the result area collapses first so the bottom bar does not block the main page workflow. The login page does not show the bottom bar to avoid interfering with login.
Account and Credits Entry
Account and Credits can be opened from the top credit display, the authorization icon, or the System Configuration drop-down menu.
The account page centralizes email, credits, invitation code, device benefits, subscription plans, credit packages, credit consumption rules, and transaction history.
Credit packages are account benefits. Log in with the same account to view balance and transaction history. Subscription plans and device authorization are bound to the current device.
Account and Credits entry. The account page centralizes credits, device benefits, subscription plans, and credit packages.
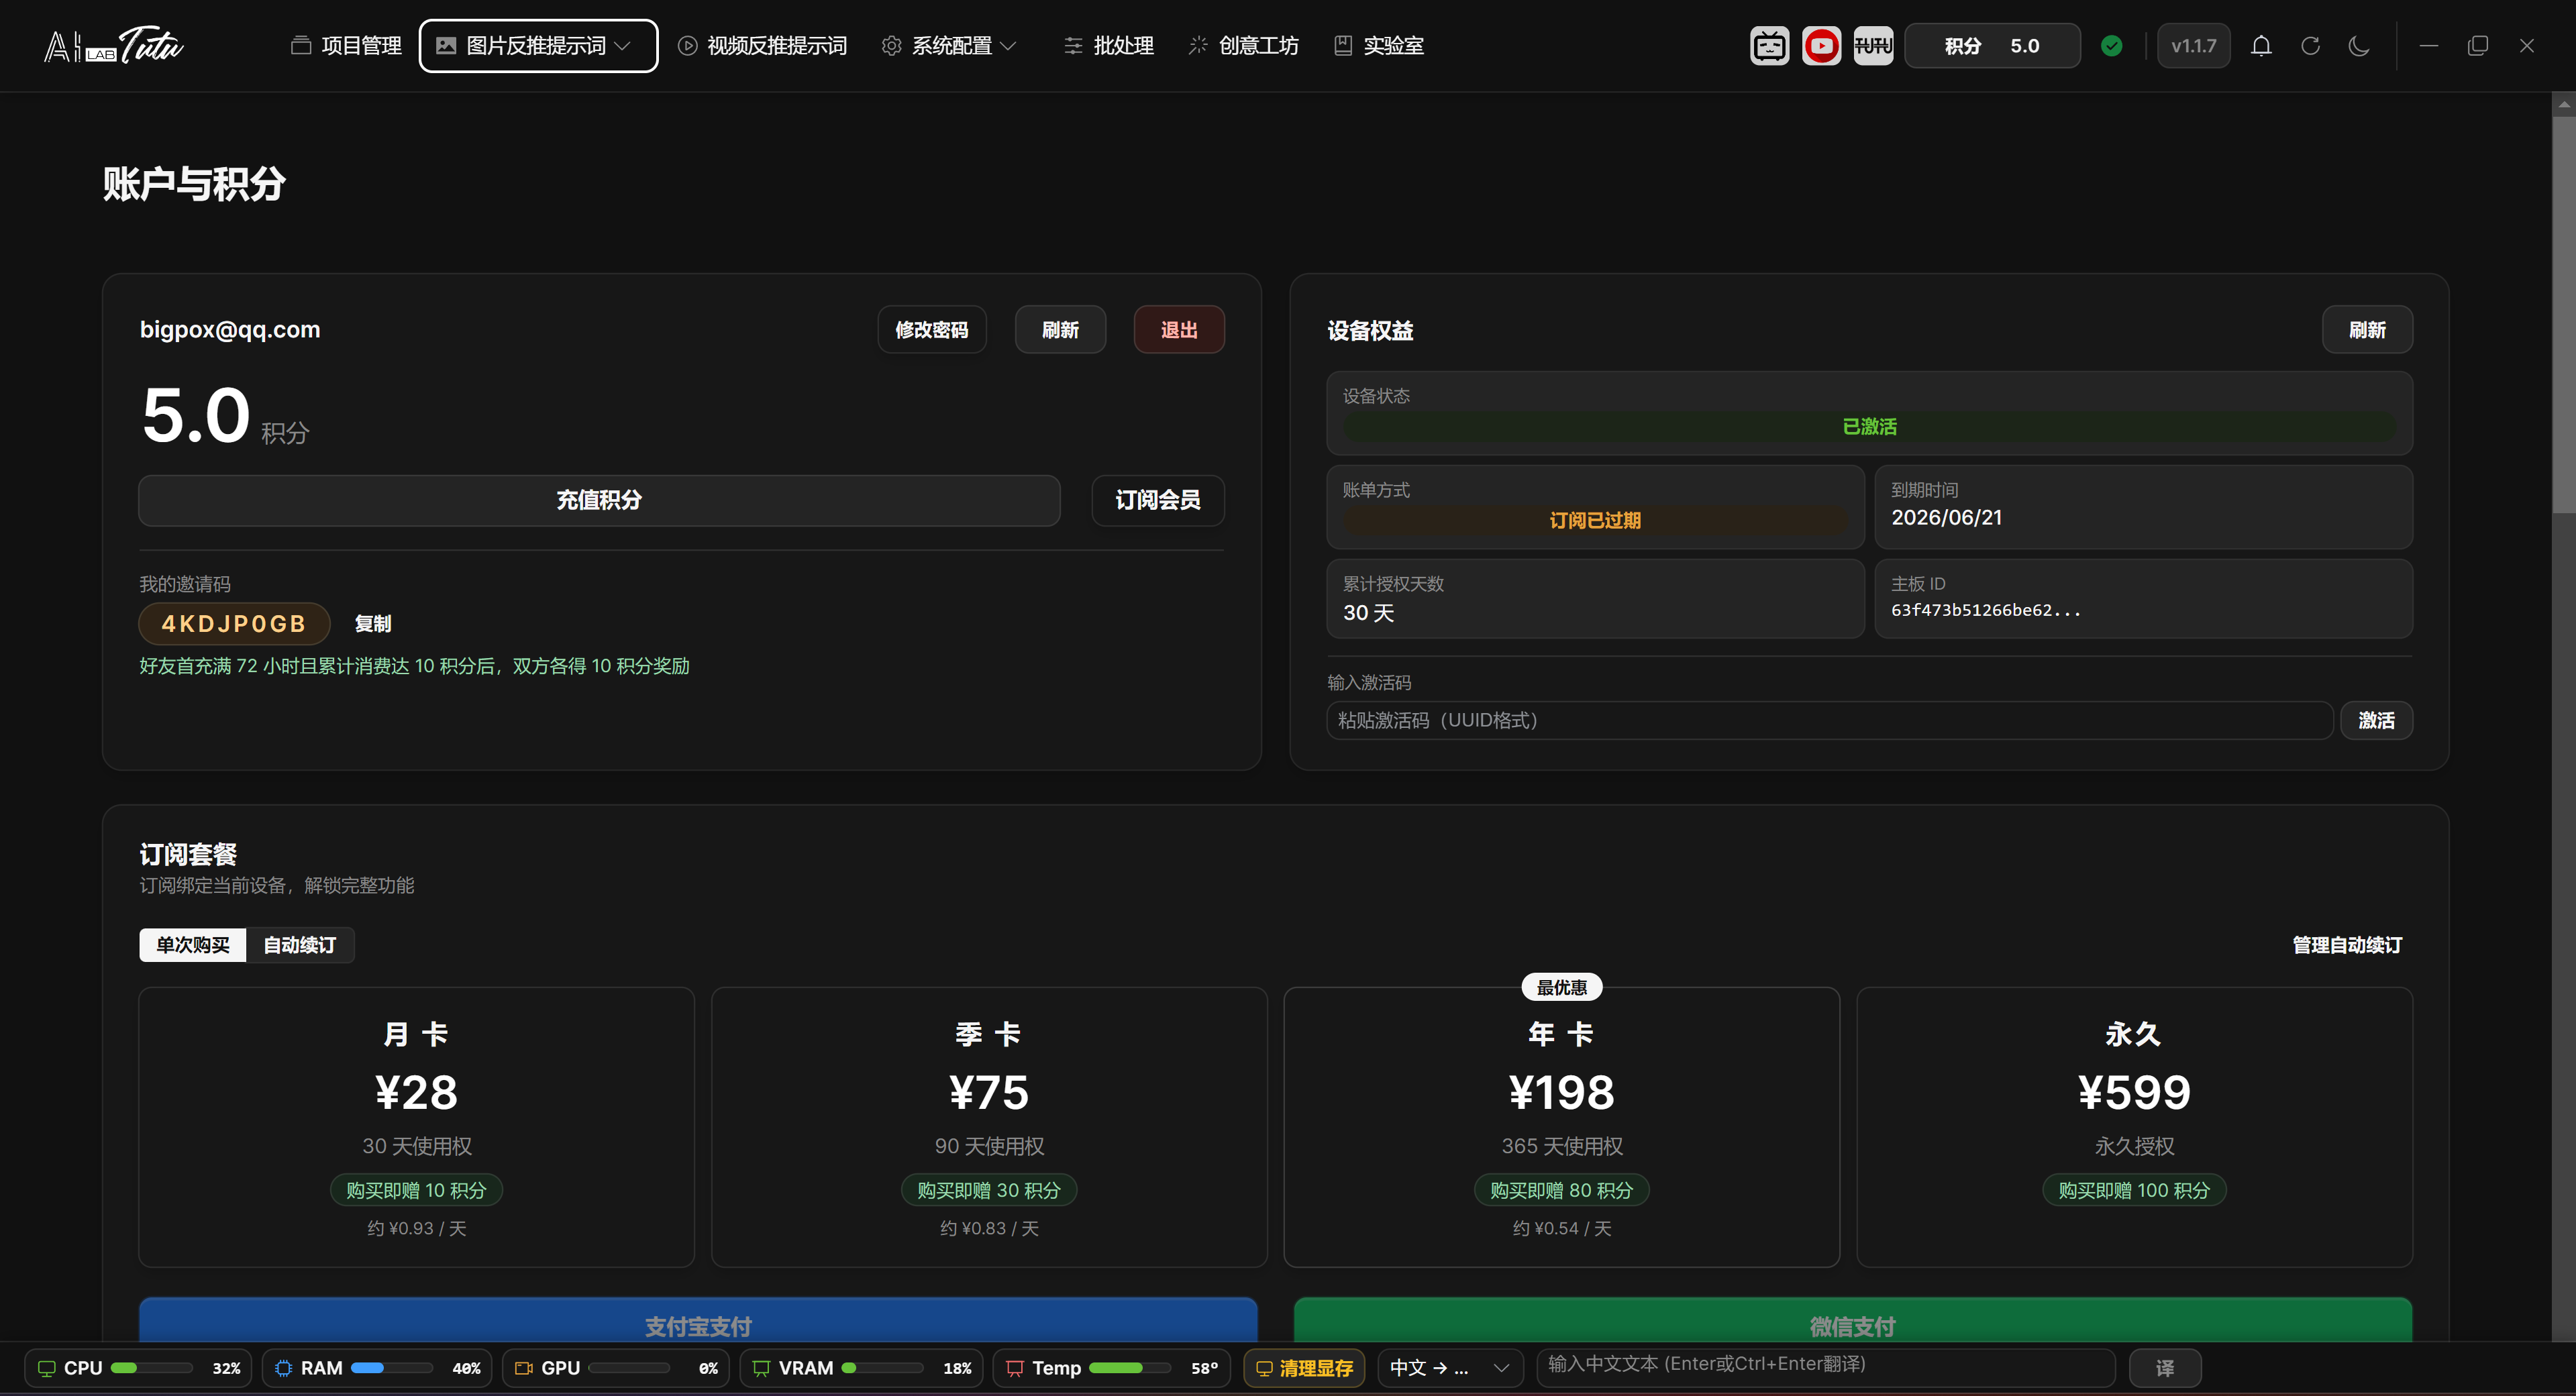
Transaction History
Transaction history is based on server records. It can be pulled for the last 3 months, last 6 months, last 1 year, or all records.
Transaction history does not need local cleanup. Use refresh and range selection to reconcile online records according to the server.
Appendix: Common Operations and Shortcuts
Video list page:
- Ctrl+A: select all.
- Ctrl+C: copy selected videos.
- Ctrl+V: paste videos.
- Delete: delete selected videos.
- Ctrl+R or F5: refresh.
- Esc or Ctrl+D: cancel selection.
Video detail page:
- Space: play or pause.
- Left and right arrow keys: rewind or advance.
- Up and down arrow keys: adjust volume.
- M: mute or unmute.
- F: enter or exit full screen.
For image pages and batch processing pages, follow the interface buttons. Before batch operations, confirm the current project, current filters, and current selection range.
Version Information
Version: see the document title or app version displayed in the top bar.
Last updated: May 28, 2026.
Author: Zhaotutu.
Changelog
Current Version
This update focuses on turning the app into a complete, stable, long-term workstation. Login, account benefits, credits, default AI, video batch processing, model downloads, dark mode, language settings, installation, and update flows have all been substantially adjusted.
New and rebuilt:
- Account login and account center are online. Email registration and login are supported. The account page centralizes credits, subscriptions, device benefits, activation status, invitation code, and transaction history.
- Default AI workflow has been improved. Image reverse prompts, natural-language descriptions, reference reverse captioning, and video understanding can use default AI directly. Regular users do not need to configure models first.
- Transaction history supports online pulling. The account page can synchronize server records for the last 3 months, 6 months, 1 year, or all records, which helps cross-device reconciliation.
- Multi-content video reverse captioning can merge analysis. When the same video generates scene description, summary, and spoken script at the same time, the default AI gateway tries to merge them into one video-understanding request.
- Video batch reverse-captioning workspace now supports batch generation of scene descriptions, summaries, and spoken scripts for multiple videos, then automatically focuses on the result content.
- Online video import has been enhanced. The video page now has Link Online Video, where pasted links or shared text are automatically recognized.
- Video batch export entry can export overall content for multiple videos. The video detail page still handles more complete material package export.
- Element editing supports a manual box-selection approach for regular rectangular targets such as watermarks, subtitles, and fixed regions.
- Model downloads now use task-style downloads, showing speed, downloaded size, remaining time, and elapsed time. Cancel and status refresh are more reliable.
- Language supports Follow System. Theme supports Follow System, Light, and Dark.
Experience and stability:
- Login page, top action bar, account page, project management, image library, reference reverse captioning, video list, model configuration, and dark mode have received extensive visual and wording cleanup.
- Top credit display synchronizes with the account page. Check Updates immediately displays checking state or failure prompts.
- Default Mode no longer exposes underlying model names, reducing confusion for new users.
- Image-list and batch-operation range prompts are clearer, reducing accidental operations.
- Creative Workshop generation progress is more detailed. If only part of a request succeeds, successful images remain and the failure count is shown.
- External model error messages are shorter and clearer. Provider icons and sorting have also been reorganized.
Fixes:
- Fixed unstable authorization recognition for users who purchased older versions after login.
- Fixed missing local transaction history after successful default AI credit charge.
- Fixed inconsistent credit charge and transaction state when default AI failed.
- Fixed repeated credit charges when the same video generated multiple content types.
- Fixed cases where incomplete multi-content video results could still be charged.
- Fixed unclear transaction-history cleanup and refresh semantics.
- Fixed large-model download UI freezes, incomplete cancellation, and progress jumps.
- Fixed similar-image empty results, invalid thumbnail requests after deletion, and inaccurate tag-filter ranges.
- Fixed video element box selection being forced through automatic recognition only.
Installation and updates:
- Update distribution has moved to a newer stable download channel. Version number, update notes, installer, update package, and official download entry flow have been centralized.
Version 1.1.6
Feature improvements:
- Large image auto-resizing: added image preprocessing to fix AI captioning failures caused by oversized images. When total pixels exceed 1536 x 1536, about 2.36 million pixels, the system automatically scales the image proportionally before captioning. This happens transparently in the background and does not affect the original image.
- Smart Generate Description: single-image natural-language captioning now preprocesses images automatically.
- Smart Generate Prompts: prompt-phrase captioning now preprocesses images automatically.
- AI-generated paired descriptions: both paired images are preprocessed automatically.
- Proportional scaling strictly preserves original aspect ratio and uses integer width and height after resizing.
- Temporary file management: resized images use temporary files and are cleaned up automatically after processing.
- Smart Generate configuration is remembered automatically. When users reopen related pages, the last-used configuration is restored.
- Smart Generate Description saves and restores model selection, language, focus target, filter strength, and related settings.
- Smart Generate Prompts uses the same persistence behavior.
- AI-generated paired descriptions save independent configuration and do not affect single-image captioning.
- Smart Generate Description and Smart Generate Prompts dialogs were redesigned to lower the usage barrier.
- Visual mode selection replaces the old focus-target drop-down with clickable cards. Each option has an icon, description, and usage hint.
- Preset modes include Default, Portrait or Face, Clothing, Person, Style, Other Elements, and Custom Prompt.
- The dialog is reorganized into three clear areas: 1 Select Main Model, 2 Select Generation Mode, and 3 Output Settings.
- LoRA training help was added to the generation-mode area through a help icon that explains LoRA training principles and captioning usage.
- Batch processing small-image optimization: in Resize or Format, Skip Upscaling is enabled by default so small images are not enlarged and only format conversion occurs.
- Splash screen no longer forces always-on-top. Users can switch to other windows while the app starts.
- Image thumbnail quality has been improved for easier face-training material selection.
- Thumbnail size increased from 256 x 256 to 384 x 384.
- Compression quality increased from 85 to 92.
- WEBP now uses the highest quality compression method.
- This applies only to newly imported images. Existing images need to be re-imported.
Bug fixes:
- Fixed imported image file names receiving random hash suffixes during batch processing.
- Fixed processed images in Resize or Format receiving random suffixes.
- Fixed flipped display in some viewers after processing photos that contain EXIF Orientation tags.
- Improved trial status query to fix cases where clicking Trial immediately showed that the trial had ended.
- Fixed occasional startup stuck at 100% due to proxy environment variable compatibility.
- Fixed small gaps between page bottom pagination components and the window bottom, and fixed the bottom pagination status bar on single-image natural-language captioning.
- Added global filtering for deprecated model ID
gemini-2.5-flash-image-preview(nano-banana), keeping the correctgemini-2.5-flash-image-preview. - Fixed Element Plus type compatibility to improve custom model stability.
Version 1.1.5
New features:
- Activation system expanded with quarterly and monthly authorization options, giving users more flexible authorization choices. The activation dialog now correctly displays authorization type and expiration time.
- Editing timeline real-time preview: when dragging the timeline playhead, the video follows in real time without waiting for dragging to end.
- Video card double-click opens detail page directly in the video captioning page.
- Tencent Cloud Translation extension scenarios were added to Other Settings. Users can apply Tencent Cloud Translation API to prompt-phrase captioning and single-image natural-language captioning translation. Tencent Cloud Translation provides a monthly free character quota suitable for daily use.
Improvements:
- Element editor button layout was improved. Clear All and Start Tracking moved from floating placement into normal content flow below Keyframe Management.
- Video player interface was simplified by removing the large center play button when paused.
- Video player control bar improved: volume icon changed from microphone to speaker, playback/volume/fullscreen buttons are larger, and custom SVG icons avoid the double-circle play-button issue.
- Sentence edit box width now adapts in single-image natural-language captioning, making long sentences easier to edit.
- System configuration subpages now have clear page titles for internal model configuration, external model configuration, and other settings.
- External model configuration layout now uses a unified outer border container around its three-column layout.
- T8star default model ID changed from
gemini-2.5-flash-image-preview(nano-banana)togemini-2.5-flash-image-preview. - Batch processing task details were simplified. Task ID is now shown as a description-table row.
- Batch task list columns now adapt to available width.
- Batch processing log area height increased from 200 px to 350 px.
Bug fixes:
- Fixed an element editor watermark-removal crash that could happen when the final segment's actual frame count was smaller than overlap frame count.
- Fixed video-list thumbnails not updating after saving results from element editing or AI video enhancement.
Version 1.1.4
Bug fixes:
- Fixed first-install trial showing that the device had already been activated.
- Fixed exported prompt-phrase tag order not matching the frontend display order.
- Fixed numeric file-name sorting in image library and video list.
- Fixed video thumbnails and playback failing when video file names contained URL special characters such as
#,?, or&. - Fixed
UNIQUE constraint failed: videos.idwhen uploading videos in multi-project environments. - Fixed element editor watermark removal reporting mask count and frame count mismatch.
- Fixed uploaded video names being incorrectly prefixed with
upload_projectID_. - Fixed database locked errors when batch-marking images as duplicate.
New features:
- Added Recheck Activation Status in the forced activation page. Already activated users can revalidate after network recovery without re-entering activation code.
- Duplicate video names in one project now receive automatic numbering, such as
video.mp4,video (2).mp4,video (3).mp4. - Image library supports drag-and-drop import from Windows Explorer or desktop for prompt-phrase and single-image natural-language pages.
- Reference natural-language captioning supports drag-and-drop import in unpaired single image, unpaired source image, and unpaired result image areas.
- Video captioning supports drag-and-drop import of local video files, including batch drag-and-drop.
Other changes:
- AI video enhancement button is temporarily hidden from the video captioning toolbar until the effect is optimized.
- Dynamic light effect in the title bar was removed to simplify visual design.
Version 1.1.3
- Added three core video-processing modules.
- Improved video export with GPU acceleration and full-screen progress dialog.
- Completed storage management system.
- Added smart database migration mechanism.
Version 1.1.2
- Added video captioning page.
- Added activation-code system.
- Added video model configuration management.
- Added YouTube video analysis.
Version 1.1.1
- Fixed startup permission issues.
- Improved image import speed.
- Improved file storage architecture.
Version 1.1.0
- Added paired-image captioning.
- Added Creative Workshop.
- Added AI Lab.
- Greatly expanded the external model ecosystem.
Technical Support
For questions or suggestions, contact:
- QQ:
331506796 - WeChat:
tujiang0411 - Official purchase and download site: https://zhaotutu.xyz
Feedback is welcome if you run into any issue.
Troubleshooting
This section collects common questions about installation, updates, login, credits, models, video workflows, element editing, and feedback. When you encounter a problem, first locate the subsection related to the page or operation you are using.
Download the app from https://zhaotutu.xyz. At the bottom of the page, choose the download entry for Tutu Super Smart Tagger. The official site entry and cloud-drive entry are updated together.
Support site: https://zhaotutu.xyz
Installation, Updates, and Login
What is the latest version? Where should I download it?
The latest version is based on the current public release shown by the app and official website. Download from the official site at https://zhaotutu.xyz. Do not continue relying on historical cloud-drive direct links or old update packages.
What should I do if update says "Please insert disk 3"?
This is a common issue caused by old update packages or installer cache. Close the app, download the latest installer or update package from the official site, and install again. If Ollama or runtime dependencies are already installed, you do not need to reinstall those bundled components.
Why do I now need to log in or register?
The current version includes an account center. After logging in or registering with email verification, the app can synchronize credits, device authorization, subscriptions, invitation code, and online transaction history. New users need to confirm the user agreement before registration.
I already bought an activation code as an old user. Do I need to buy again?
No. After logging in or registering, the system tries to recognize older authorization according to the current device information. Open Account and Credits to view device authorization, activation status, and subscription information.
Account, Credits, and Charging
How do I view credits and transaction history?
Open Account and Credits, then click refresh to synchronize server-side credits and transaction history. The transaction range can be the last 3 months, last 6 months, last 1 year, or all records, which is useful for cross-device reconciliation.
Will default AI charge repeatedly?
The default AI charging flow has been tightened. Image, paired-image, and video requests write transaction history after success. When the same video generates scene description, summary, and spoken script at the same time, the app merges them into one video-understanding request and charges credits once according to the real amount returned by the server.
What if credit charging fails or transaction history does not appear?
First refresh credits and transaction history on the account page, and confirm the selected transaction range. The app writes successful default AI charges only after success. Failed tasks, insufficient credits, or missing results should not appear as successful charges.
Are credits still available after changing computers?
Credits follow the account. Log in with the same account to view balance and transaction history. Device authorization follows hardware and does not automatically migrate to another computer just because the same account logs in.
Image Reverse Prompts, Prompts, and Image Generation
What should I do if image prompts or image generation fail?
Read the specific reason shown in the dialog. Possible causes include insufficient credits, unavailable model, too frequent requests, oversized images, temporary API issues, or API key configuration errors. Default AI can be used directly. External models require checking keys and model availability in Model Settings.
How do I choose Prompt Phrase Mode, Natural Language Mode, or Reference Reverse Captioning?
Use Prompt Phrase Mode when you need keywords and tags. Use Natural Language Mode when you need complete descriptive sentences. Use Reference Reverse Captioning when you need to describe the change from a source image to a result image.
Must I configure a model before first use?
No. In Default Mode, logging in and buying credits is enough to use default AI. Advanced configuration is needed only when using your own API key, local model, or custom provider.
Video Reverse Prompts and Online Videos
Where is video batch reverse captioning?
Open Video Prompt Reverse Captioning, select a project, and import videos. Then use the batch reverse entry in the video list or detail page to generate scene descriptions, summaries, or spoken scripts. After completion, the page automatically switches to generated results.
How do I import online videos?
Click Link Online Video on the video page, paste a video link or shared text, and the system automatically recognizes the link inside it. If the platform restricts access, the link is invalid, or the network environment does not support it, the interface shows the failure reason. In that case, download the video locally and import it as a local video.
Should I still look for the old YouTube analysis button?
No. Do not follow older documents that point to a separate YouTube analysis button. The current unified path is Link Online Video on the video page. Paste a link or shared text there.
Does generating scene description, summary, and spoken script for the same video charge multiple times?
In default AI gateway mode, the app tries to merge them into one video-understanding request and charge credits once according to the real amount returned by the server, avoiding repeated analysis.
Where is AI video enhancement?
The AI video enhancement button is still hidden from the main interface and is not part of the regular workflow. Video element editing and package export remain available.
Element Editor, Local Models, and Performance
Why does Element Editor say models are missing or processing cannot run?
Element removal and video repair depend on local models and GPU. Start task-style download from the video model or Element Editor entry first, then wait until speed, downloaded size, remaining time, and related states complete. Without an available GPU, these processing workflows are blocked.
How do I choose manual box selection or automatic recognition?
Automatic recognition is suitable when the model should locate the target by itself. Manual box selection is suitable for watermarks, subtitles, fixed corner labels, regular rectangular areas, and other clearly positioned targets. The current version supports switching to manual box selection in Element Editor.
Where did the old video model configuration page go?
It is now managed under System Configuration -> Model Settings. Video reverse-captioning capability is controlled through model configuration, external providers, and the video reverse-prompt marker.
What should I do if the app is slow or tasks are slow?
Reduce the number of tasks running at the same time. Check VRAM, memory, and disk space in the bottom status bar. For local-model tasks, also confirm that the model is fully downloaded and loaded correctly. After tasks finish, use Clear VRAM in the bottom bar to release leftover VRAM.
Projects, Batch Processing, and Interface Settings
For first use, should I create a new project or import a project?
In most cases, create a new project first. Import Labeled Dataset is only for continuing to edit old prompt or natural-language caption datasets.
Why does the image or video entry say I need to select a project first?
Images, videos, and generated results all belong to a project. Return to Project Management and click a project row to set the current project.
What is batch processing mainly used for now?
It is mainly used for resizing or formatting images, renaming materials, and detecting similar images. Export images from the corresponding image mode. Run video batch reverse captioning and export from the video page.
Can Detect Similar Images delete images directly?
The page provides deletion operations, but deletion is high risk. Preview first, confirm the range, and back up if necessary.
Where do I change language and dark mode?
Open System Configuration -> Other Settings to change language. Theme is switched from the top-bar theme button among Follow System, Light, and Dark.
If the Problem Still Cannot Be Solved
What should I do if the problem still exists?
Record the app version, operation page, error text, whether you used default AI, external model, or local model, and the approximate format of the video or image. Then contact Tutu support. For credit-related issues, also provide an account-page transaction-history screenshot or the time of the charge.
How do I contact technical support?
QQ: 331506796
WeChat: tujiang0411
When giving feedback, include account email, problem screenshots, task type, and necessary logs.