User Guide
This guide walks through the normal TutuTrainer desktop workflow: installing the app, preparing a dataset, choosing a base model, starting LoRA training, monitoring progress, and using the finished model.
Official website: https://zhaotutu.xyz
Contents
- Install and First Launch
- Quick Start
- Hardware and Model Guidance
- Interface Overview
- Training Dashboard
- Dataset Management
- Base Model Management
- FAQ
- Practical Tips
- Appendix
Install and First Launch
Download the latest Windows installer from the official website:
https://zhaotutu.xyz
Use the official website or clearly announced official channels only. Avoid repackaged installers, modified scripts, and marketplace resales.
Install
- Download the latest TutuTrainer installer.
- Run the installer.
- If Windows asks for WebView2 Runtime, install it.
- If Windows reports missing runtime DLL files, install the Microsoft Visual C++ Redistributable.
- Launch TutuTrainer after installation finishes.
First Launch
- Double-click the TutuTrainer shortcut or
TutuTrainer.exe. - Wait for the interface to load. First launch can take 30 to 60 seconds.
- Check the resource monitor area to confirm that your NVIDIA GPU is visible.
- Configure paths before starting the first training run.
Quick Start
Use this section to run a first LoRA training job. Detailed explanations for each page are covered later in the guide.
Step 1: Configure Paths
- Open the training dashboard.
- Click the path settings button in the lower-right area of the dashboard.
- Configure the dataset folder, model folder, and training output folder.
- Save the path settings.
Step 2: Prepare a Dataset
Most users start with a prepared dataset. You can use either method:
Method A: Use an existing dataset folder
- Open the dataset folder configured in path settings.
- Copy or move your prepared dataset folder into that dataset folder.
- Keep one folder per dataset.
- Make sure the images and matching
.txtcaptions are inside that dataset folder. - Return to TutuTrainer, open Dataset Management, and click refresh if the dataset does not appear.
Method B: Create a dataset in TutuTrainer
- Open Dataset Management from the top navigation.
- Create a new dataset with a clear name.
- Enter the dataset detail page.
- Add image files to the dataset.
- Write or import captions for the images.
Each training image should have a matching .txt caption file. For batch captioning, use Tutu Super Smart Tagger to generate and review captions before training.
Step 3: Configure and Start Training
- Return to the Training Dashboard.
- Choose the training type.
- Choose the model architecture.
- Choose the model source: automatic download, local model, or custom model.
- Select the target dataset from the dataset dropdown.
- Optionally configure sample prompts.
- Click the start training button.
TutuTrainer calculates recommended training settings automatically based on the selected model, dataset, and available hardware. Normal users do not need to manually tune advanced parameters for a first run.
Step 4: Review Results
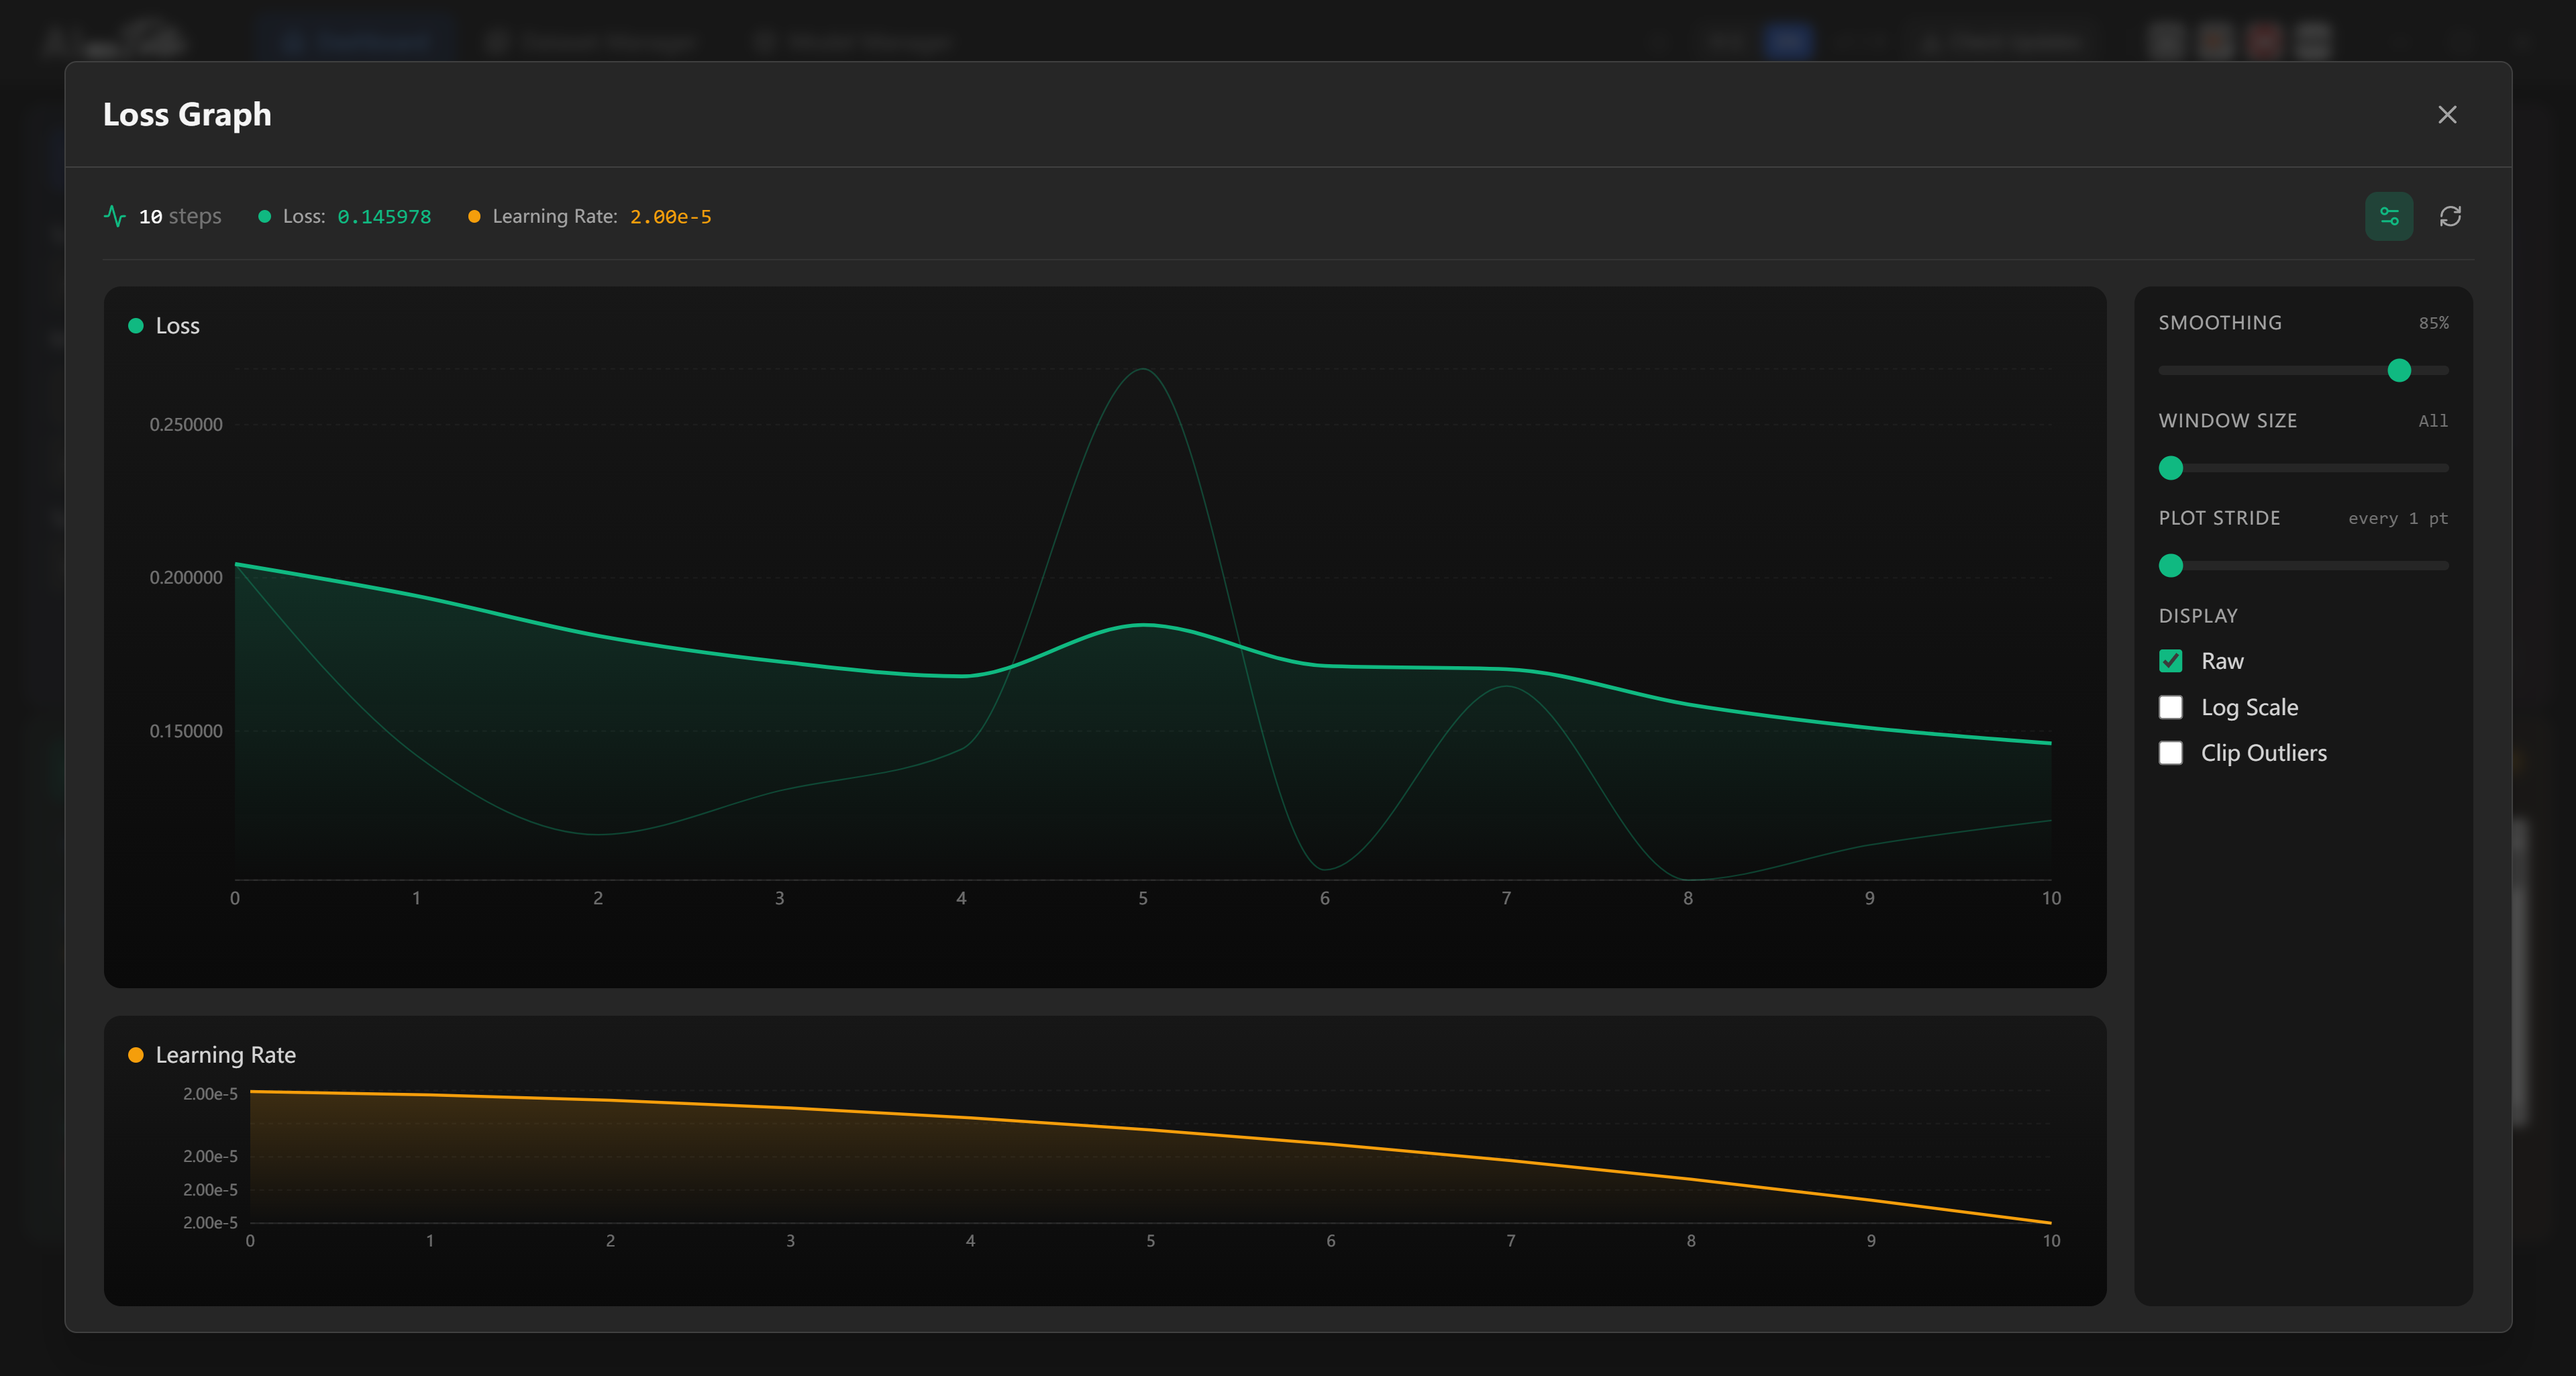
During training, watch job progress, resource usage, samples, and logs.
When the run is complete:
- Open the model output area.
- Review the generated
.safetensorsfiles. - Check the sample images and logs.
- Test several checkpoints in your target generation workflow.
The final checkpoint is not always the best checkpoint. Keep multiple checkpoints and choose the one that performs best for your target prompts.
Hardware and Model Guidance
TutuTrainer is a Windows desktop application for local or cloud GPU LoRA training.
Hardware Requirements
| Item | Minimum | Recommended |
|---|---|---|
| Operating system | Windows 10/11, 64-bit | Windows 11, 64-bit |
| CPU | Intel Core i5 or comparable | Intel Core i7/i9 or AMD Ryzen 7/9 |
| System memory | 64 GB RAM | 96 GB RAM or more |
| GPU | NVIDIA GPU with 16 GB or more VRAM | RTX 5090, RTX 4090, or professional 24 GB+ NVIDIA GPU |
| Storage | 100 GB free space | 500 GB+ NVMe SSD |
| Driver | NVIDIA driver 522.25 or newer | Latest NVIDIA driver |
Supported Model Architectures
The model selector in your installed version is the final source of truth. The main public model list includes the following architectures.
Image generation models:
| Model architecture | Practical VRAM guidance | Typical use |
|---|---|---|
| Anima | 8 GB | Lightweight image generation training |
| Boogu Image | 24 GB recommended | Boogu base image generation training |
| ERNIE-Image | 24 GB | ERNIE image generation training |
| FLUX.1 | 24 GB | High-end image generation training |
| FLUX.2 [Klein] 4B Base | 16 GB | Lighter FLUX.2 Klein training |
| FLUX.2 [Klein] 9B Base | 24 GB | Larger FLUX.2 Klein training |
| KREA 2 RAW | 10 GB minimum, 24 GB+ recommended | KREA 2 RAW LoRA training with Tutu timestep |
| Qwen-Image | 24 GB | Qwen image generation training |
| Qwen-Image-2512 | 32 GB | Newer Qwen image generation training |
| SD 1.5 | 8 GB | Classic lightweight Stable Diffusion LoRA |
| SDXL | 16 GB | Stable Diffusion XL LoRA |
| Z-Image | 24 GB | Z-Image base model training |
| Z-Image De-Turbo | 24 GB | Z-Image De-Turbo training |
Image editing and instruction models:
| Model architecture | Practical VRAM guidance | Typical use |
|---|---|---|
| Boogu Image Edit | 30 GB+ recommended for multi-control datasets | Boogu image editing and control training |
| FLUX.1-Kontext-dev | 24 GB | Context-aware FLUX image editing |
| Qwen-Image-Edit | 32 GB | Instruction-based image editing |
| Qwen-Image-Edit-2509 | 32 GB | Qwen image editing workflow |
| Qwen-Image-Edit-2511 | 32 GB | Newer Qwen image editing workflow |
Video and audio-capable models:
| Model architecture | Practical VRAM guidance | Typical use |
|---|---|---|
| LTX-2 (Video+Audio) | 32 GB | Video and audio training workflow |
| LTX-2.3 (Video+Audio) | 32 GB | Newer video and audio training workflow |
| Wan 2.2 I2V (14B) | 24 GB | Image-to-video training |
| Wan 2.2 T2V (14B) | 24 GB | Text-to-video training |
| Wan 2.2 TI2V (5B) | 16 GB | Lighter text/image-to-video training |
These numbers are practical guidance, not a strict guarantee. Dataset size, image resolution, model format, driver state, other running programs, and Windows virtual memory can all affect whether a job starts successfully. For Boogu Image Edit, extra control datasets increase memory pressure, so 30 GB+ VRAM is the safer starting point.
High-memory models, especially Qwen image-editing workflows and larger video workflows, may need 96 GB system memory or more even when the GPU VRAM looks sufficient.
Choosing a Starting Point
| Scenario | Recommended direction | Why |
|---|---|---|
| First experiment | SD 1.5, SDXL, or Z-Image | Lower memory requirement and faster feedback. |
| Character or person LoRA | Z-Image, FLUX2 Klein, or KREA 2 RAW | Strong general image quality when hardware allows. |
| Style LoRA | Any suitable image model family | Dataset consistency matters more than brand-new model choice. |
| Chinese prompt workflow | Qwen-Image or Z-Image | Better fit for Chinese-language prompting workflows. |
| Limited VRAM, 10 to 16 GB | SD 1.5, SDXL, KREA 2 RAW, or Wan 2.2 TI2V | More practical on lower-memory GPUs. |
| Video training | Wan 2.2 TI2V | More practical than larger video model families. |
Interface Overview
TutuTrainer has three main working pages in the top navigation.
| Page | Purpose |
|---|---|
| Training Dashboard | Configure, start, monitor, stop, and review training jobs. |
| Dataset Management | Create datasets, add images, and edit captions. |
| Base Model Management | Download, scan, configure, and register base models. |
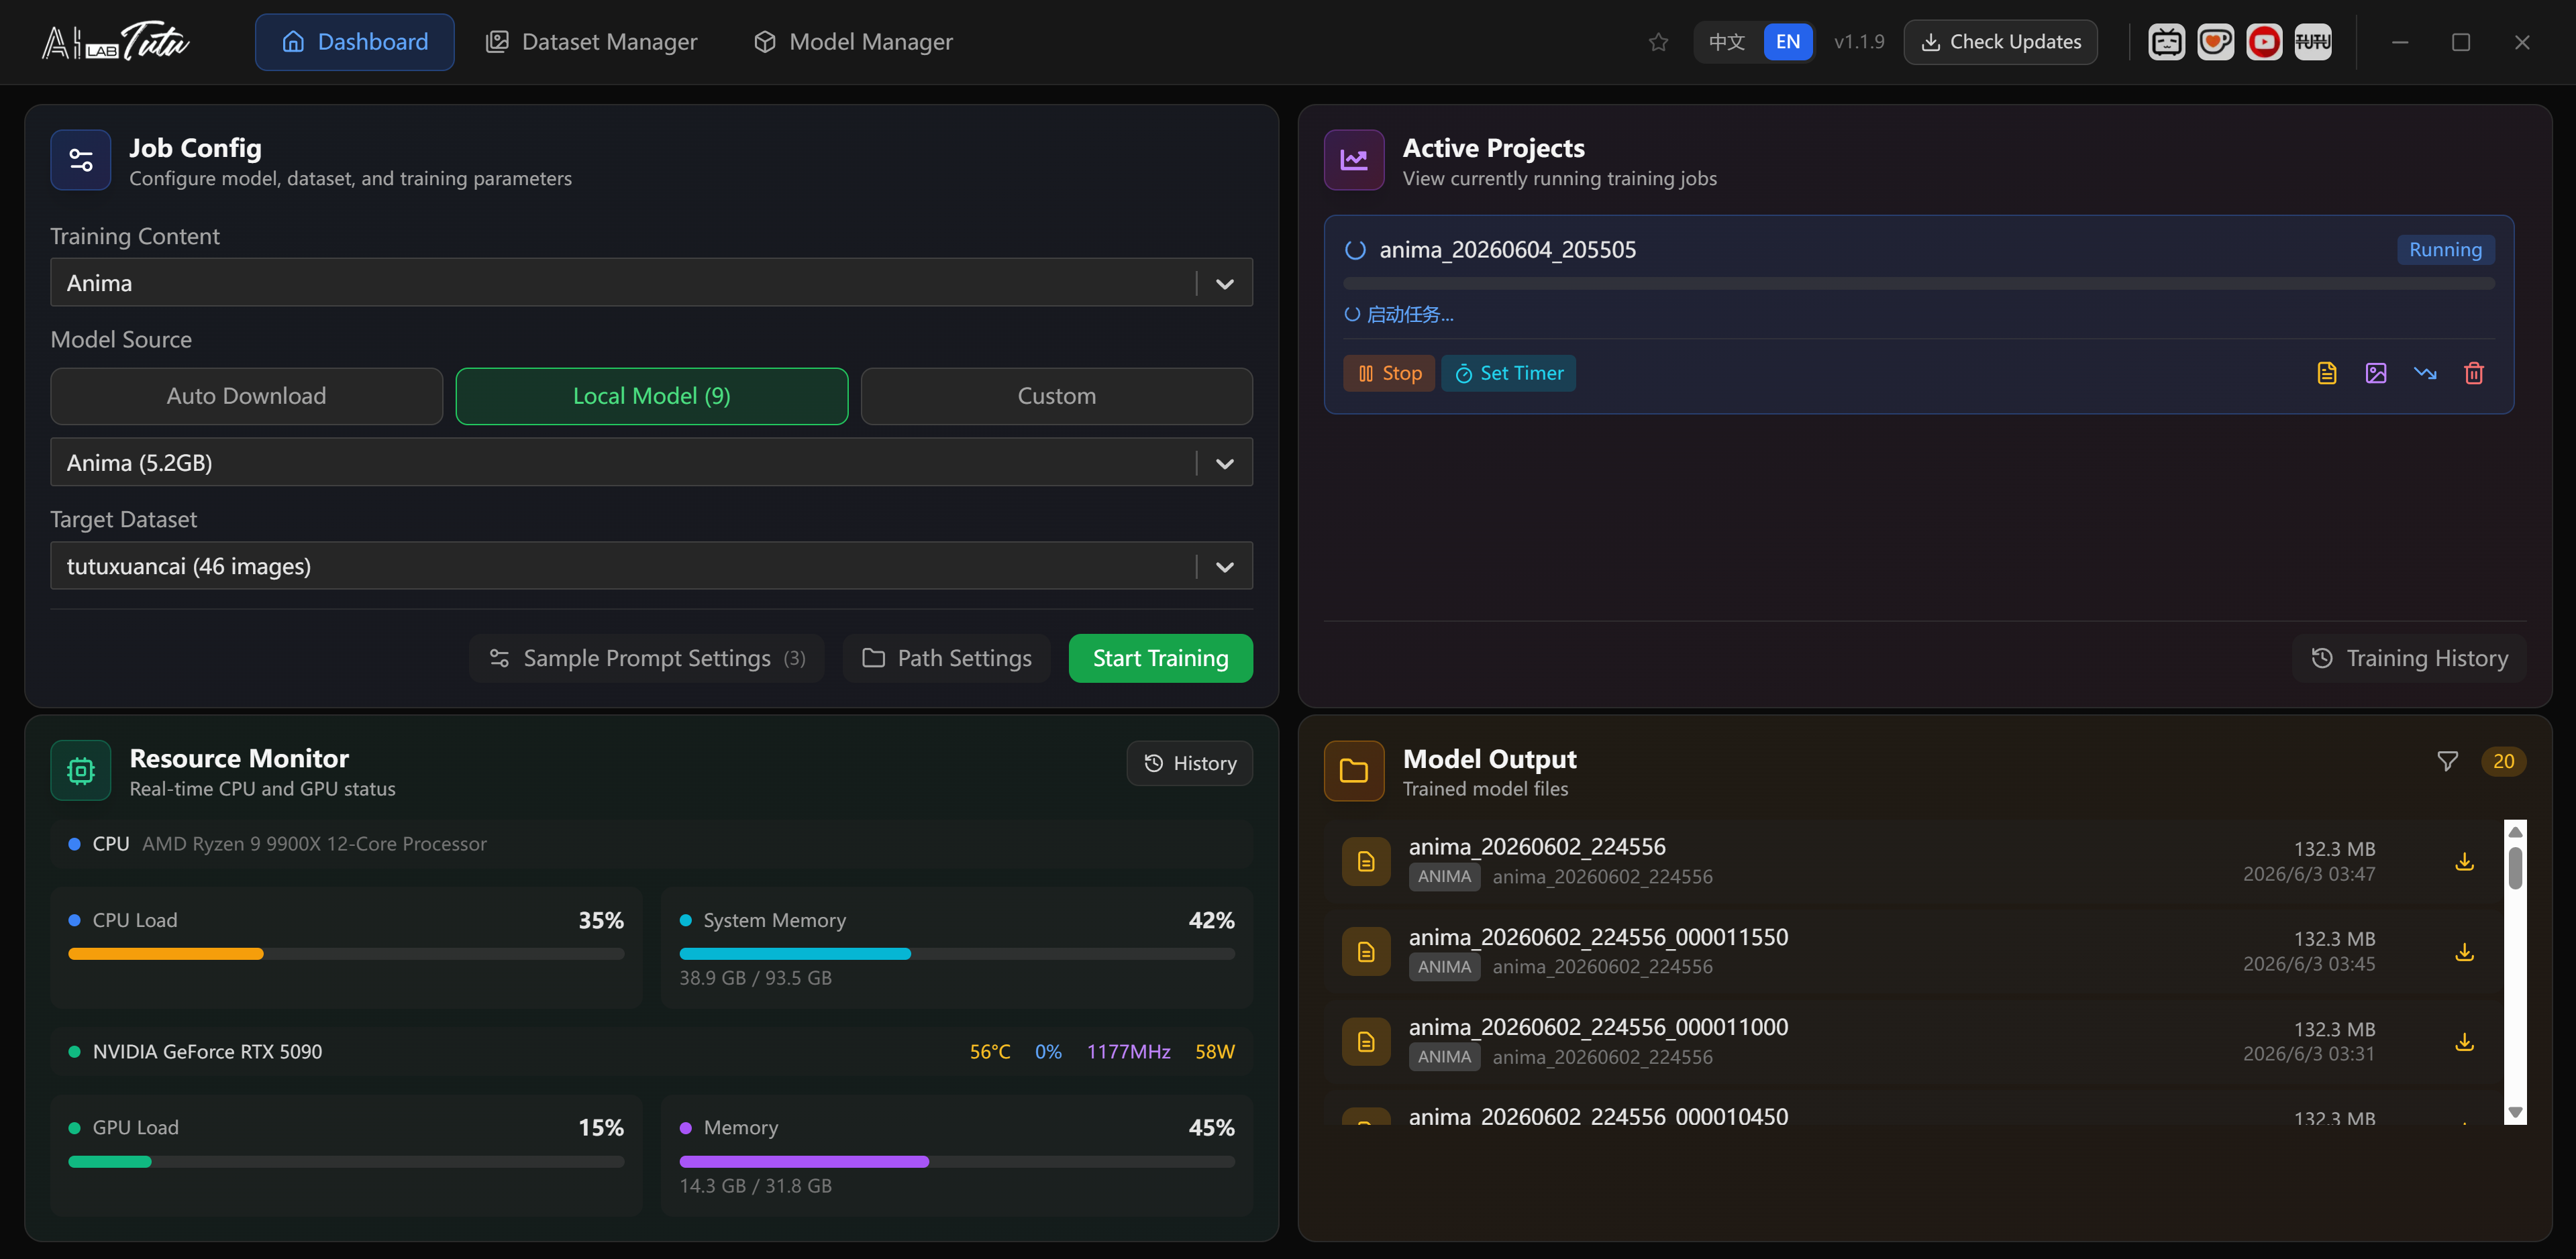
Training Dashboard
Training Type
The default workflow is LoRA training. It is suitable for teaching a model a character, person, product, object, style, visual concept, or motion-related target depending on the selected model family.
Model Source
TutuTrainer supports three normal ways to select a base model.
| Source | When to use it |
|---|---|
| Automatic download | Use this when you want the app to download required files if they are not already available locally. |
| Local model | Use this when the model has already been downloaded into the model folder. |
| Custom model | Use this when the model lives outside the standard folder or needs manual component configuration. |
Model Architecture
Choose the architecture that matches your base model and target workflow. Use Hardware and Model Guidance when you need model names, VRAM guidance, or a starting-point recommendation.
Target Dataset
The dataset dropdown lists created datasets. A dataset usually appears as a name plus image count.
If a dataset is missing:
- Confirm the dataset folder is under the configured dataset root.
- Confirm it contains supported image files.
- Refresh the dataset list.
- Reopen path settings if the app is scanning a different folder.
Sample Prompts
Sample prompts are used to generate preview images during training.
- Open the sample prompt settings from the dashboard.
- Use preset prompts or write your own.
- Keep sample prompts close to the final use case.
- Use both simple and stress-test prompts if you want to judge generalization.
- Translation tools may be available in the app depending on version.
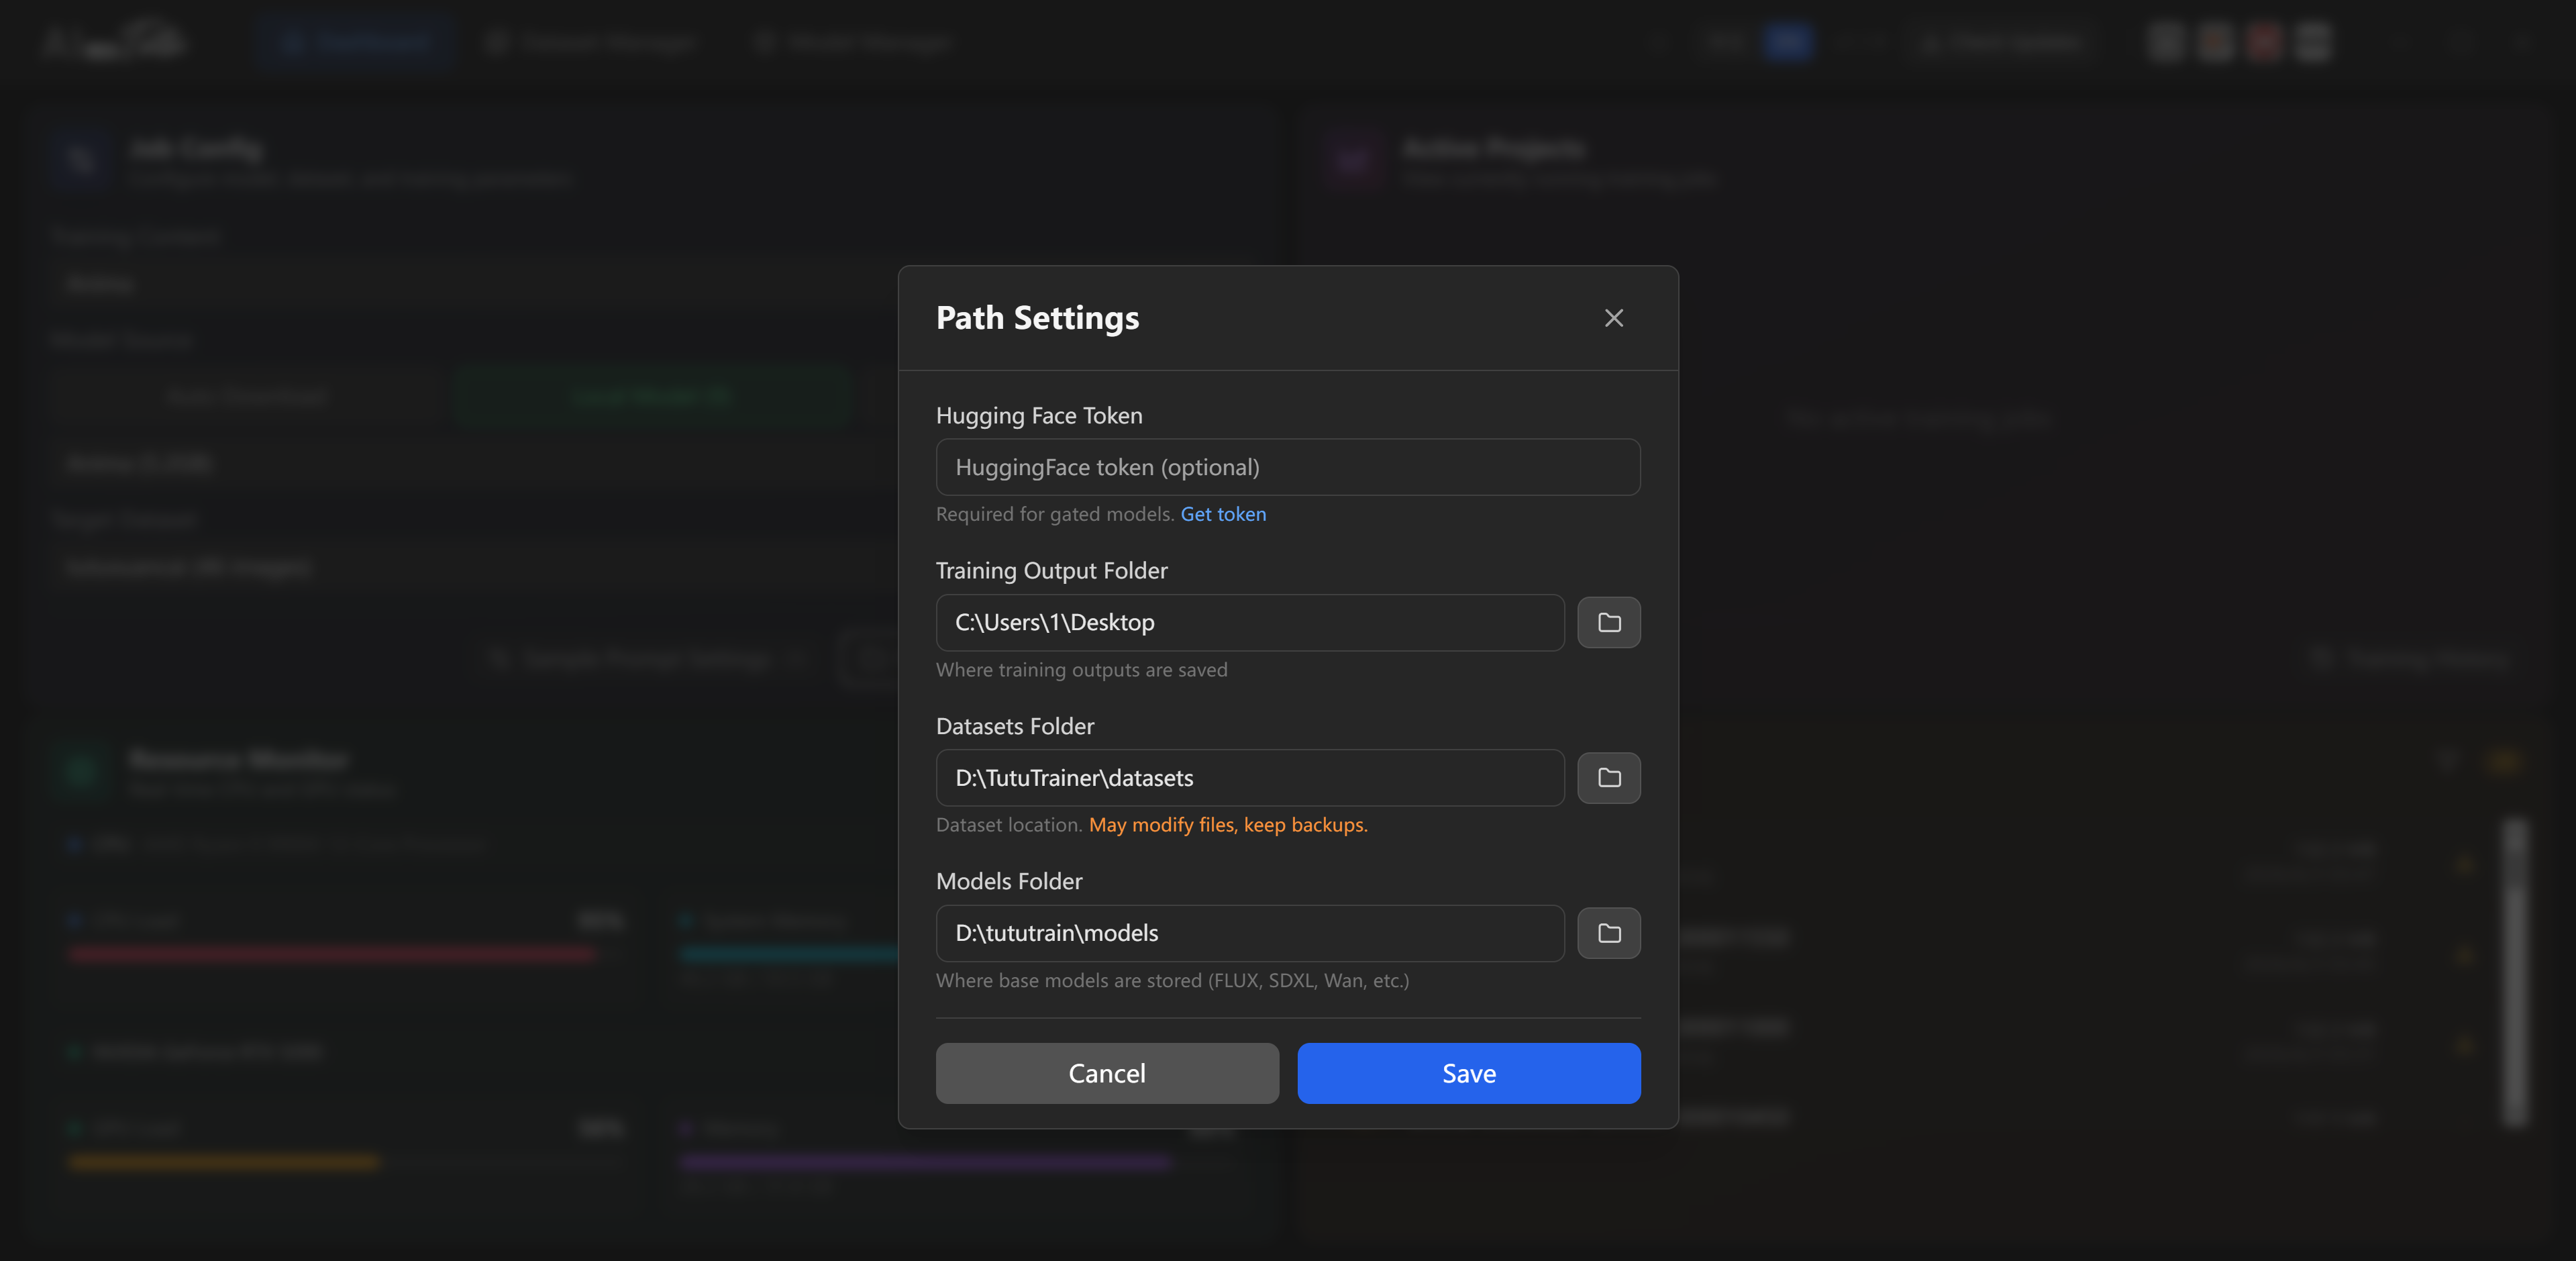
Path Settings
The path settings control where the app reads and writes important files.
| Setting | What it affects |
|---|---|
| Training output folder | LoRA outputs, samples, logs, and job files. |
| Dataset folder | Dataset discovery and dataset creation. |
| Model folder | Base model discovery, downloads, and local model scanning. |
If the UI cannot see your datasets or models, check these paths first. Most "not found" problems come from the app looking at a different root folder than the one you edited in File Explorer.
Start Training
After you click start:
- The app calculates recommended parameters.
- A job name is created automatically.
- The job appears in Active Jobs.
- Logs and samples begin updating as training progresses.
If the app says the job is queued but no other job is running, stop the job and start it again. This can happen rarely when memory, VRAM, or virtual memory is in a bad state.
Resource Monitor
The resource monitor shows live hardware status.
Typical fields include:
- CPU usage.
- System memory usage.
- GPU usage.
- VRAM usage.
- GPU temperature.
- GPU clocks.
- GPU power.
If GPU usage stays very low after training starts, check the logs and make sure the job actually entered the training stage.
Active Jobs and Auto Stop Timer
The active job card shows:
- Job name.
- Current step and total steps.
- Progress bar.
- Training speed.
- Stop button.
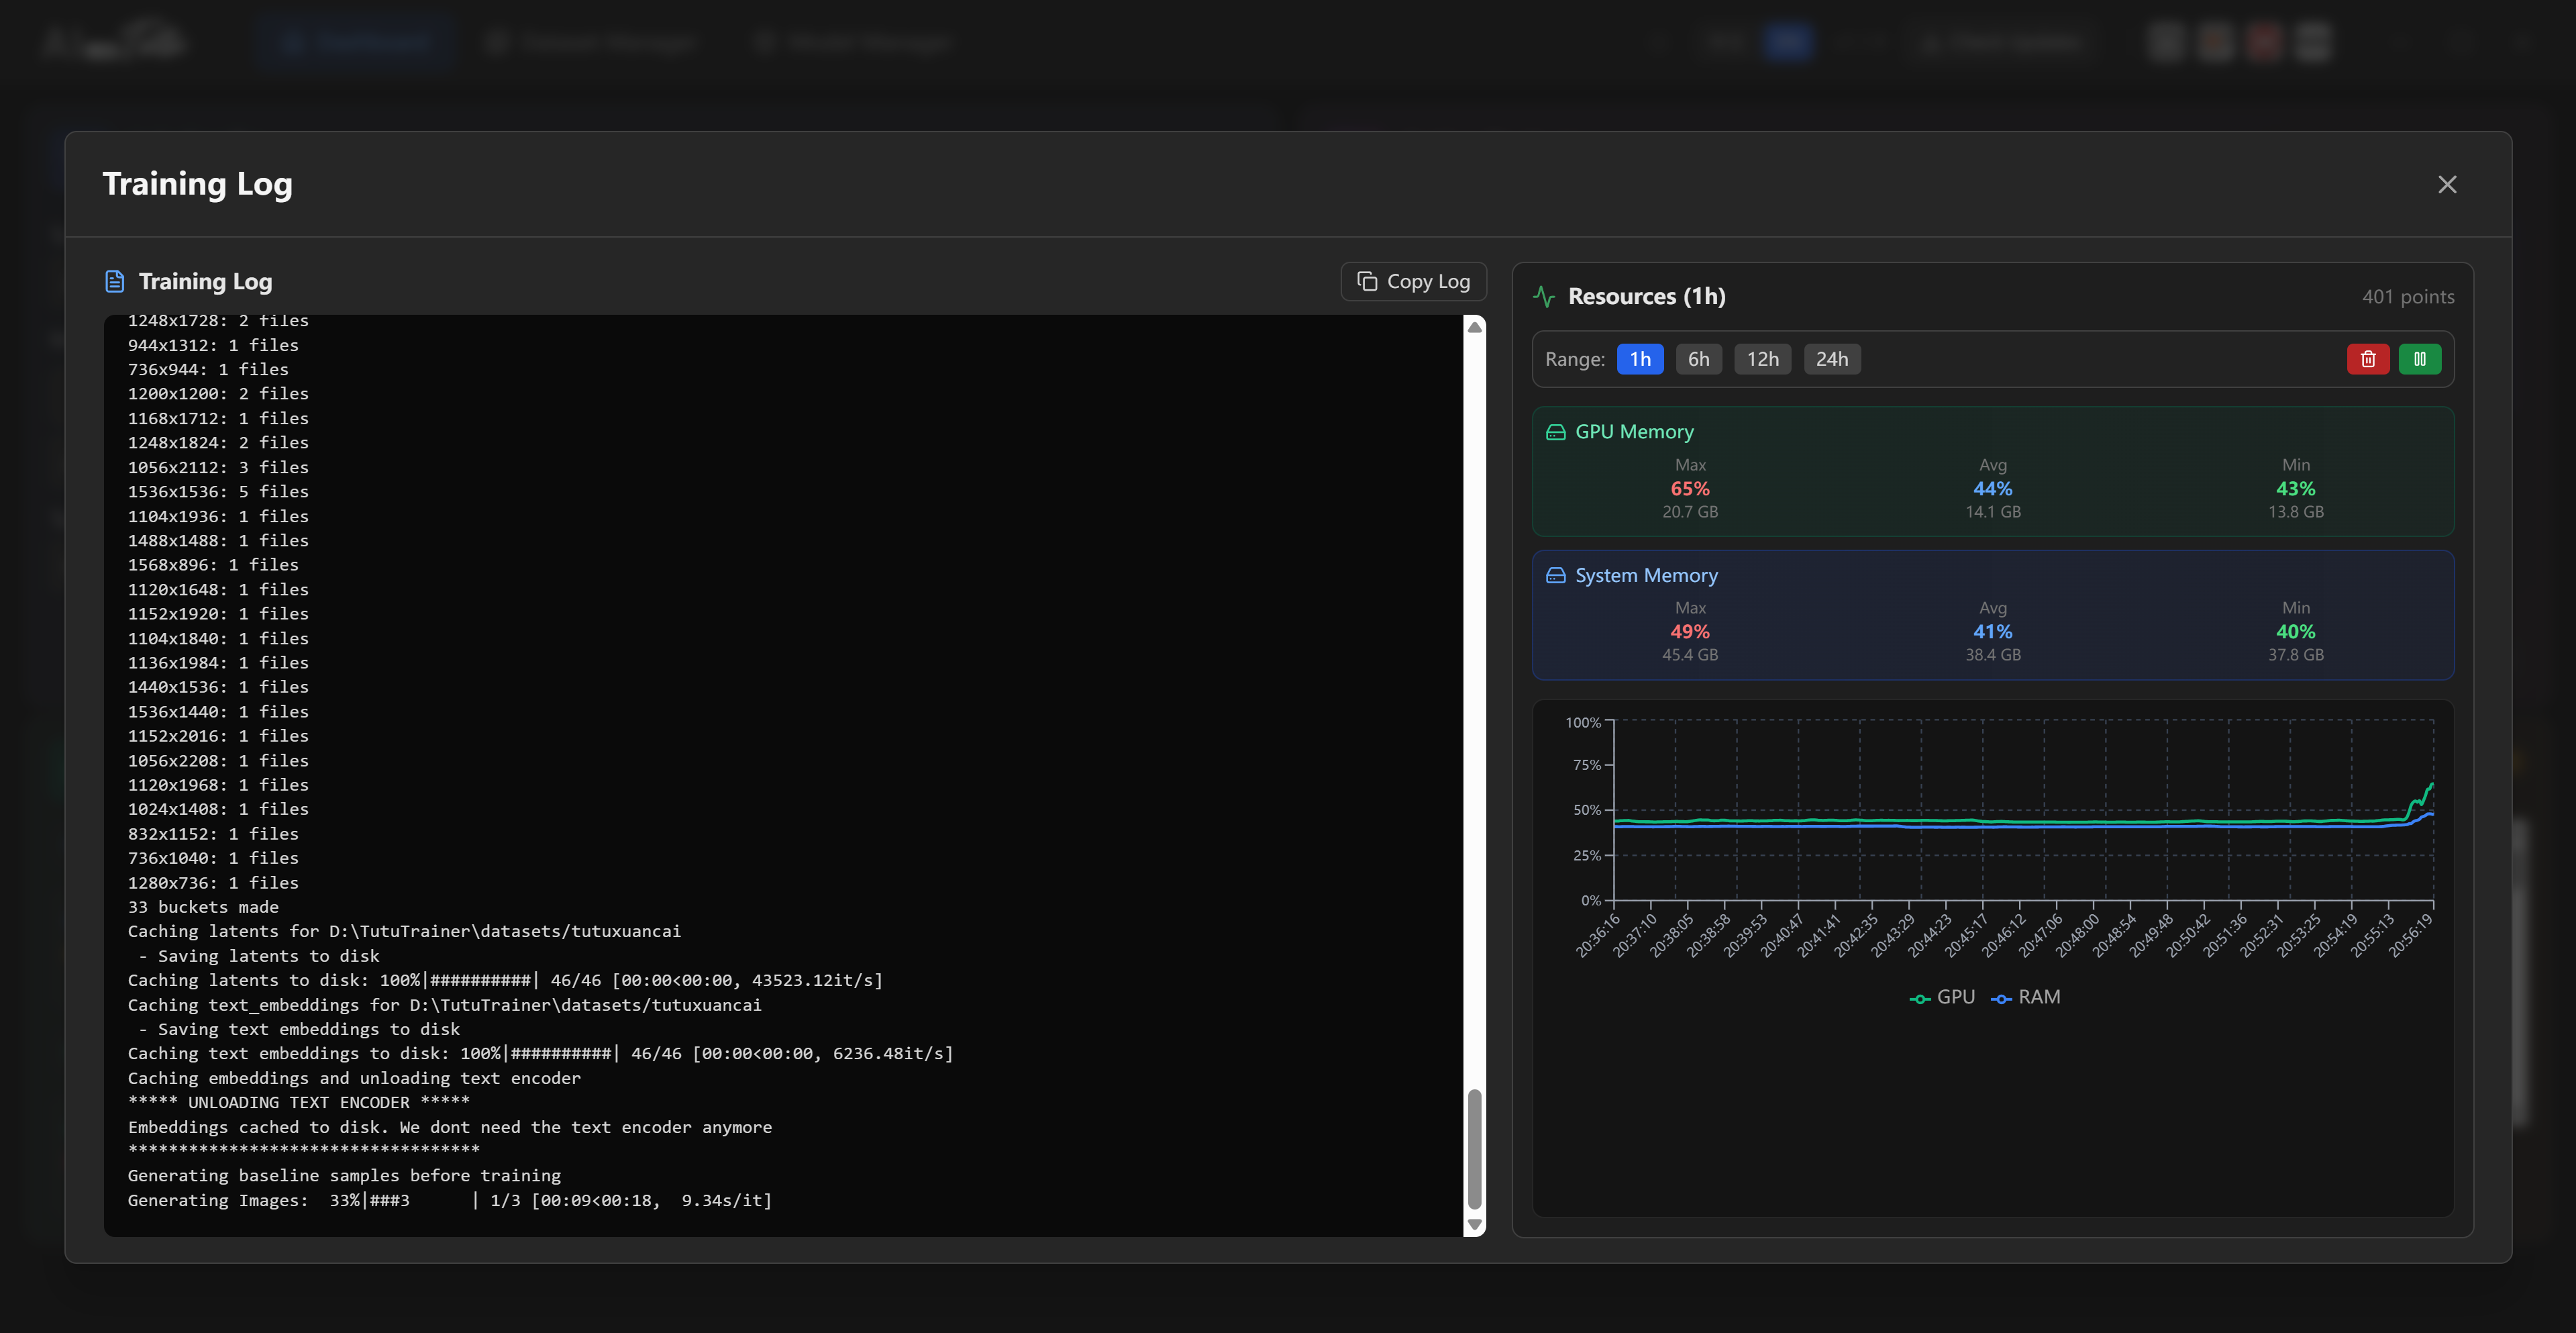
Click a job card to open the detail page.
The detail page commonly includes:
- Overview: job summary and logs.
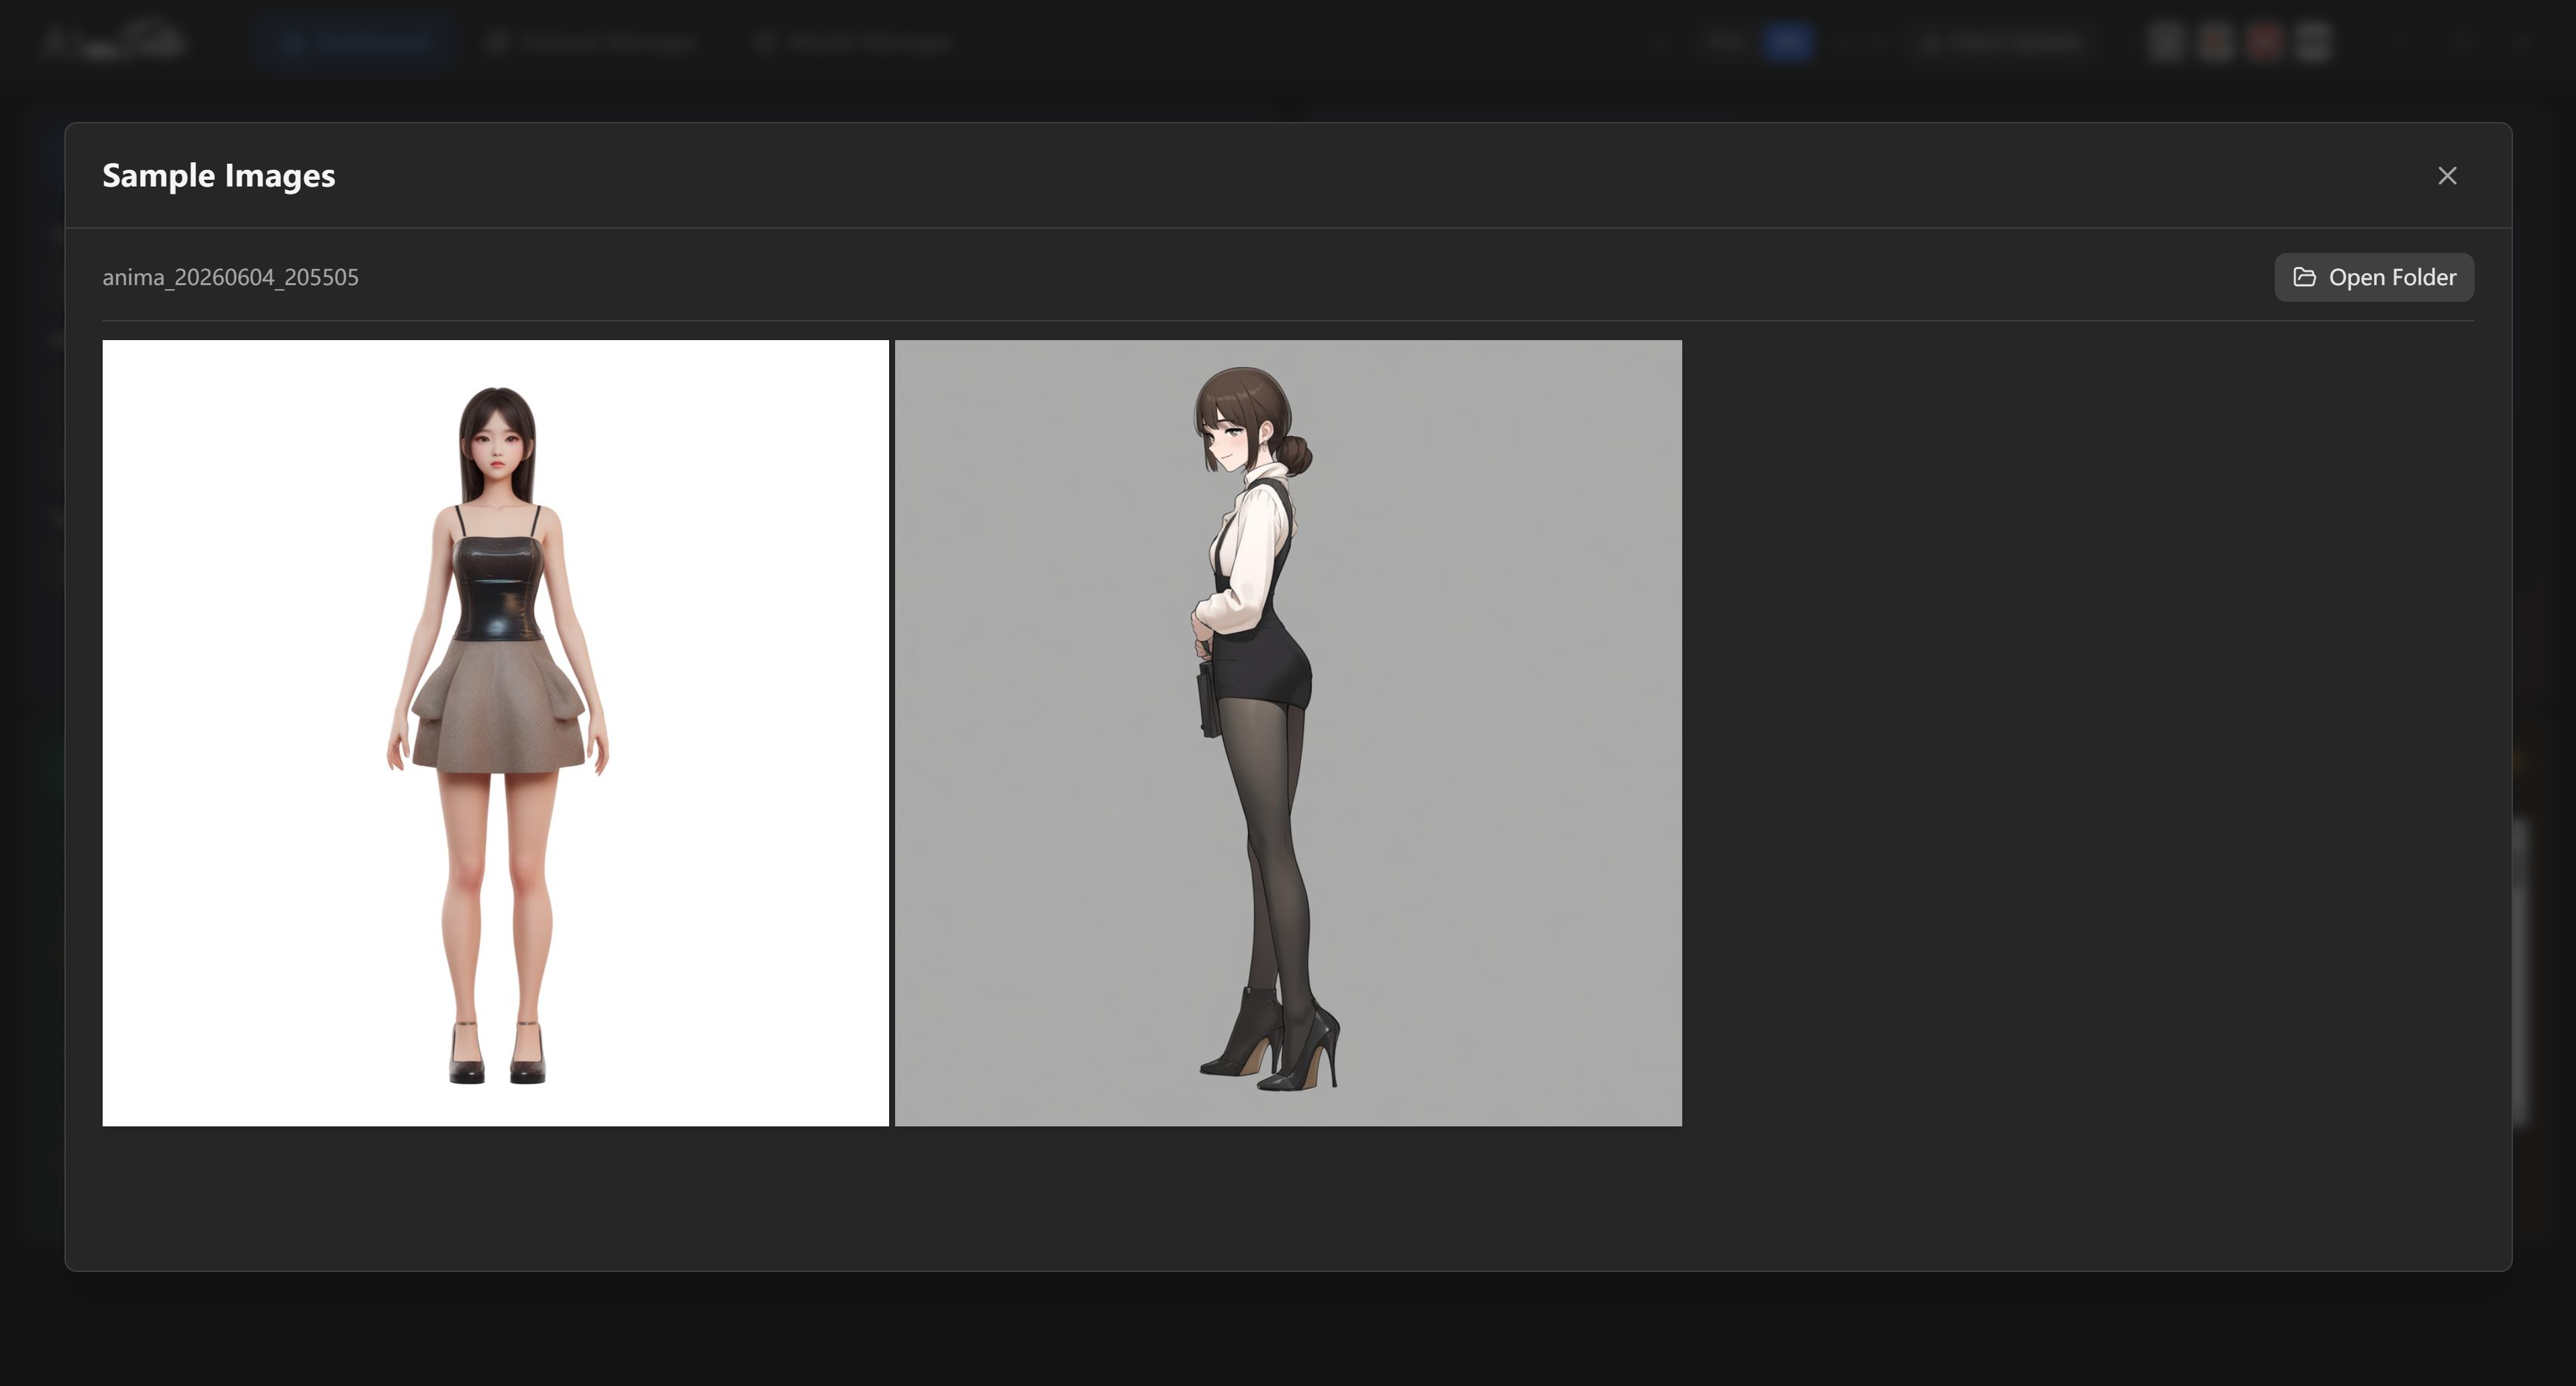
- Samples: generated sample images.
- Config File: full configuration used for that run.
TutuTrainer also includes an auto stop timer for active training jobs. Open the Auto Stop (hours) menu and choose a preset duration such as 2, 4, 8, 12, or 24 hours. You can also enter a custom hour and minute value, then click Set.
When the selected time limit is reached, TutuTrainer stops the training job automatically. This is useful because default step counts are often generous, and a job does not always need to run all the way to the final step.
The timer controls training duration; it does not automatically decide which checkpoint is best.
Model Output and Checkpoints
The output area lists finished model files.
You can usually see:
- Filename.
- File size.
- Related job.
- Creation time.
- Download or copy action.
- Open-folder action.
Outputs can be sorted or filtered depending on the app version.
Test several saved checkpoints in your target generation workflow. The final checkpoint may be overtrained, so choose the checkpoint that performs best for your prompts.
Dataset Management
Dataset List
The dataset list page summarizes the dataset root.
Common statistics:
- Total dataset count.
- Total image count.
- Captioned image count.
- Total file size.
Common actions:
- Open guide.
- Refresh.
- Open dataset folder.
- Open captioning tool.
- Create dataset.
View Modes
Grid view shows dataset cards and preview images.
List view shows more table-like detail for scanning names, counts, and status.
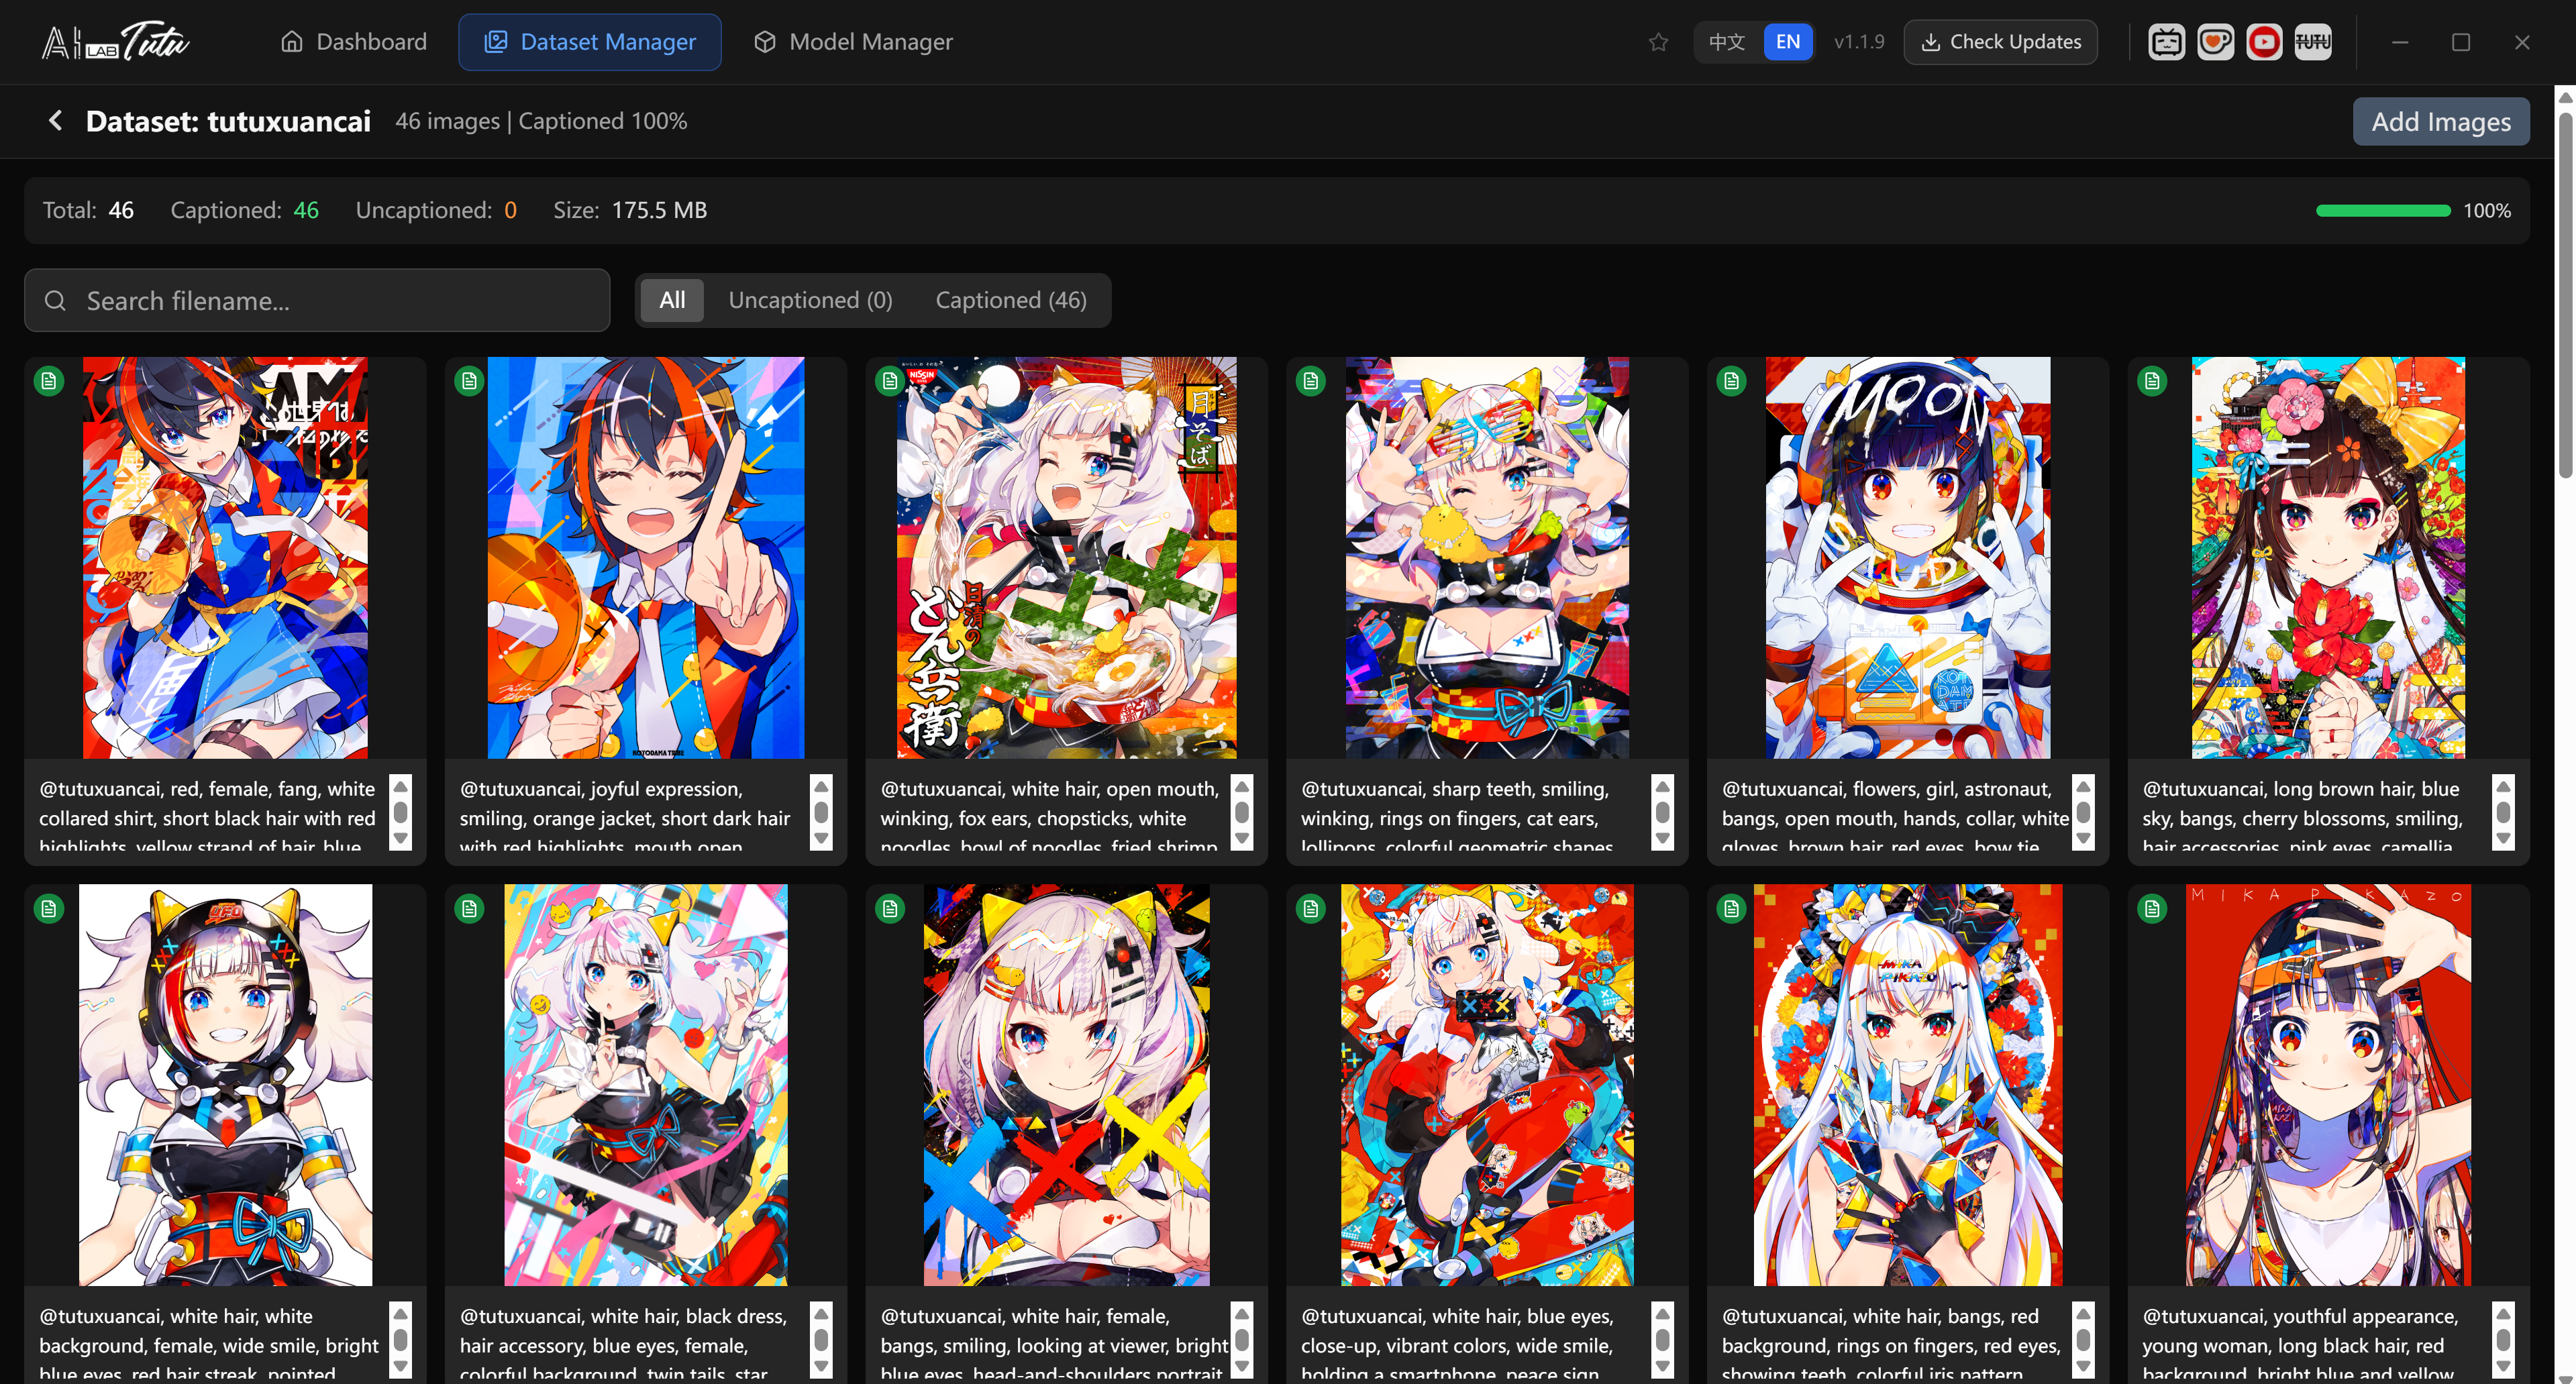
Dataset Detail Page
The dataset detail page shows the images in one dataset.
Common functions:
- View all images.
- See caption status.
- Search or filter images.
- Filter by captioned or uncaptained status.
- Add images.
- Open an image viewer.
- Edit captions.
Add Images
- Click the add-image action.
- Select one or more files.
- Use JPG, JPEG, or PNG.
- Wait for the app to copy or register the files.
- Confirm the images appear in the dataset detail page.
Edit Captions
Click an image card to open the viewer, then edit the caption in the side panel.
Captions are automatically saved as .txt files with the same base filename.
Example:
portrait_0001.png
portrait_0001.txt
Image Requirements
Recommended image properties:
- Format: JPG, JPEG, or PNG.
- Resolution: usually 512x512 to 2048x2048 is practical.
- Quality: clear, sharp, and not heavily compressed.
- Content: aligned with the concept you want the LoRA to learn.
- Quantity: enough variation to learn the target without burying it in unrelated material.
Remove images that are blurry, duplicated, misleading, watermarked in a harmful way, or unrelated to the training target.
Caption Writing
Each image should have a caption that describes what is actually visible.
Person or character example:
a young woman with long black hair, wearing a white dress, sitting on a bench, park background, natural lighting, upper body shot
Style example:
oil painting of a mountain landscape, impressionist style, warm colors, soft brushstrokes, sunset lighting
Good captions are consistent but not fake. Do not force a tag into every image unless the concept is actually present or you intentionally use a trigger word strategy.
Base Model Management
Model List
The model manager lists recognized base models.
| Column | Meaning |
|---|---|
| Model name | Display name and storage path. |
| Type | Diffusers-style folder format or single-file format. |
| Source | Local, cache, download, or custom source. |
| Size | Model file or folder size. |
| Actions | Configure, edit, open, refresh, or remove depending on model type. |
Common Actions
- Refresh: scan the model folder again.
- Open folder: open the model folder in File Explorer.
- Cloud-drive download: open provided model download links.
- Add custom model: register a model outside the standard folder.
Download a Model
- Click the cloud-drive download action if your installed version provides it.
- Find the model you need.
- Open the download link.
- Download the archive, usually
.zipor.7z. - Extract it into the model folder.
- Preserve the expected folder structure.
- Return to TutuTrainer and click refresh.
Large video models can be very large. Moving or extracting them can take several minutes or much longer on slower disks.
Single-File Model Configuration
Some models are distributed as a single .safetensors file. If TutuTrainer needs component paths, configure the model before training.
- Click the configure action beside the model.
- Choose the correct model architecture.
- Specify required component files.
- Save the configuration.
- Refresh or return to the dashboard before starting training.
Custom Models
Use a custom model when the model is not in the standard model folder.
- Click Add Custom Model.
- Enter a clear model name.
- Choose the model type.
- Select the model path or component files.
- Save the model.
If you are unsure whether a model is a folder-format model or a single-file model, use automatic download first or compare the folder structure with a known working model.
FAQ
Install and Startup
How do I update to the latest version?
TutuTrainer includes an in-app update flow. When an update notice appears, follow the prompt to download and install it. If the in-app update fails, retry or download the latest installer from the official website.
Windows says WebView2 Runtime is missing. What should I do?
Install Microsoft WebView2 Runtime. Some installers include a WebView2Installer.exe; otherwise download it from Microsoft.
Windows reports missing DLL files. What should I do?
Install the Microsoft Visual C++ Redistributable for x64 Windows. A common official Microsoft link is:
https://aka.ms/vs/17/release/vc_redist.x64.exe
The window is blank after launch.
Wait 30 to 60 seconds on first launch. If the window stays blank, install or repair WebView2 Runtime, then restart the app.
GPU and Memory
The app cannot detect my GPU.
Check the following:
- Install or update the NVIDIA driver.
- Run
nvidia-smiin a terminal and confirm Windows can see the GPU. - Confirm the installed driver is new enough for the selected model workflow.
- Restart TutuTrainer after driver changes.
Training fails with out-of-memory errors.
Try the following:
- Choose a lighter model family.
- Close other GPU-heavy applications.
- Make sure Windows virtual memory is large enough.
- Use a machine with more VRAM or system memory for high-memory models.
Training
The job says queued, but there is no job in front of it and the logs are empty.
Stop the job and start it again. This can happen rarely when VRAM, system memory, or virtual memory is not in a good state.
What does "OSError: page file is too small to complete the operation" mean?
Windows ran out of usable memory or virtual memory. Increase system memory if possible, increase Windows virtual memory, close other programs, and reboot before trying again.
Why does a black console window appear when training starts?
This is normal for some training processes. Minimize it and let the job continue.
What is the difference between separated format and merged format?
Separated format is the standard folder-style model layout used by many diffusion model repositories. The model is split into multiple component folders and files.
Merged format is a single-file model format, commonly seen in ComfyUI workflows as one .safetensors file.
When you add a custom merged model, TutuTrainer may convert it into the separated standard format before training. If required files are missing, the app may download missing components when the workflow supports it.
Important notes:
- If you incorrectly mark a merged model as separated format when adding a custom model, the app will not convert it and training may fail.
- If you are not familiar with model formats, use automatic download first.
- After a merged model is converted, the app may show an associated separated model. Training uses that associated model. The conversion does not modify the original source file.

Training is very slow.
AI training is compute-heavy. If the selected model is close to or beyond your hardware limit, the app may use aggressive memory-saving behavior and training can become much slower.
Things to check:
- Whether GPU usage is near 100 percent.
- Whether VRAM is full.
- Whether the selected model family is too large for the machine.
- Whether you are training a video model, which is usually slower than image models.
For example, the same Z-Image training job may take many hours on a 16 GB GPU but much less time on a high-end GPU.
Sample images look bad.
Early samples often look bad. Quality should improve as training progresses.
Check:
- Whether sample prompts match your target use case.
- Whether captions are accurate.
- Whether the dataset quality is good.
- Whether the checkpoint is undertrained or overtrained.
Always test the finished LoRA in your actual generation workflow before deciding it failed.
I cannot find the trained model.
The model is saved under the training output folder configured in path settings. You can also use the model output area to download the file or open the output folder.
Dataset and Model Files
Moving or copying a cached model keeps showing "processing". Is the app frozen?
Usually no. Moving or copying large model files is slow, especially for video models that can be tens of gigabytes or more. On mechanical hard drives it can take much longer. Do not start other file operations while it is processing; wait for the operation to finish.
The dataset scanner cannot find my images.
Check:
- The images are JPG, JPEG, or PNG.
- The dataset is inside the configured dataset folder.
- The dataset has a normal folder name.
- You clicked refresh after adding files.
Captions are not associated with images.
Caption files must have the same base filename as the image and use the .txt extension.
image1.jpg
image1.txt
Practical Tips
Dataset Quality
- Keep the dataset focused on one target concept.
- Prefer fewer high-quality images over many weak images.
- Use accurate captions. Tutu Super Smart Tagger can help generate and review captions in batches.
- Include moderate variation in pose, angle, expression, lighting, or background when it helps the target.
- Remove images that teach the wrong thing.
Training Review
- Watch sample images during training.
- Watch GPU usage, VRAM, and temperature.
- Keep multiple checkpoints.
- Stop early if the model has already reached the desired result.
- Save logs when diagnosing failed jobs.
Using Results
The finished .safetensors LoRA file can usually be used in tools that support LoRA loading, such as:
- ComfyUI.
- Stable Diffusion WebUI variants.
- Fooocus.
- Other LoRA-compatible generation tools.
Test the LoRA with simple prompts first, then move to more complex final prompts.
Appendix
Installed Directory Structure
Typical installation folders may include:
TutuTrainer/
|-- TutuTrainer.exe
|-- WebView2Installer.exe
|-- backend/
|-- ui/
|-- node/
|-- config/
|   |-- accuracy_recovery_adapters/
The exact folder layout can change by version.
Default Data Locations
The main data folders are controlled by path settings:
- Dataset folder.
- Model folder.
- Training output folder.
- Logs folder.
If you need support, keep the relevant logs and the job configuration file.
Quick Links
Use the icons in the upper-right area of the app when available:
- Bilibili tutorials.
- Ko-fi support.
- YouTube channel.
Support
If you need help, check the logs first, then contact the official support channel listed by Zhaotutu.
- Official website: https://zhaotutu.xyz/
- YouTube: https://www.youtube.com/@zhaotutu/videos
- Telegram: https://t.me/zhaotutu